How to Manage Directory Listing
As an Atlas admin, you can add new directories and manage them effortlessly. You can also update, edit, delete, change activation status, mark as featured, or verify directories as needed. You can also handle reported directories and filter listings by activation status, users, and verification status for better organization.
How to Add a Listing
- Log in to the Admin and access the Dashboard from the Admin Panel.
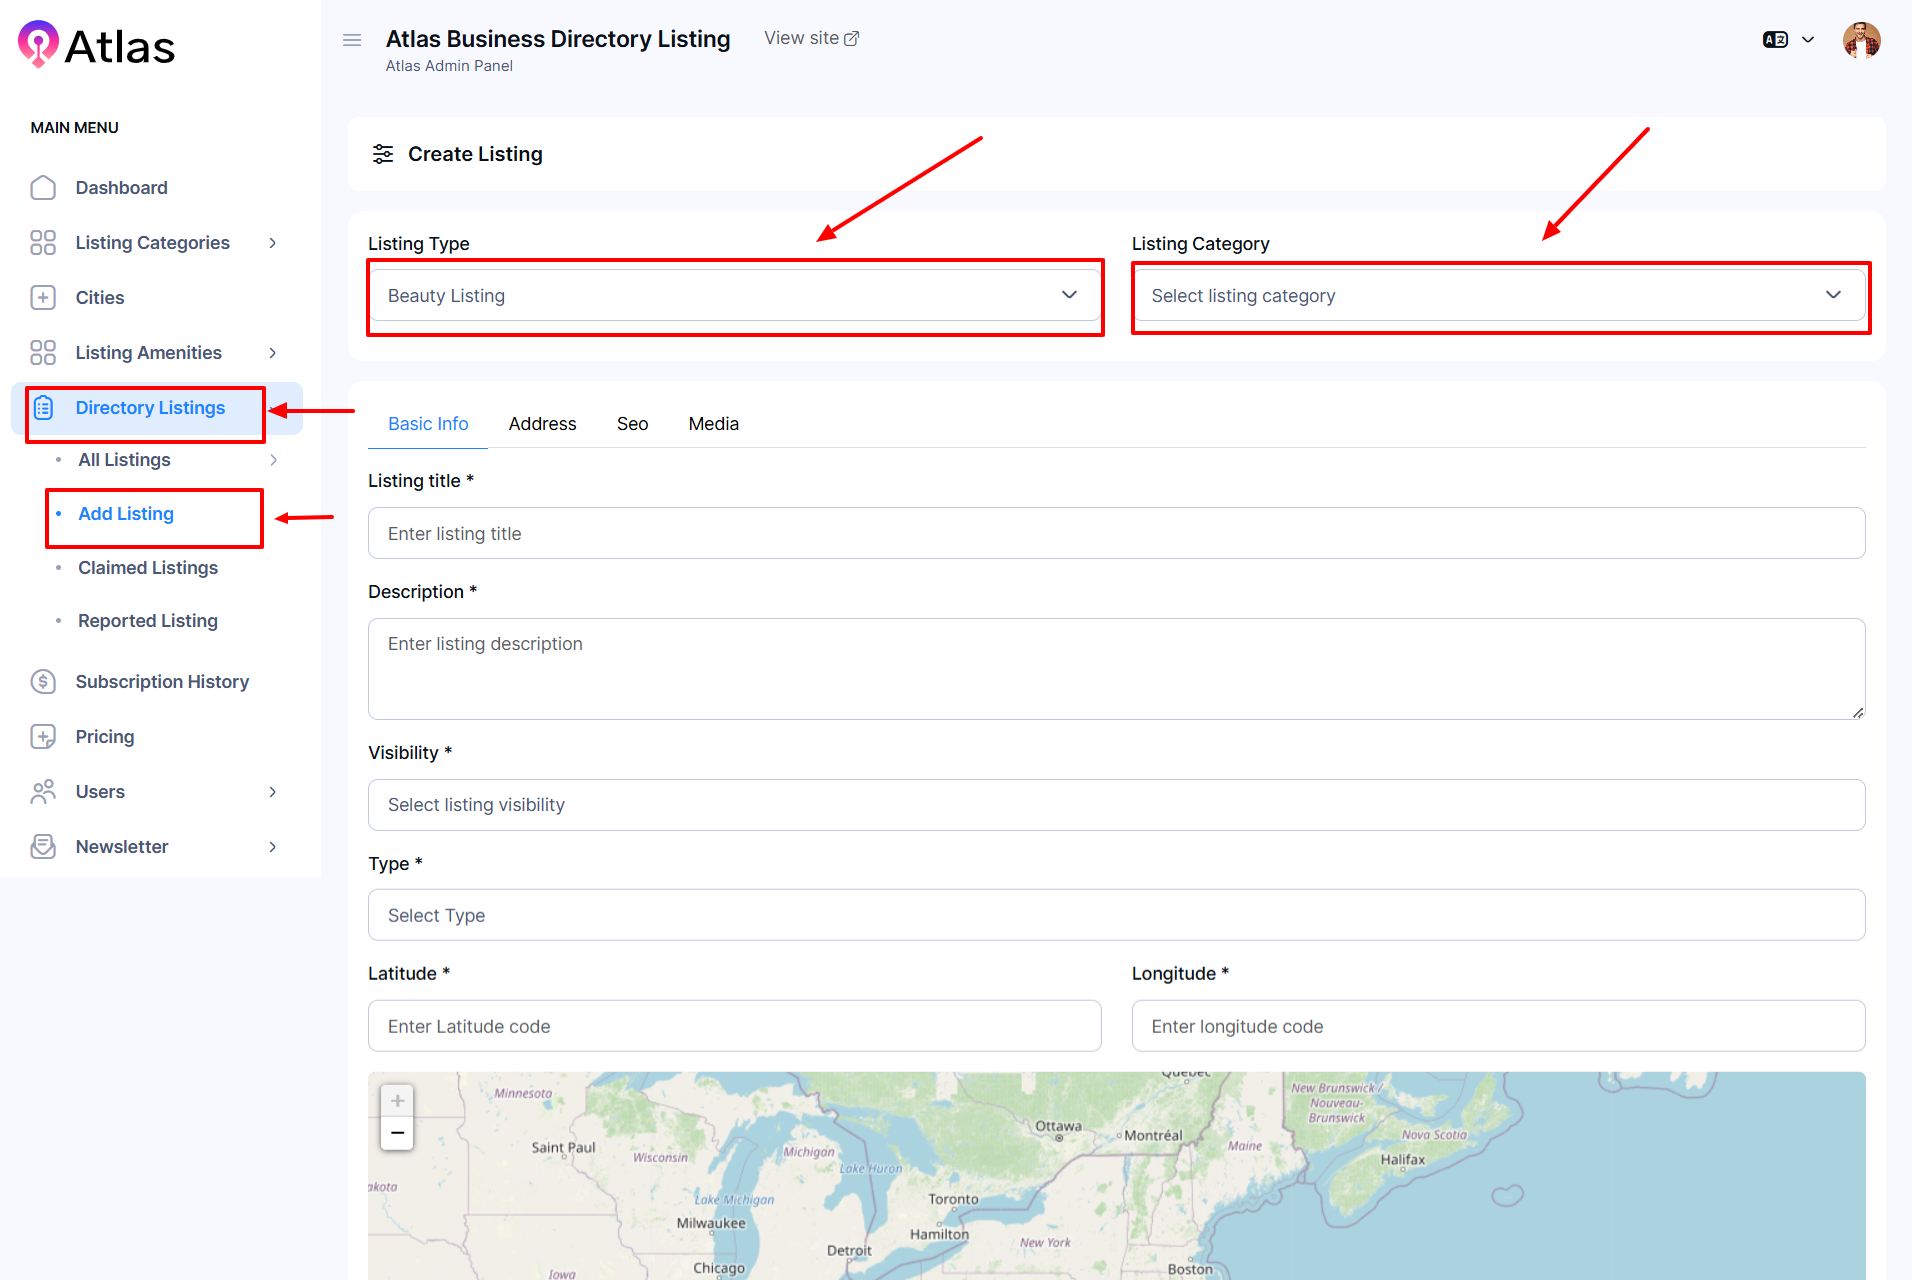
- Navigate to Directory Listings from the left menu and select Add Listing to open the entry form.
- Choose a Listing Type from the dropdown to display the corresponding form.
- Select a Listing Category from the dropdown menu.
- Enter the desired title in the Listing Title field.
- Provide a detailed description in the Description field.
- Set the visibility using the Visibility dropdown.
- Choose the appropriate option from the Type dropdown.
- Enter latitude and longitude values in their respective fields.
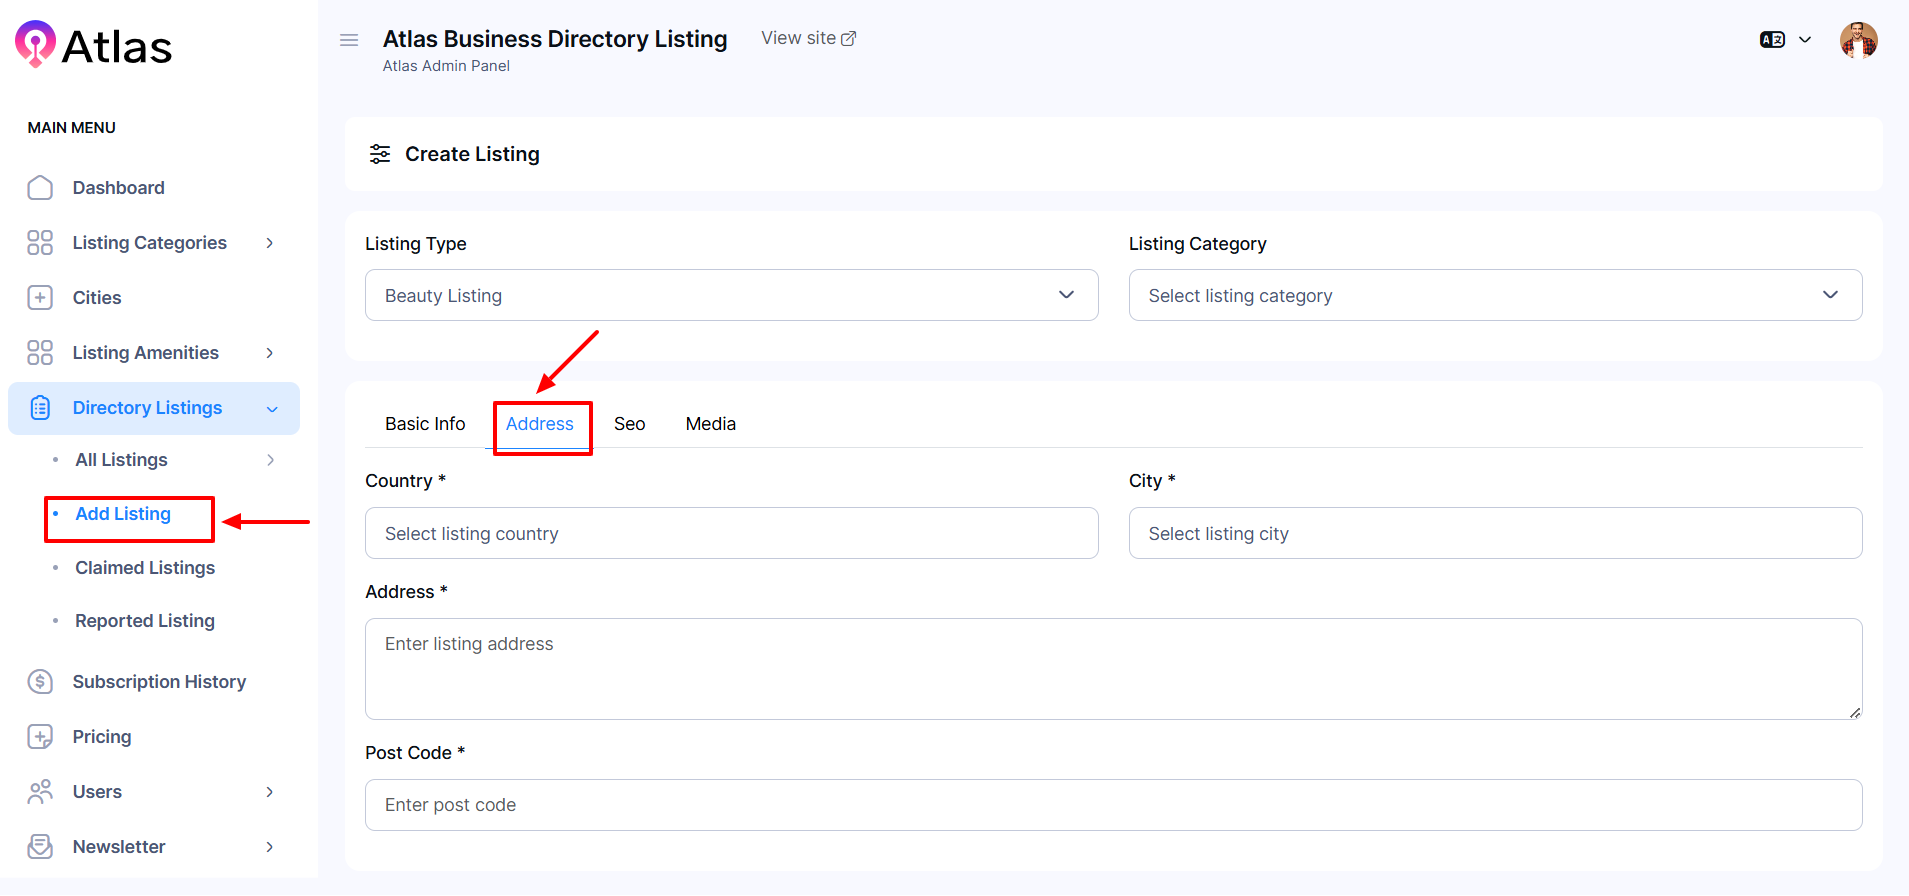
- Click the Address to expand the address form:
-
-
-
Select the Country and City from the dropdowns.
-
Enter the full address and postal code.
-
-
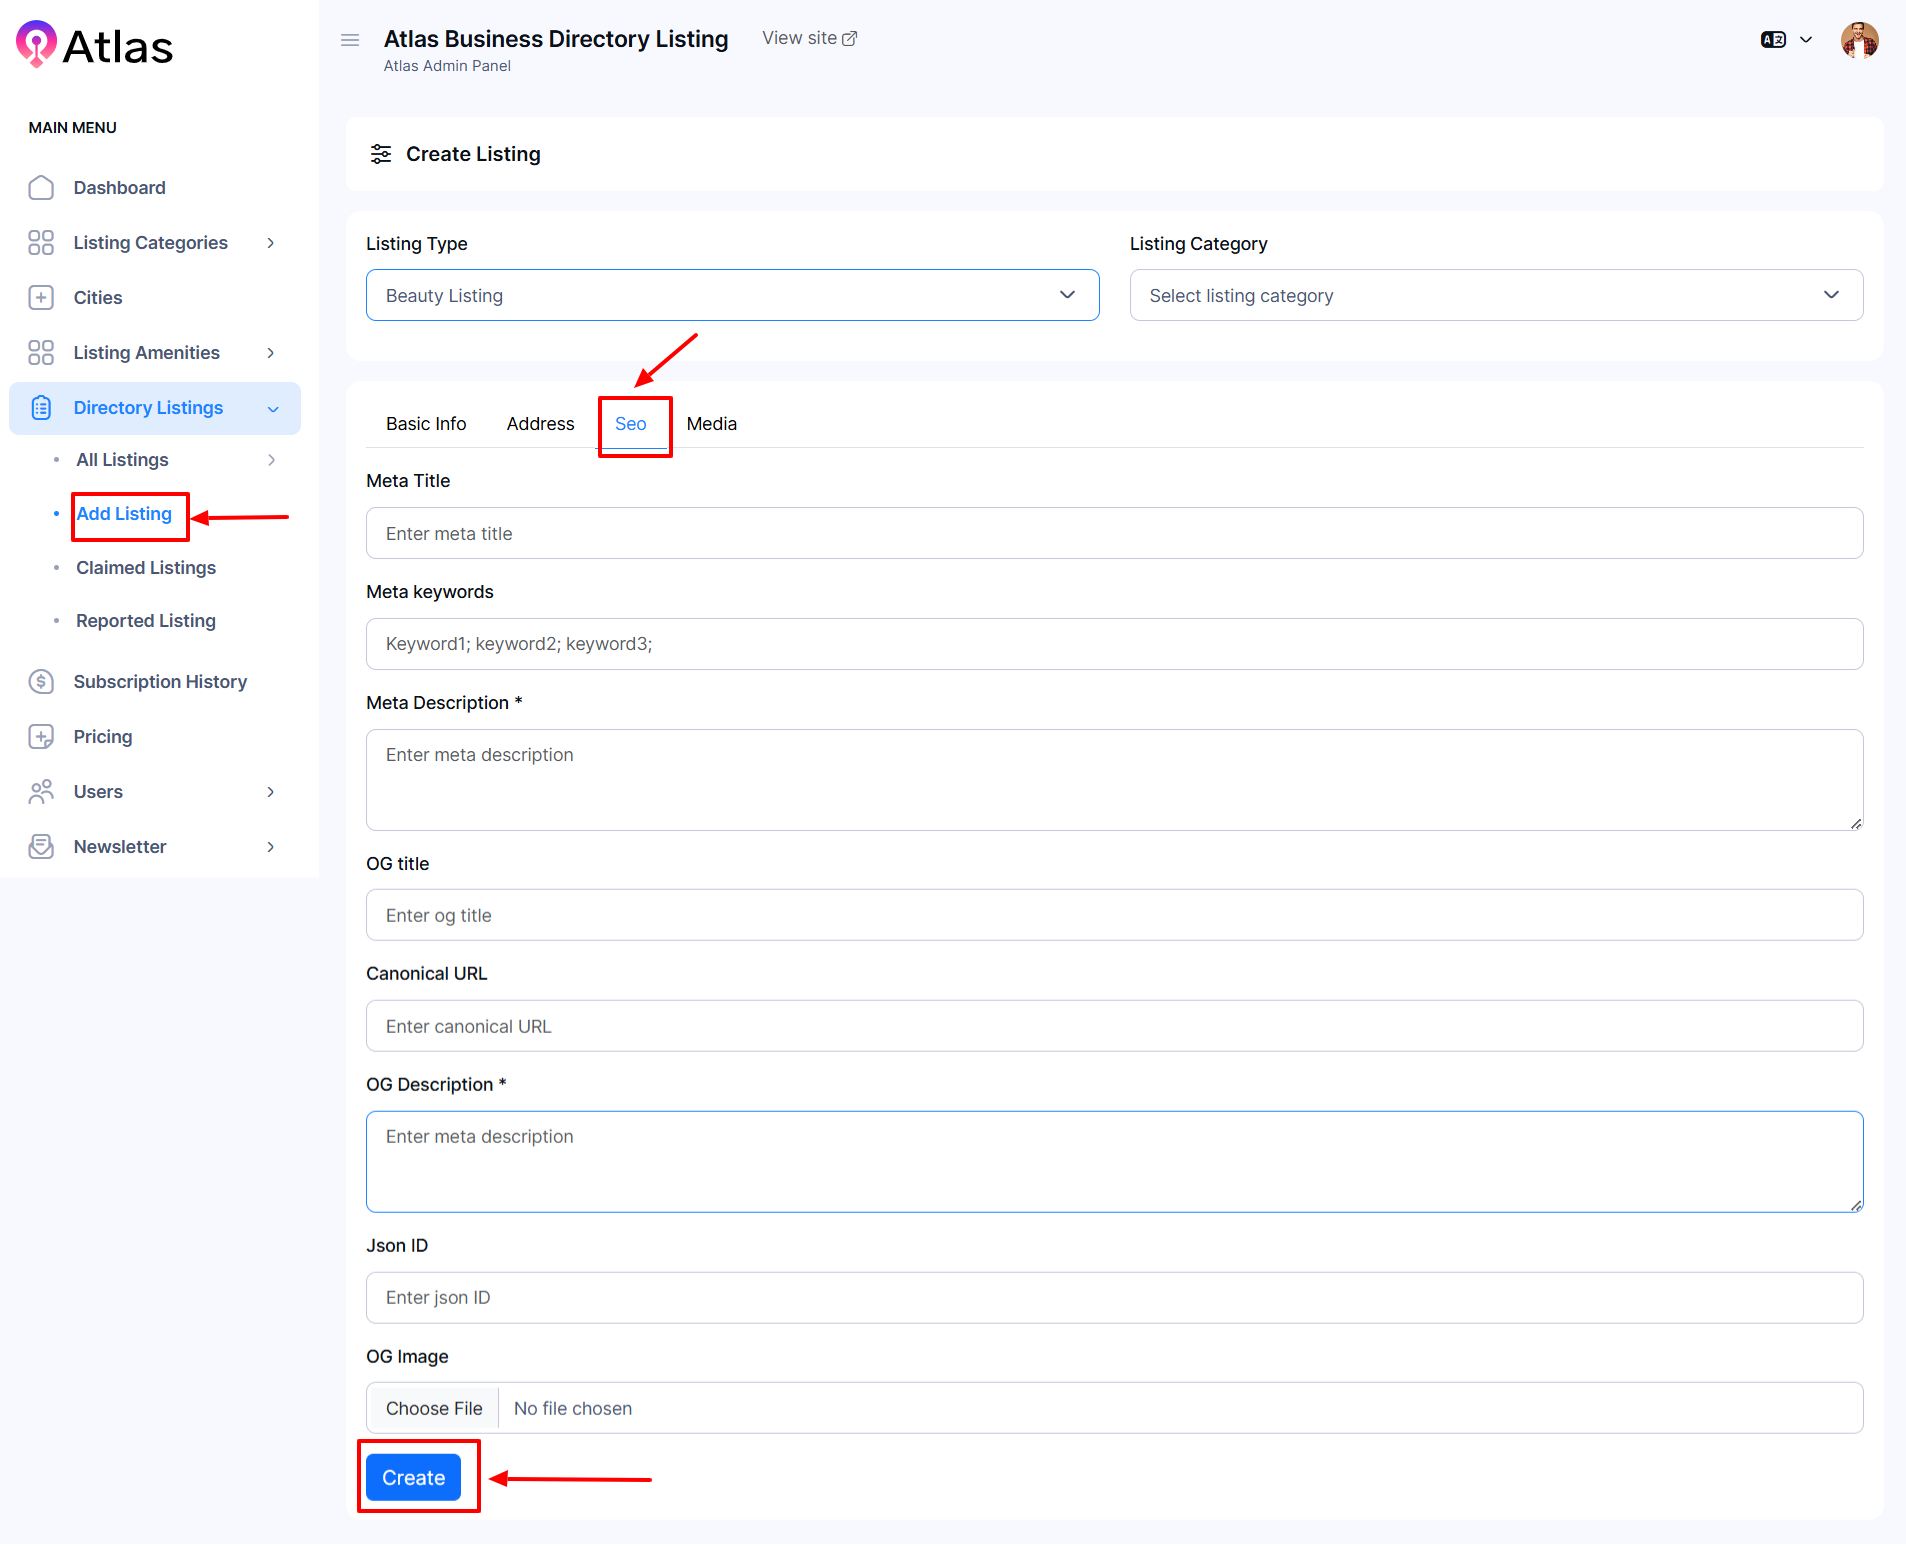
- Click the SEO button to expand SEO settings:
-
-
-
Fill in the Meta Title, Meta Keywords, Meta Description, Og Title, Canonical URL, Og Description, and Json ID fields.
-
-
- In the Image section
-
-
-
Click Choose File to upload a relevant image.
-
-
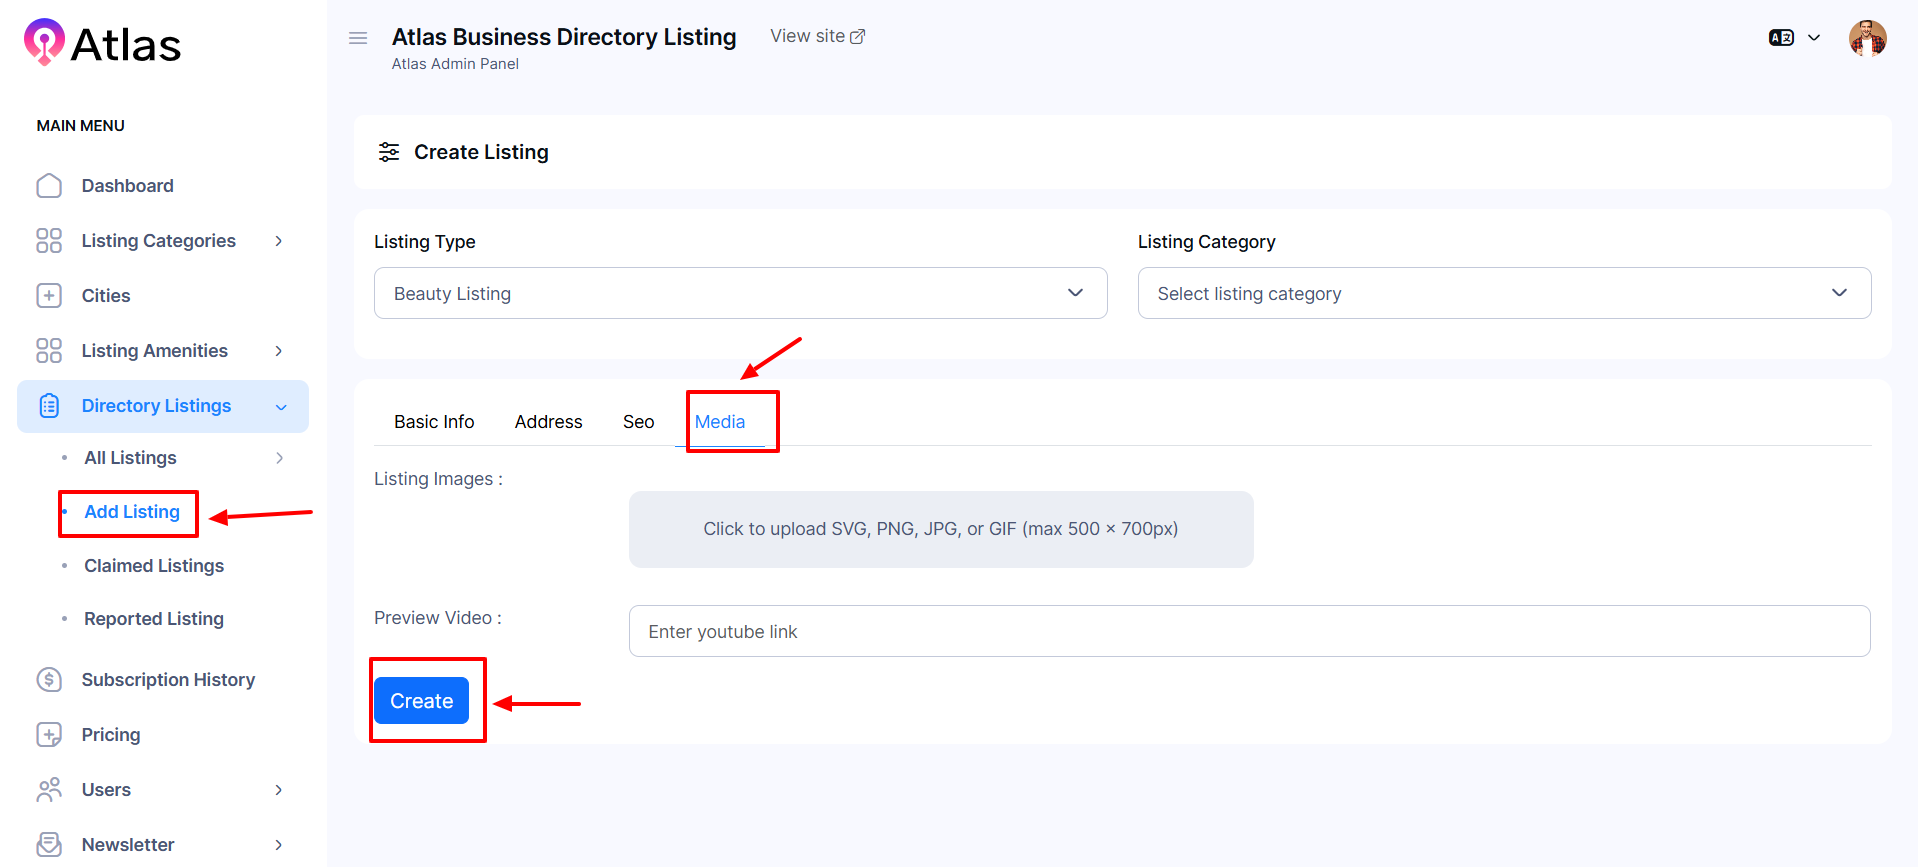
- Select Media to access the media form:
-
-
-
Upload a listing image and, if applicable
-
Add a video link in the Preview Video field.
-
-
- Finally, click Create to save the new listing with all the provided details.
How to List Amenities
- Log in to the Admin and access the Dashboard from the Admin Panel.
- From the left menu, go to Directory Listings and select All Listings.
- Click on Beauty from the left menu.
- Select Add New Listing to open the entry form, similar to the Add Listing menu.
- Fill in the required information in the form.
- Finally, click Create to save the new listing with all the provided details.
Note: The same procedure will apply to Cars, Real Estate, Hotels, and Restaurants.
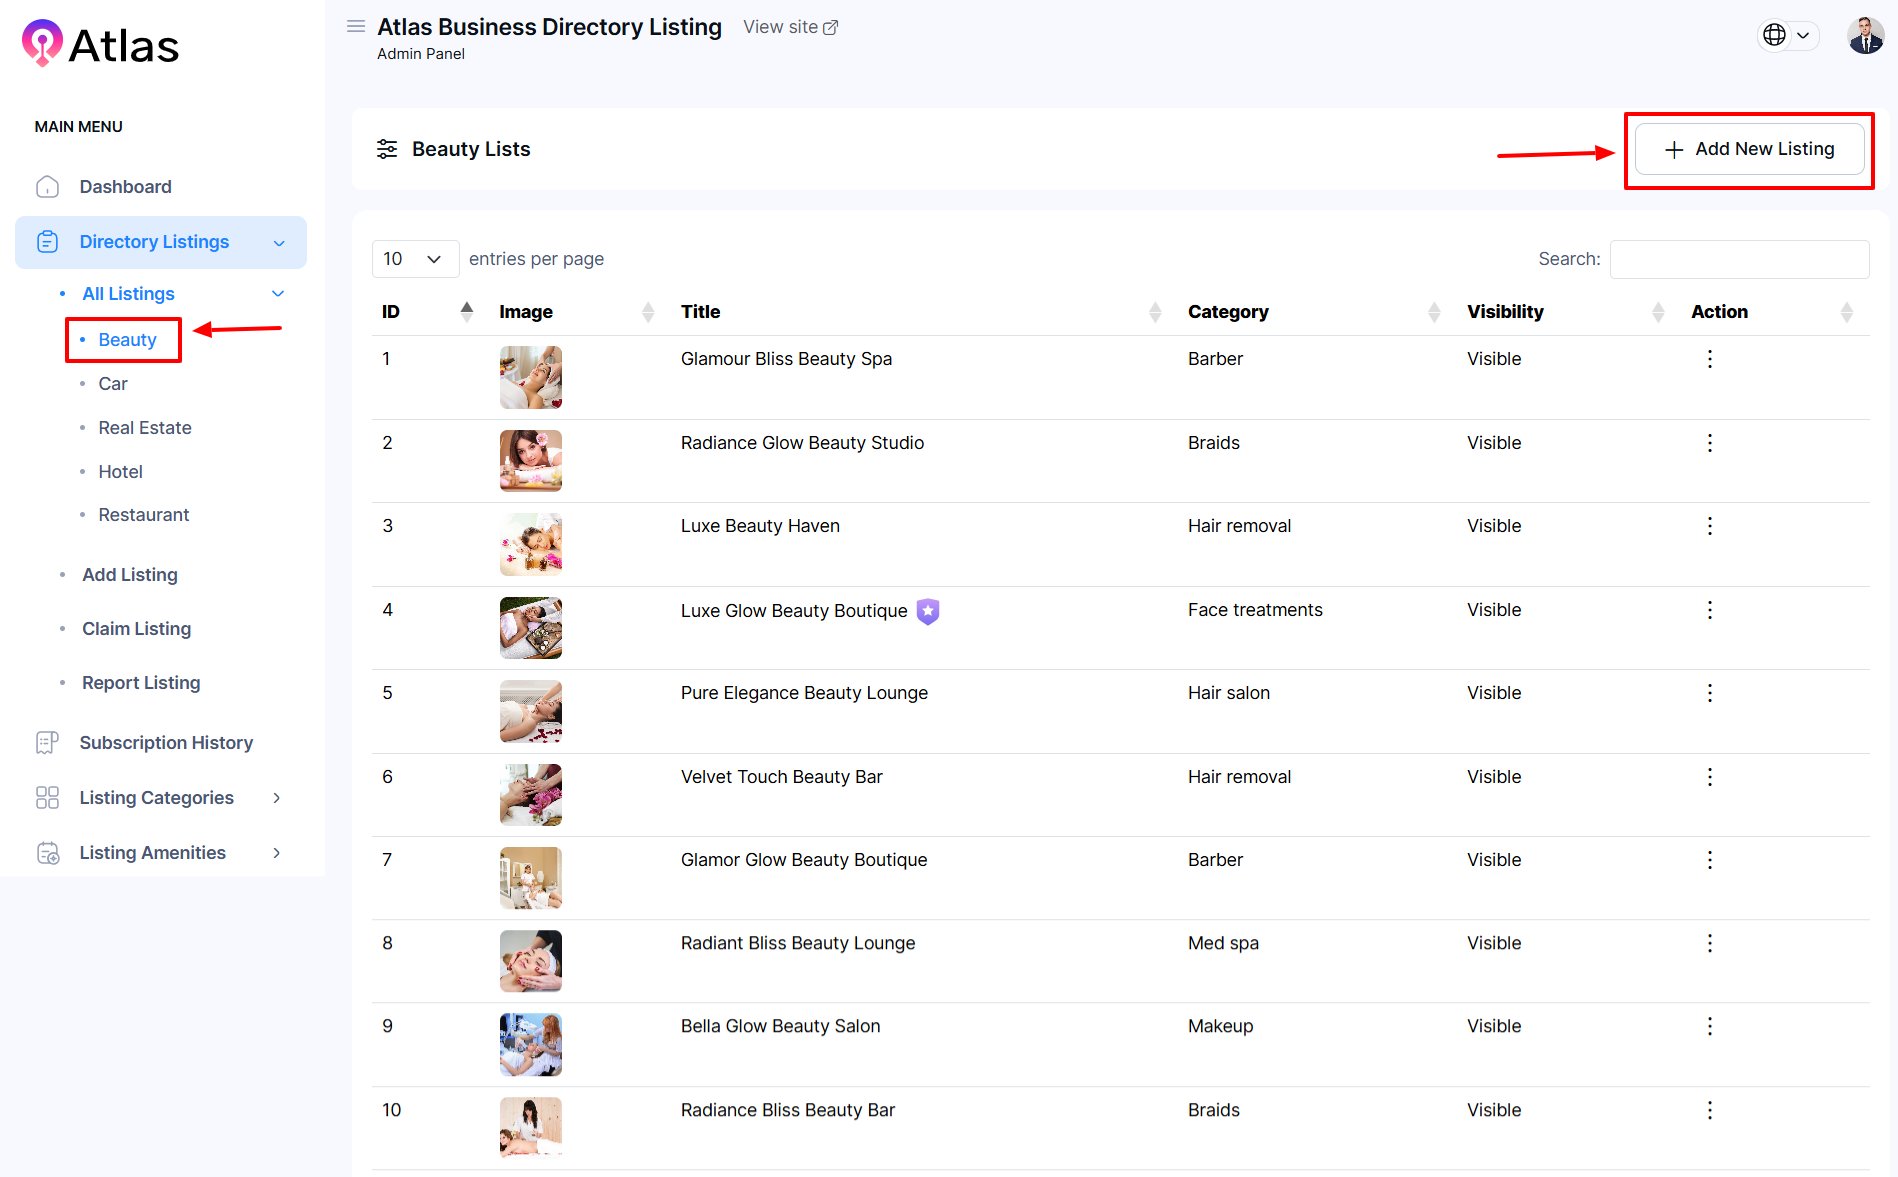
How to Edit Beauty
- Log in to the Admin and access the Dashboard from the Admin Panel.
- Navigate to Directory Listings from the left menu and select All Listings.
- Click on Beauty from the left menu.
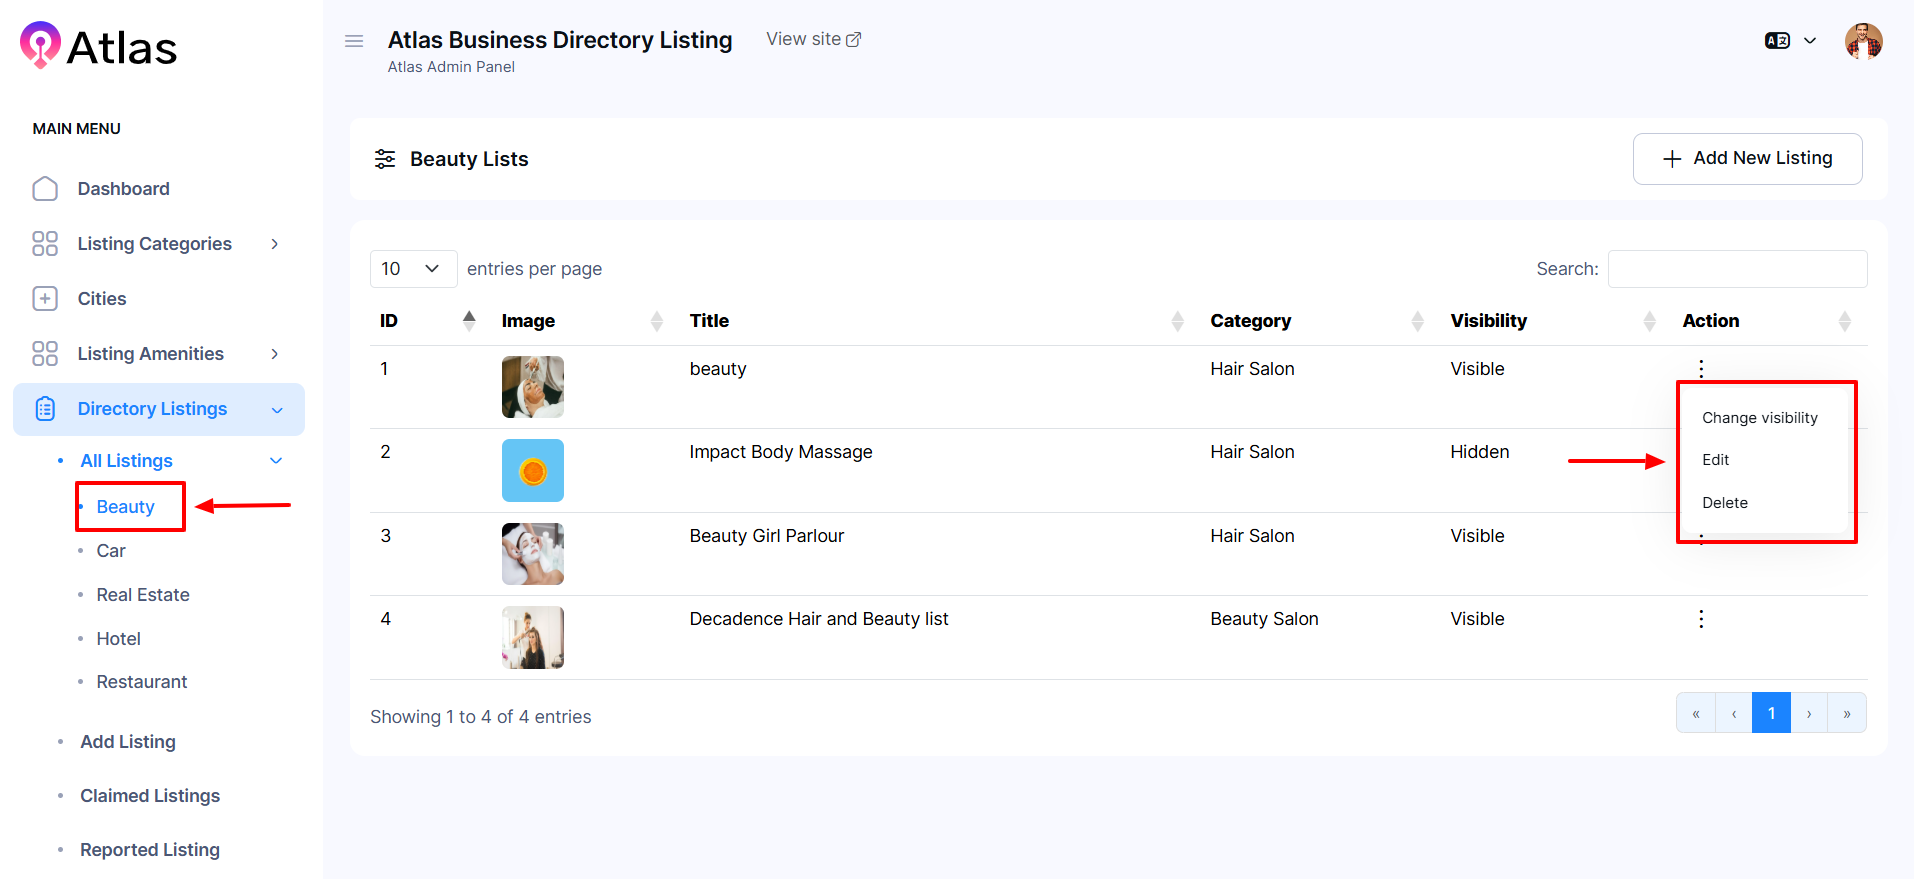
- Click the Action button (three dots) to open a menu with the options: Change Visibility, Edit, and Delete.
- Select Edit to open the entry form.
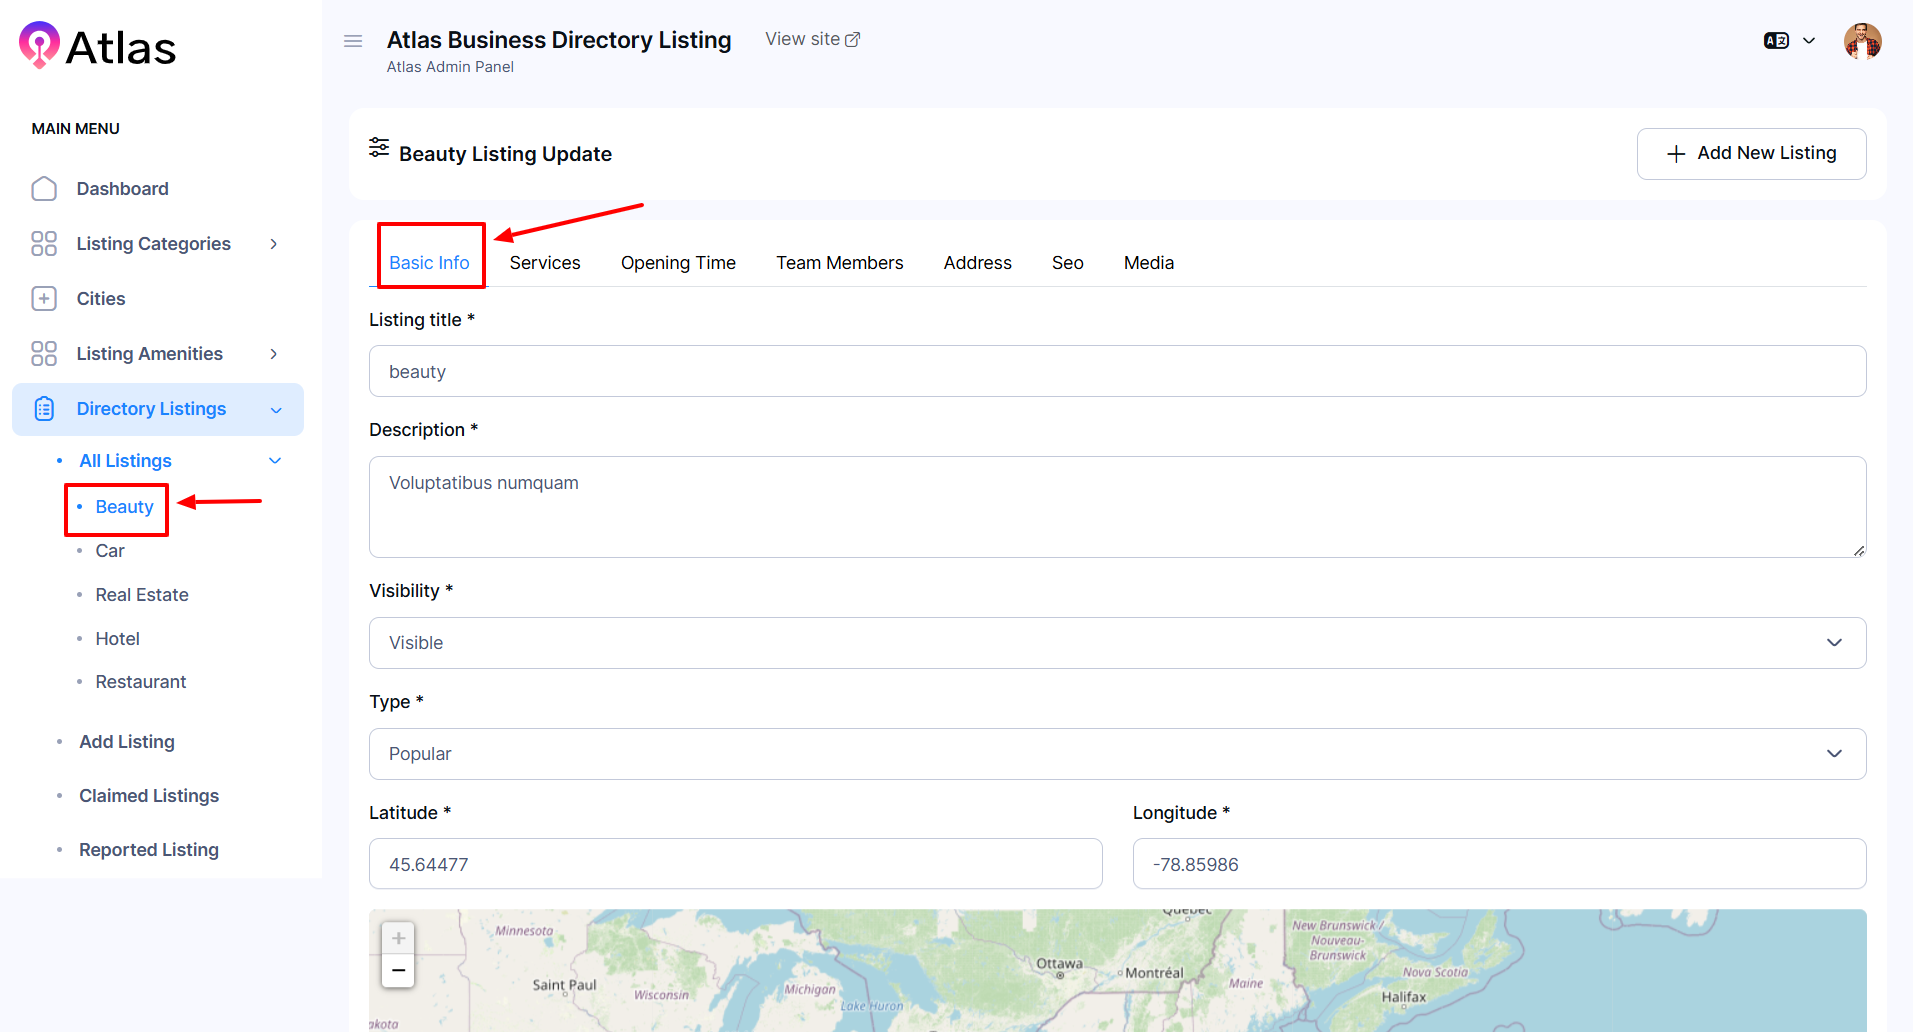
- In the Basic Info section:
-
-
Enter the listing title in the Listing Title field.
-
Enter the desired description in the Description field.
-
Choose the desired option from the Visibility dropdown.
-
Select the appropriate listing type from the Type dropdown.
-
Input the latitude and longitude values in their respective fields.
-
-
-
-
- Finally, click the Update button to save the provided information.
-
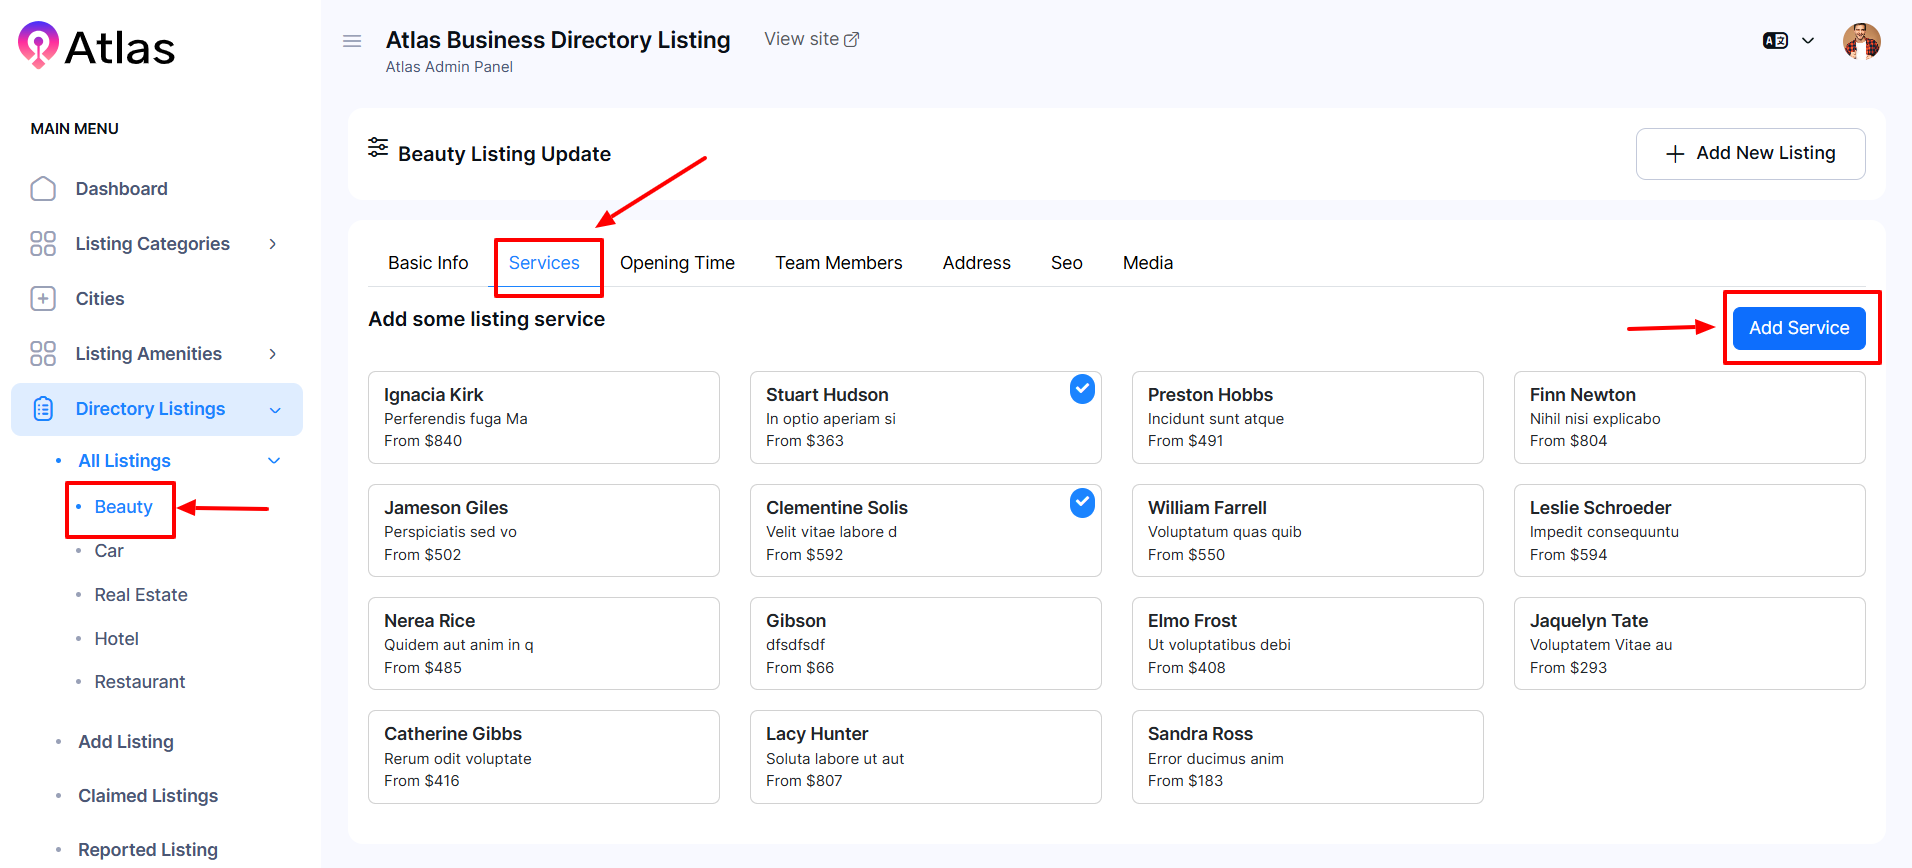
- In the Service section:
-
- Click the Service button to display the service entry form.
- Click Add Service to create new services:
-
-
-
-
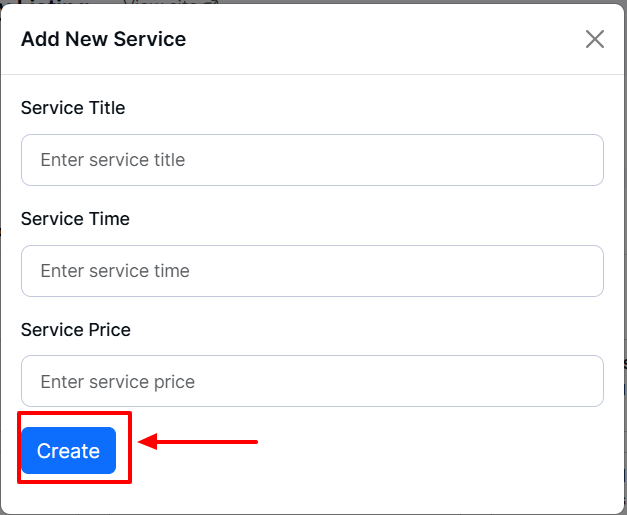
Enter the service name in the Service Title field.
-
Specify the duration in the Service Time field.
-
Enter or select the price in the Service Price field or dropdown.
-
Click Create to save the service details.
-
-
-
-
- Finally, click the Update button to save the provided information.
-
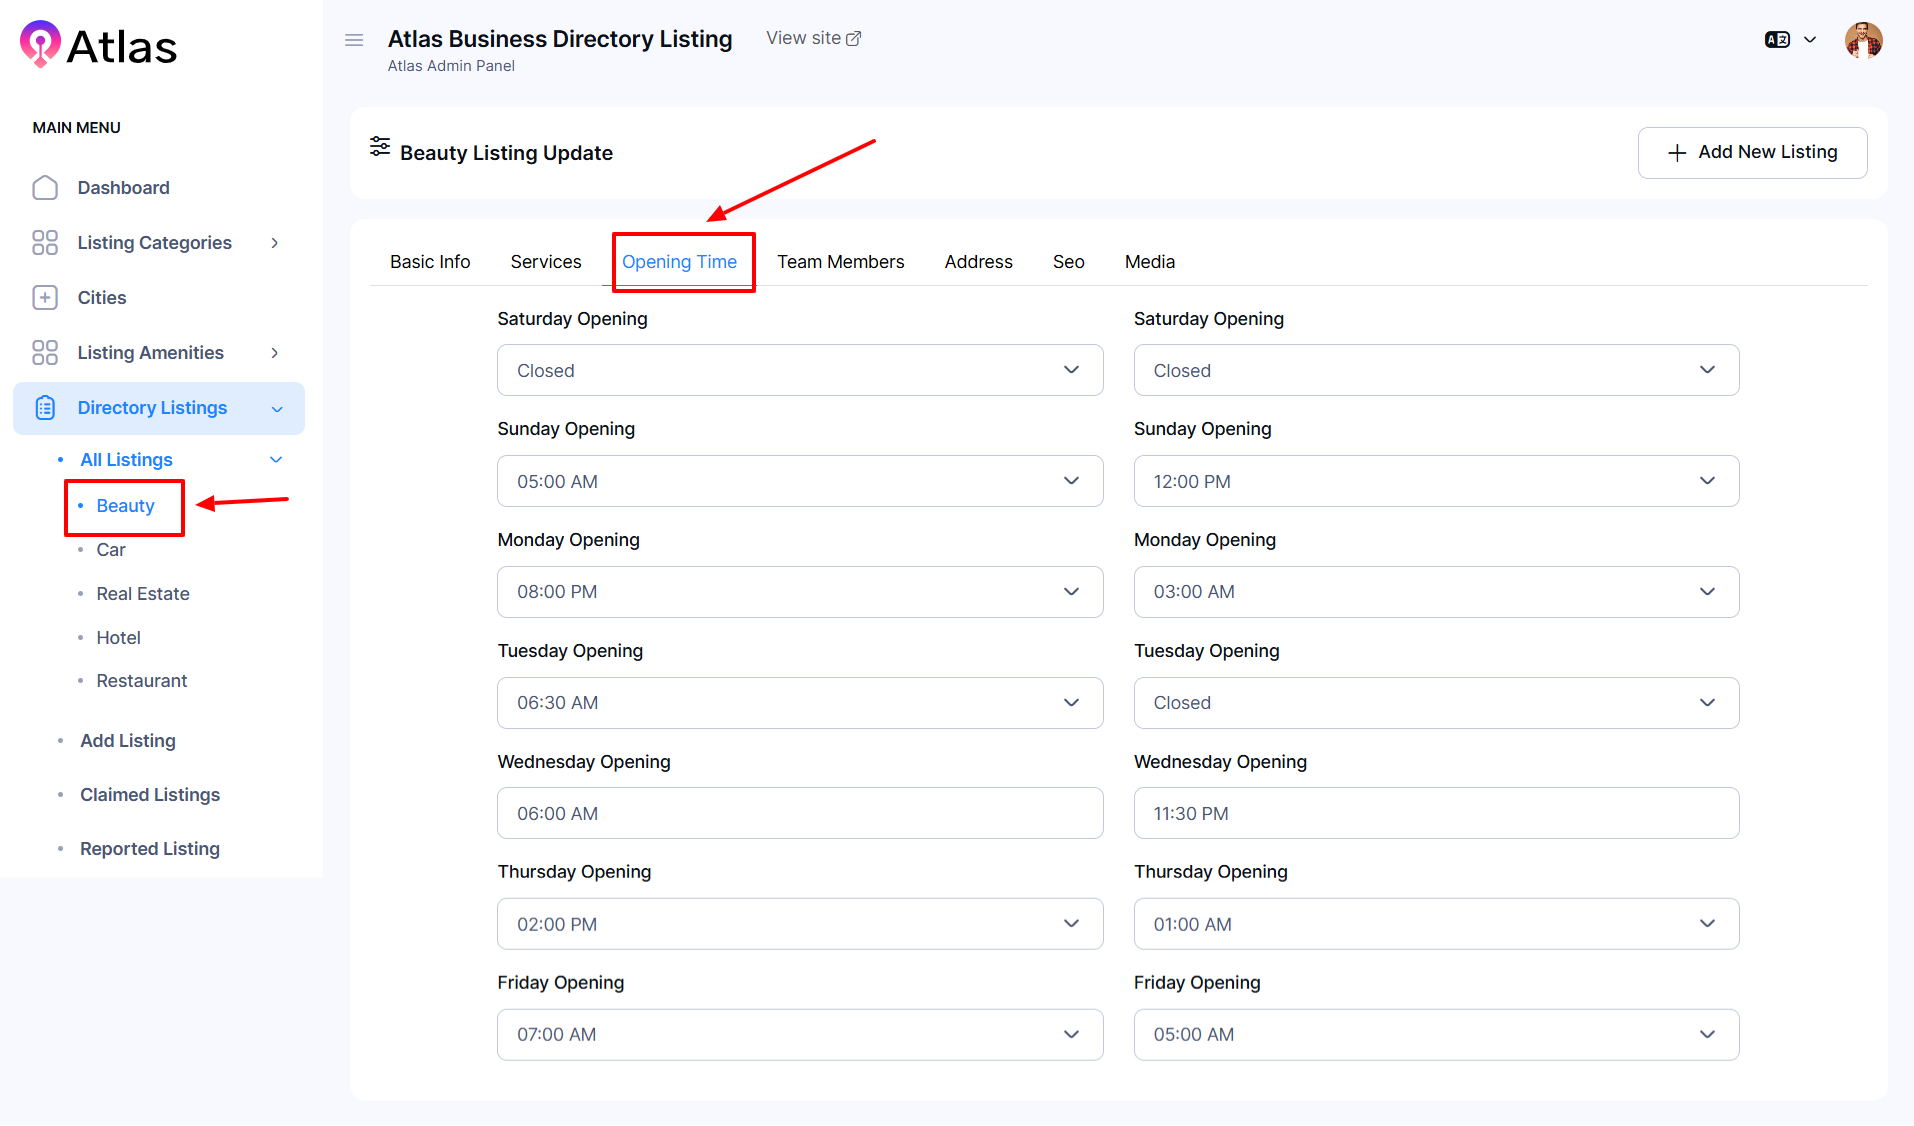
- In the Opening Time section:
-
- Click the Opening Time button to manage working hours.
- After entering all required information, click the Update button to save the provided information.
-
- In the Team Member Section:
-
- Click the Team Member button to manage team details.
- Click Add Team to open a new entry form:
-
-
-
-
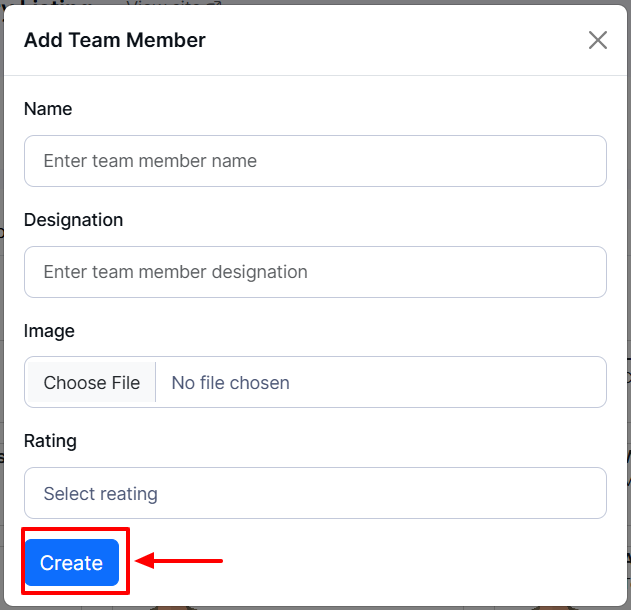
Enter the team member’s name in the Name field.
-
Enter the designation in the Designation field.
-
Upload a relevant image by clicking Choose File in the Image section.
-
Select a rating from the Rating dropdown menu.
-
Click the Create button to save the provided information.
-
-
-
-
- Finally, click Update to save the provided information.
-
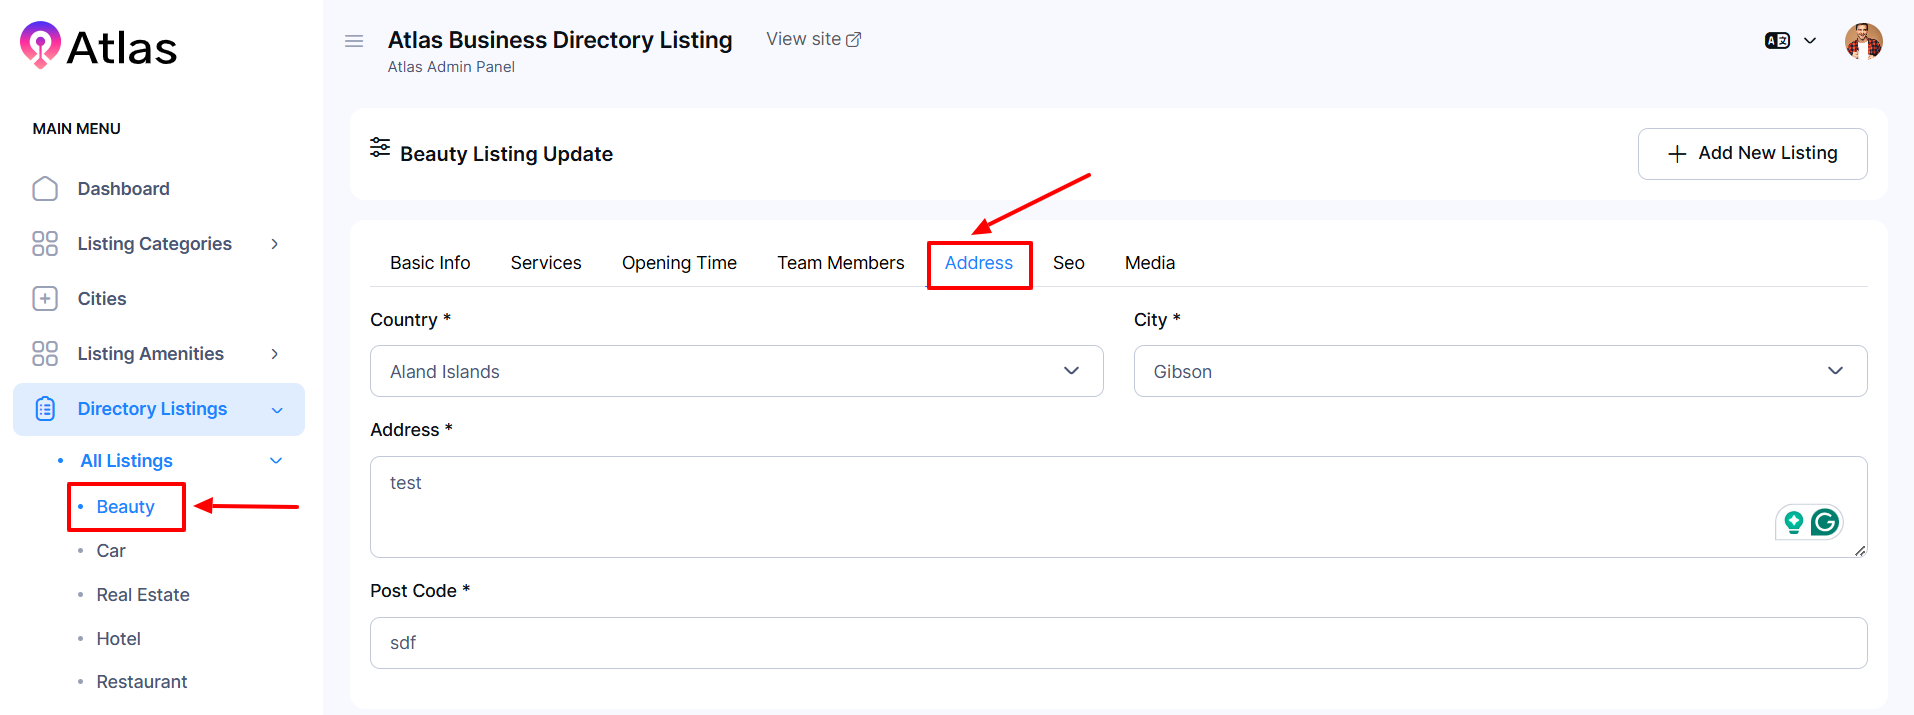
- In the Address section:
-
-
-
Select Country from the Country dropdown menu.
-
Choose City from the City dropdown menu.
-
Put the Address in the Address field.
-
Type the postcode in the Post Code field.
-
Click the Update button to save the provided information.
-
-
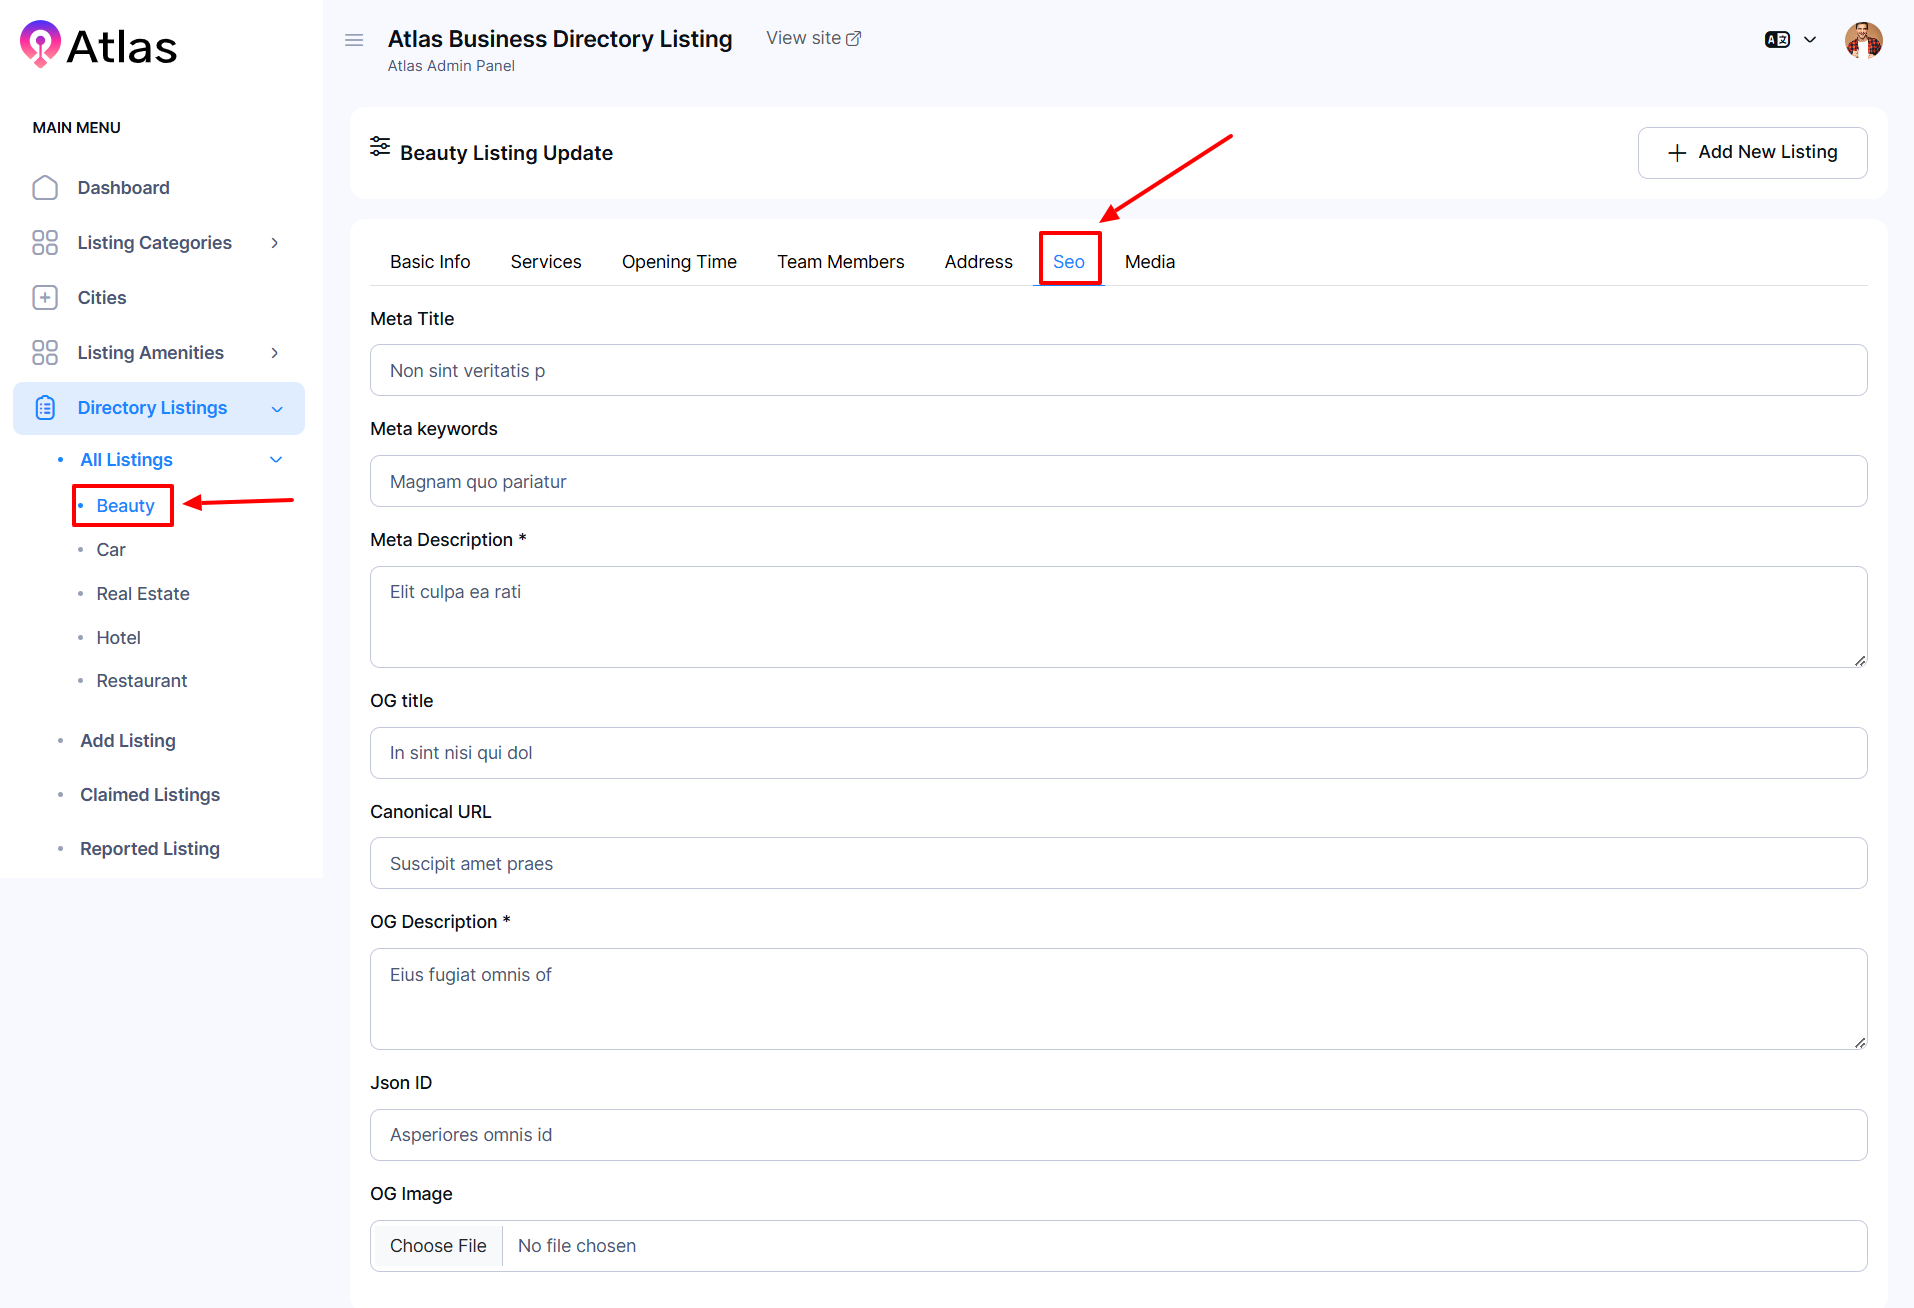
- In the SEO section:
-
-
Fill in the fields for Meta Title, Meta Keywords, Meta Description, Og Title, Canonical URL, Og Description, and Json ID.
-
In the Image section, click Choose File to upload a relevant image.
-
-
-
-
- Click Update to save the provided information.
-
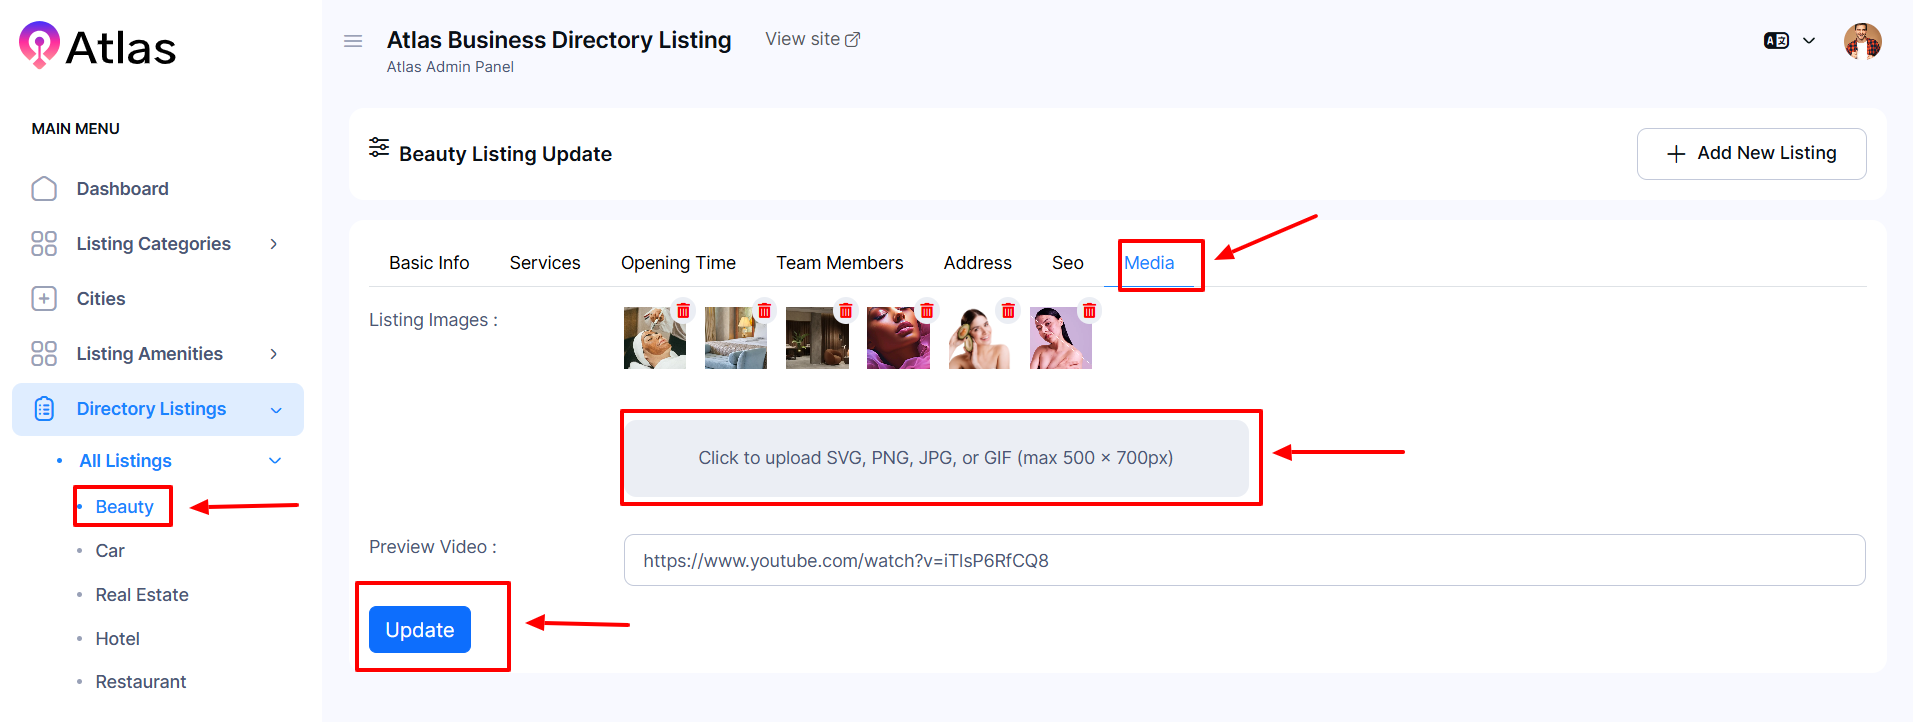
- In the Media section:
-
-
-
Upload a listing image in the listing Images field.
-
Add a video link in the Preview Video field that is applicable.
-
-
- Finally, click the Update button to save the new listing with all the provided information.

How to Delete Beauty Amenities
- Log in to the Admin and access the Dashboard from the Admin Panel.
- Navigate to Directory Listings from the left menu and select All Listings.
- Click on Beauty from the left menu.
- Click the Action button (three dots) to open a menu with the options to change Visibility, Edit, and Delete.
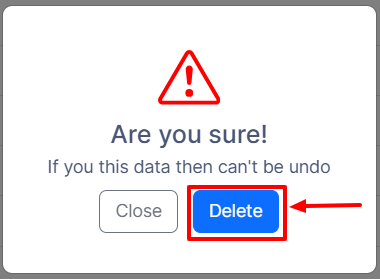
- Select Delete a confirmation window will pop up.
- If you click the Delete button category will be deleted; otherwise, Close. Note: Never back it again.
Note: The same procedure will apply to Cars, Real Estate, Hotels, and Restaurants.
How to Edit a Car
- Log in to the Admin and access the Dashboard from the Admin Panel.
- Navigate to Directory Listings from the left menu and select All Listings.
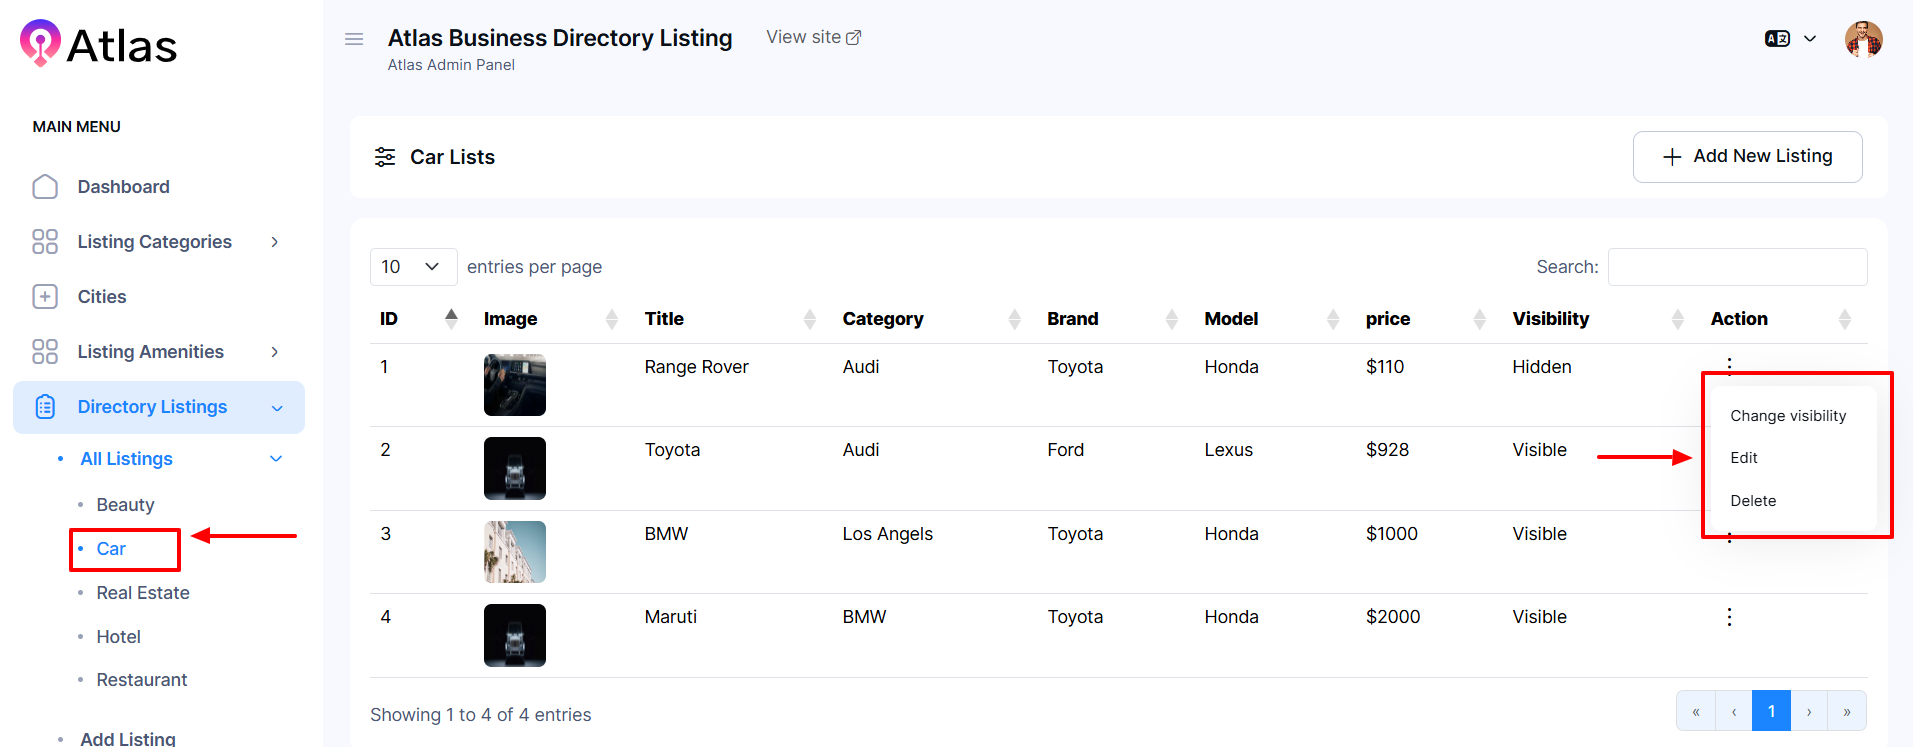
- Click on Car from the left menu.
- Click the Action button (three dots) to open a menu with the options to change Visibility, Edit, and Delete.
- Select Edit to open the entry form.
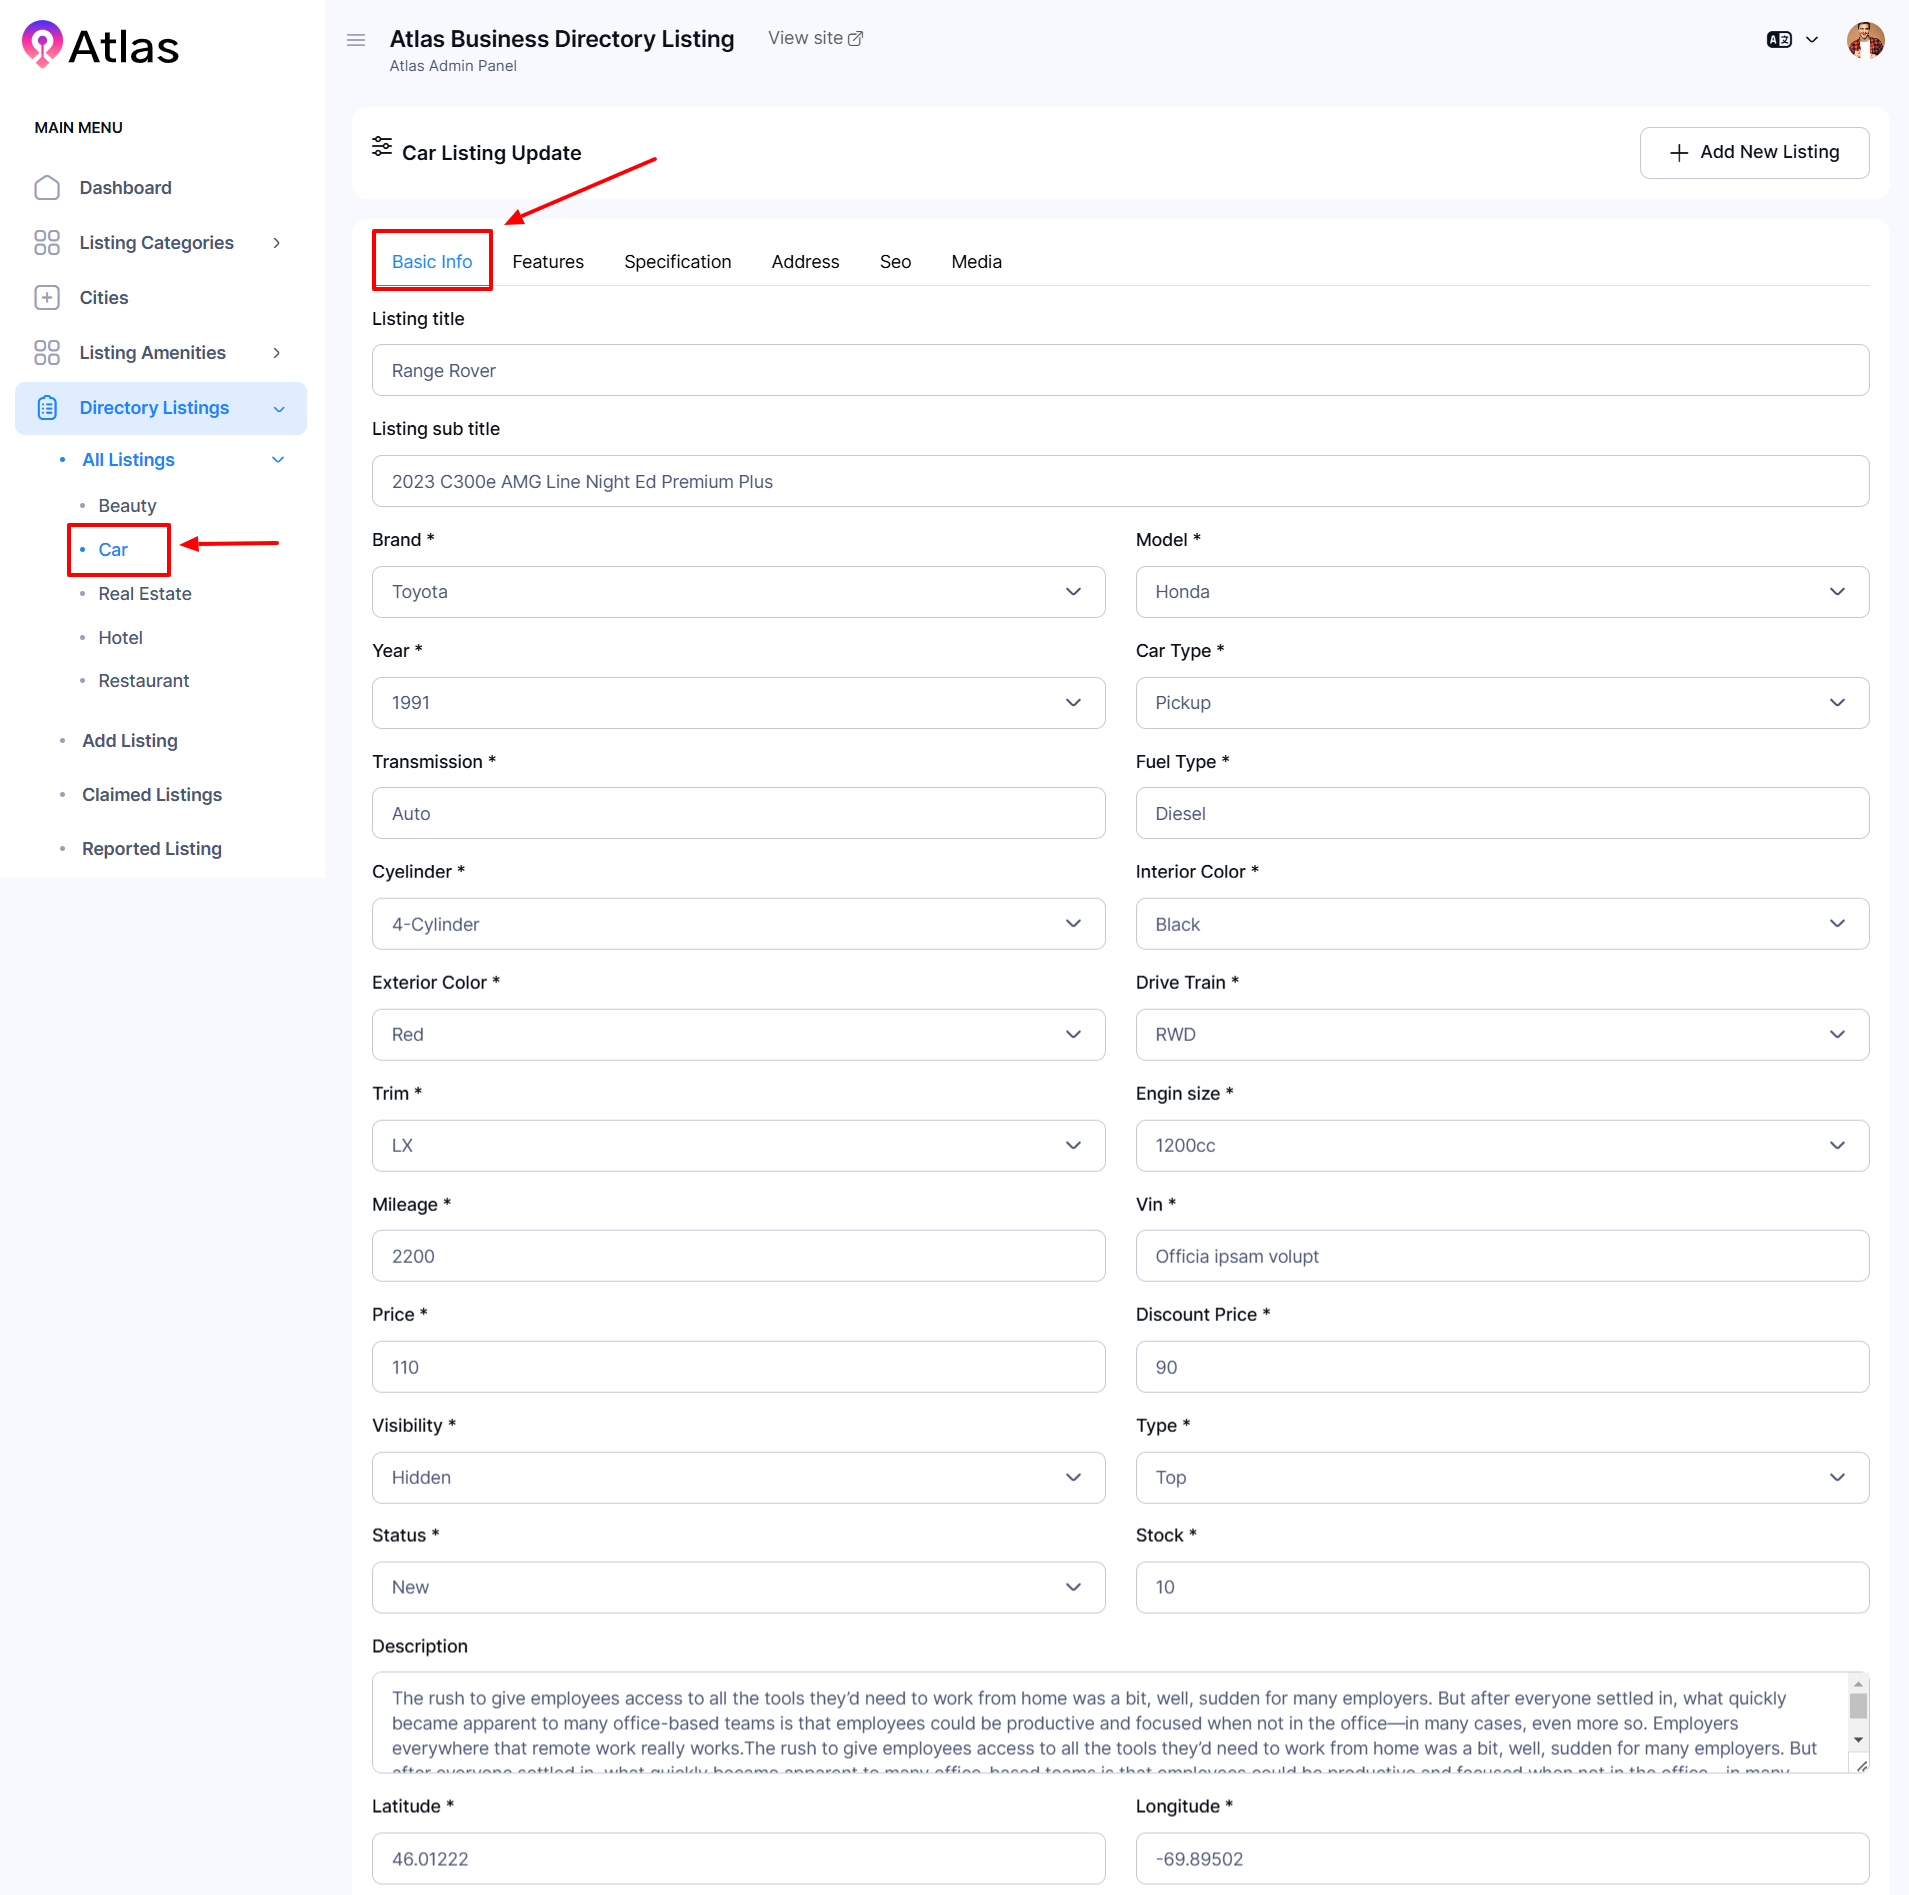
- In the Basic Info section:
-
-
-
Enter the listing title in the Listing Title field.
-
Enter the desired listing subtitle in the Listing subtitle field.
-
Choose the Brand, Model, Year, Car type, Transmission, Fuel type, Cylinder, Interior color, Exterior color, Drive train, Trim, Engine size, Mileage, Vin, Price, Discount Price, Visibility, Type, Status, and Stock from the dropdown menu or type if needed.
-
Type the desired description in the Description field.
-
Input the latitude and longitude values in their respective fields.
-
-
- Click the Update button to save the provided information.
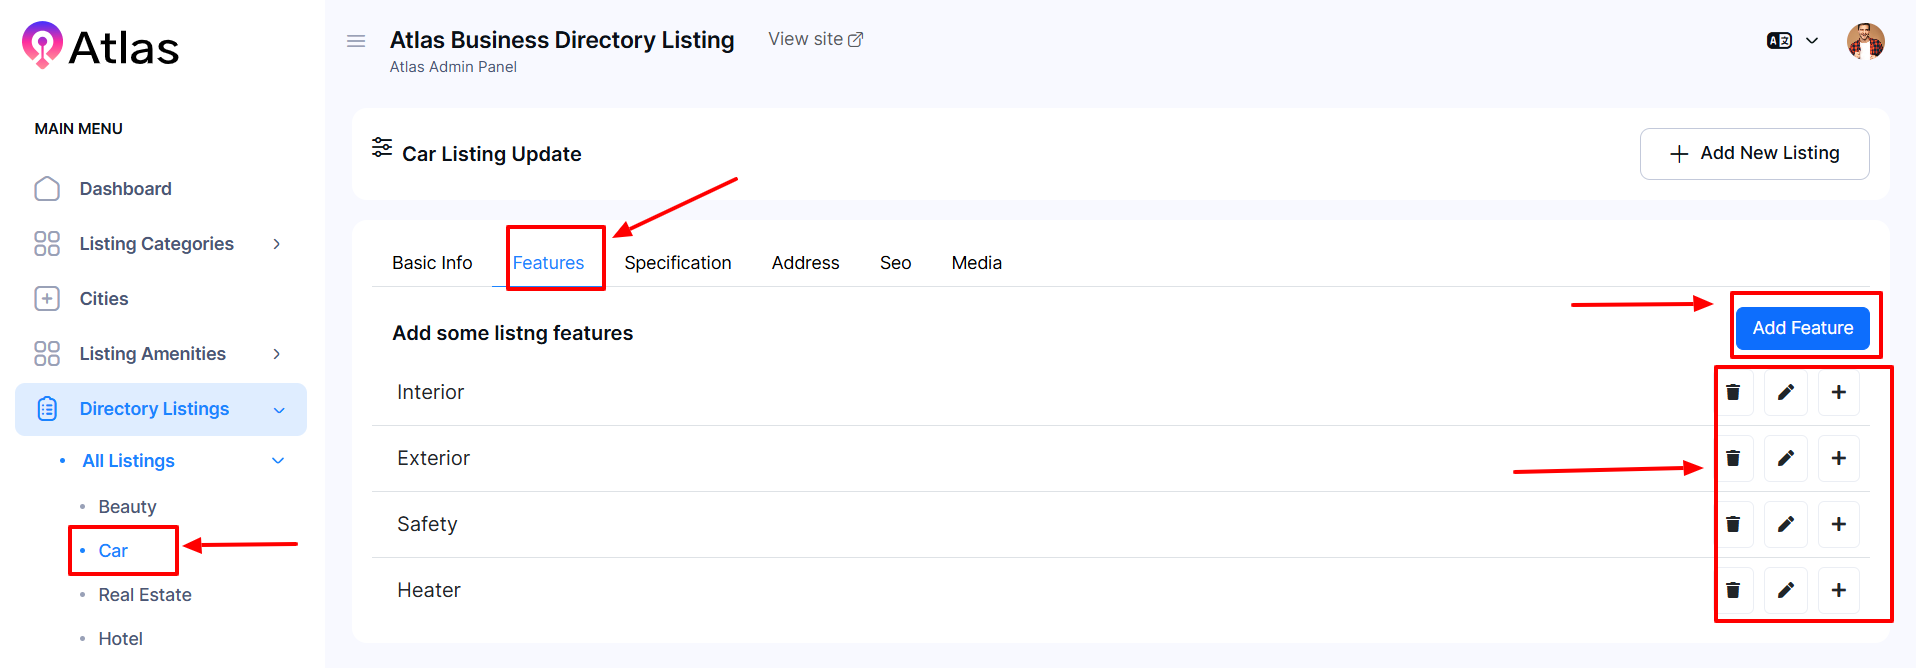
- In the Features section:
-
- Click the Features button to display the service entry form.
-
Click Add Feature to create a new feature:
-
Enter the feature name in the Feature Title field.
-
Click the Save button to save the feature details.
-
- Click the Update button to save the provided information.
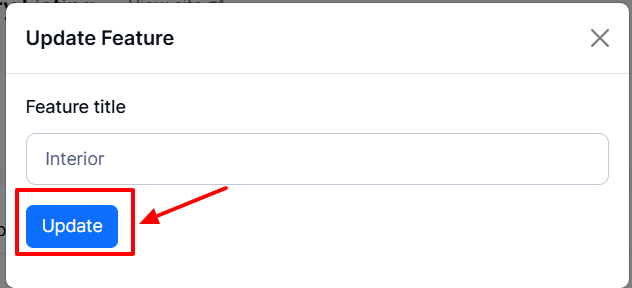
- Click the Pen button, and a new window will pop up with an entry form.
-
-
Type the feature title and click the Update button to update the information.
-
-
- Click the Plus Sign (+) button, and a new window will pop up to add the feature.
-
-
-
Type the desired feature title in the Feature Title field.
-
Click the Save button to add the information.
-
-
- Click the Update button to save the provided information.
- Select Delete a confirmation window will pop up.
-
-
-
If you click the Delete button feature will be deleted; otherwise, Close.
-
-
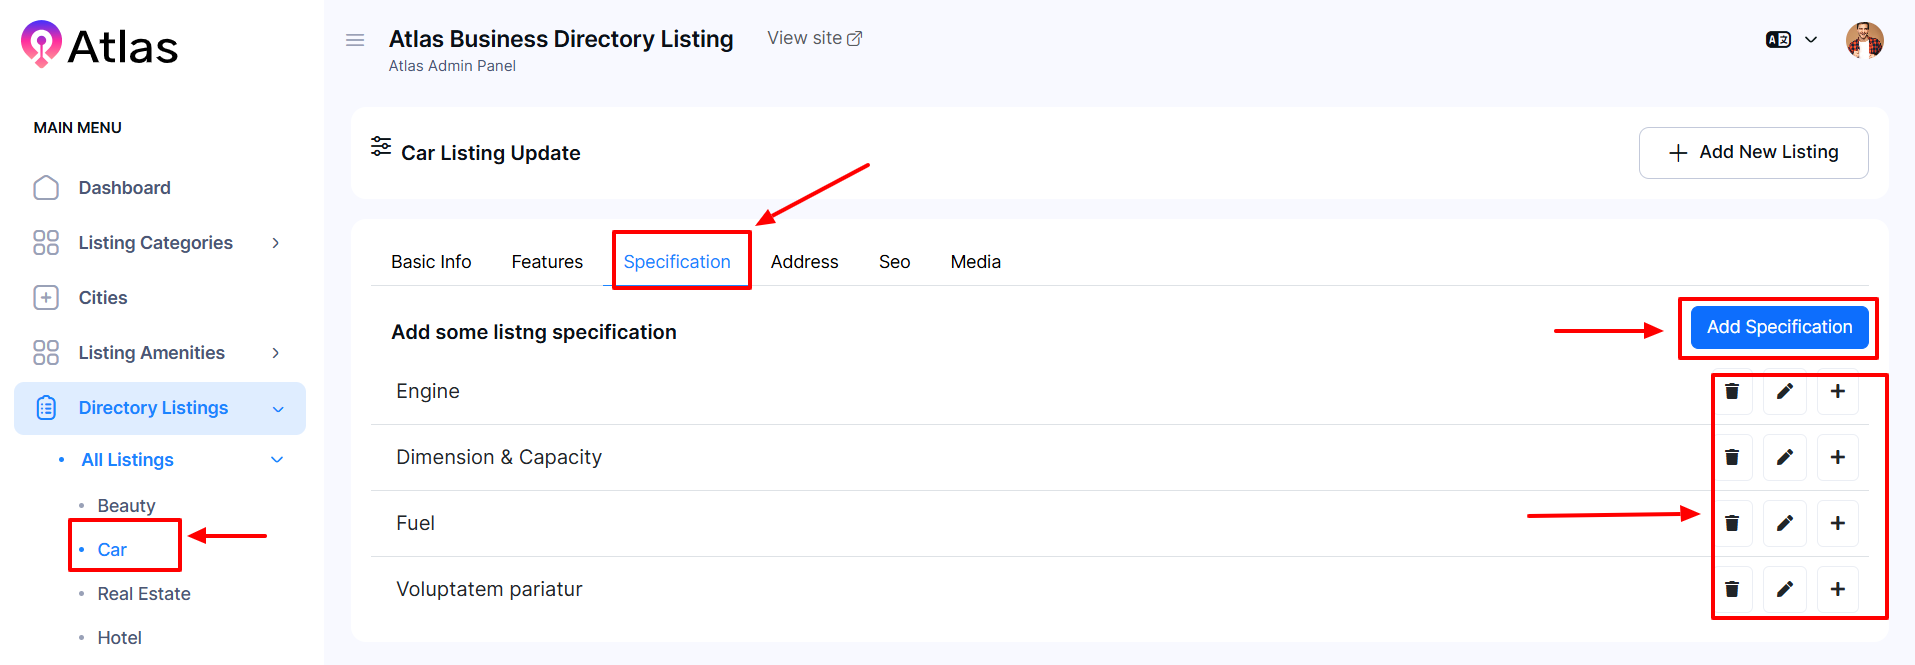
- In the Specification section:
-
-
-
Click the Specification button a new window will pop up to add specifications.
-
-
- Click the Pen button a new window will pop up to edit the feature.
-
-
-
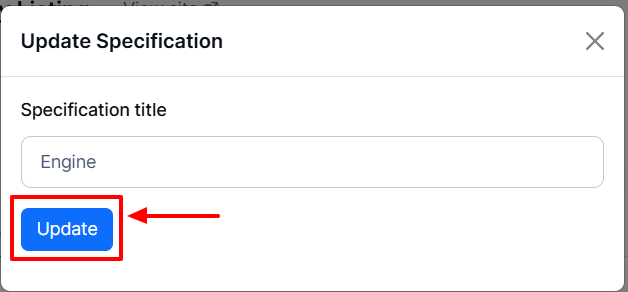
Type the specification title and click the Update button to update the information.
-
-
- Click the Plus Sign (+) button a new window will pop up to add the specification.
-
-
-
Type the specification value in the Specification Value field.
-
Click the Save button to add the information.
-
-
- Select the Delete button a confirmation window will pop up.
-
-
-
If you click the Delete button feature will be deleted; otherwise, Close.
-
-
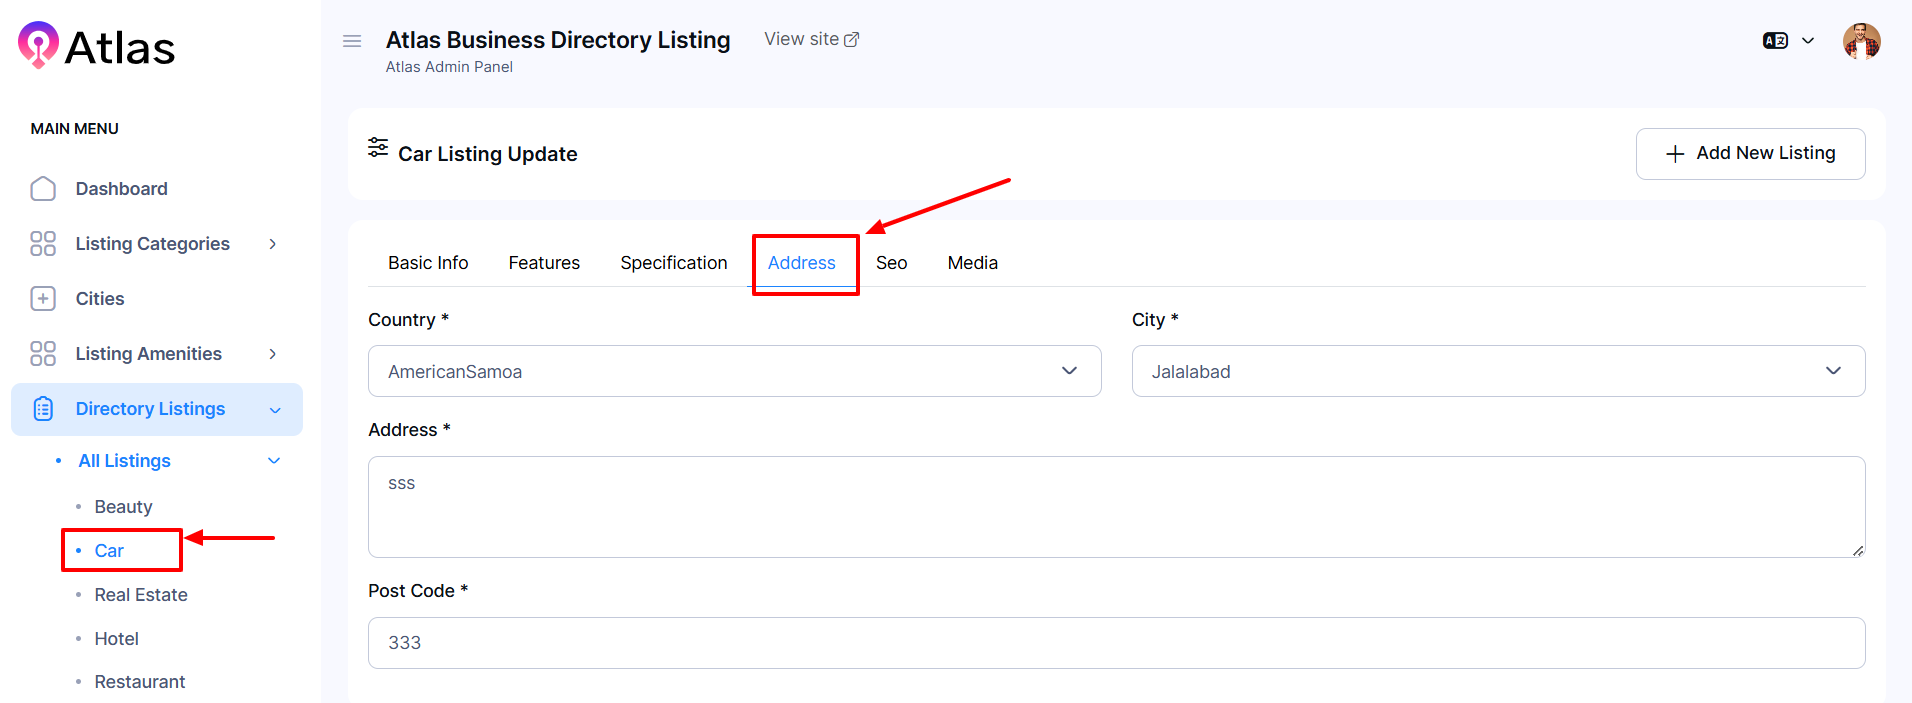
- In the Address section:
-
-
-
Select Country from the Country dropdown menu.
-
Choose City from the City dropdown menu.
-
Put the Address in the Address field.
-
Type the postcode in the Post Code field.
-
-
- Click the Update button to save the provided information.
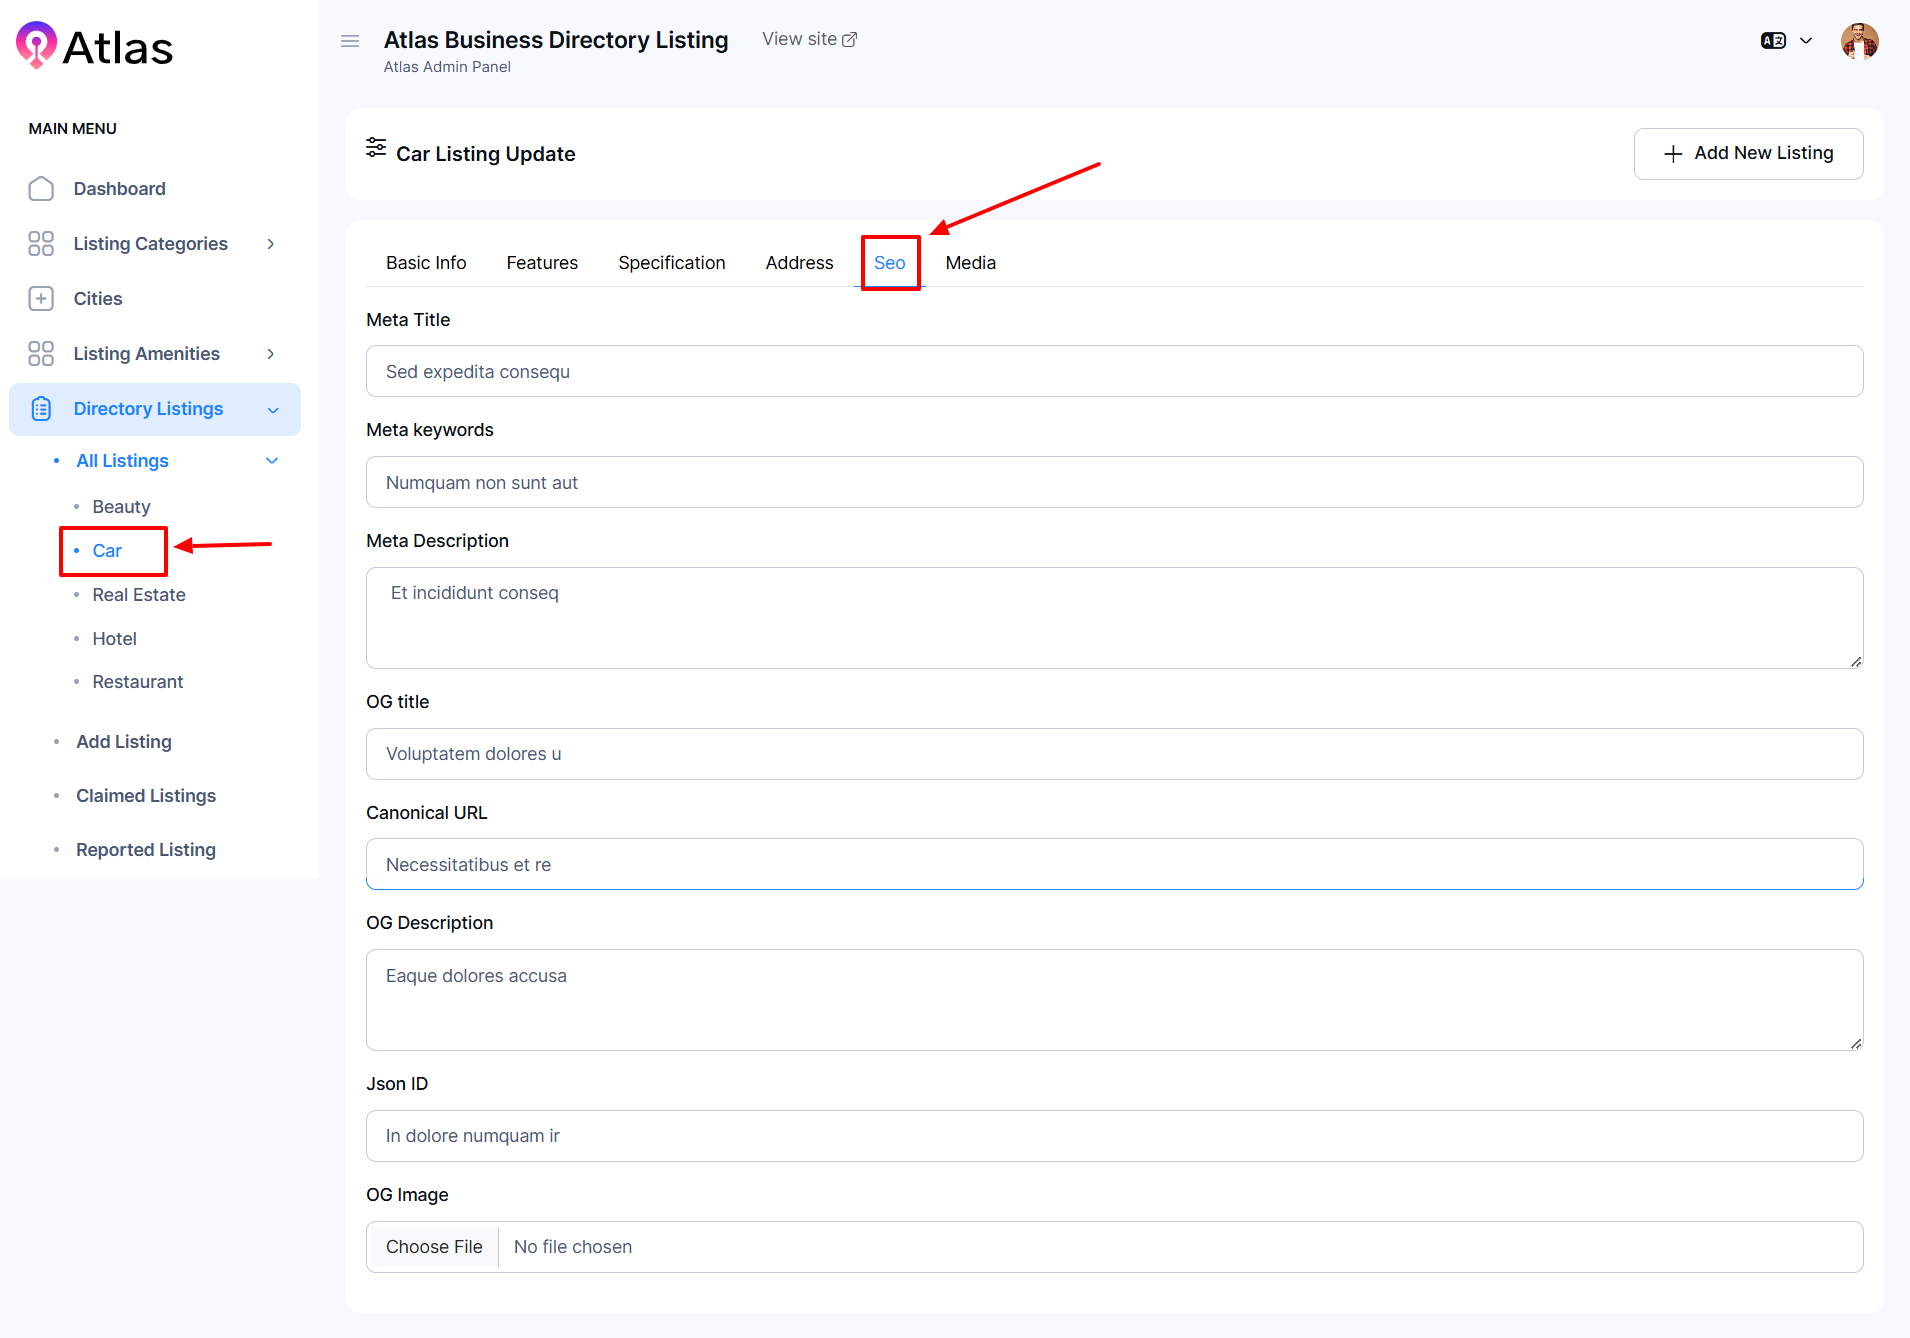
- In the SEO section:
-
-
-
Fill in the fields for Meta Title, Meta Keywords, Meta Description, Og Title, Canonical URL, Og Description, and Json ID.
-
In the Image section, click Choose File to upload a relevant image.
-
-
- Click the Update button to save the provided information.
- In the Media section:
-
- Upload a listing image in the listing image field.
- Add a video link in the Preview Video field that is applicable.
-
- Finally, click the Update button to save all the provided information.


How to Edit Real Estate
- Log in to the Admin and access the Dashboard from the Admin Panel.
- Navigate to Directory Listings from the left menu and select All Listings.
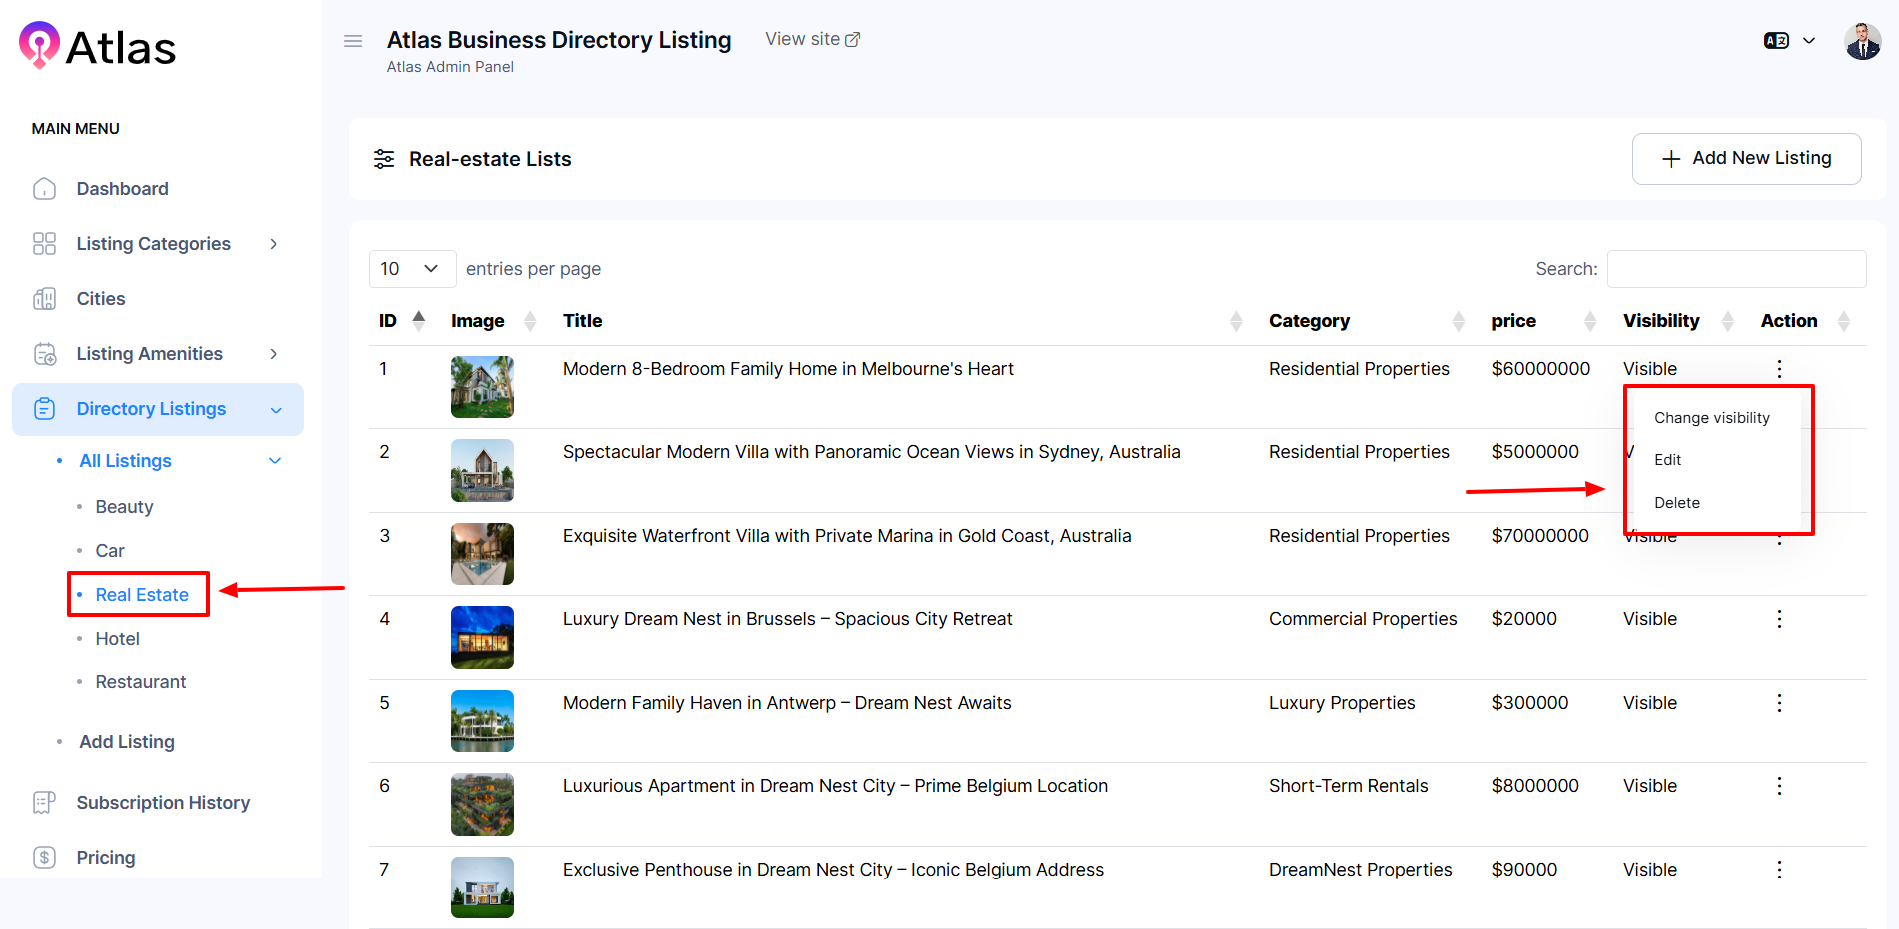
- Click on Real Estate from the left menu.
- Click the Action button (three dots) to open a menu with the options to change Visibility, Edit, and Delete.
- Select Edit to open the entry form.
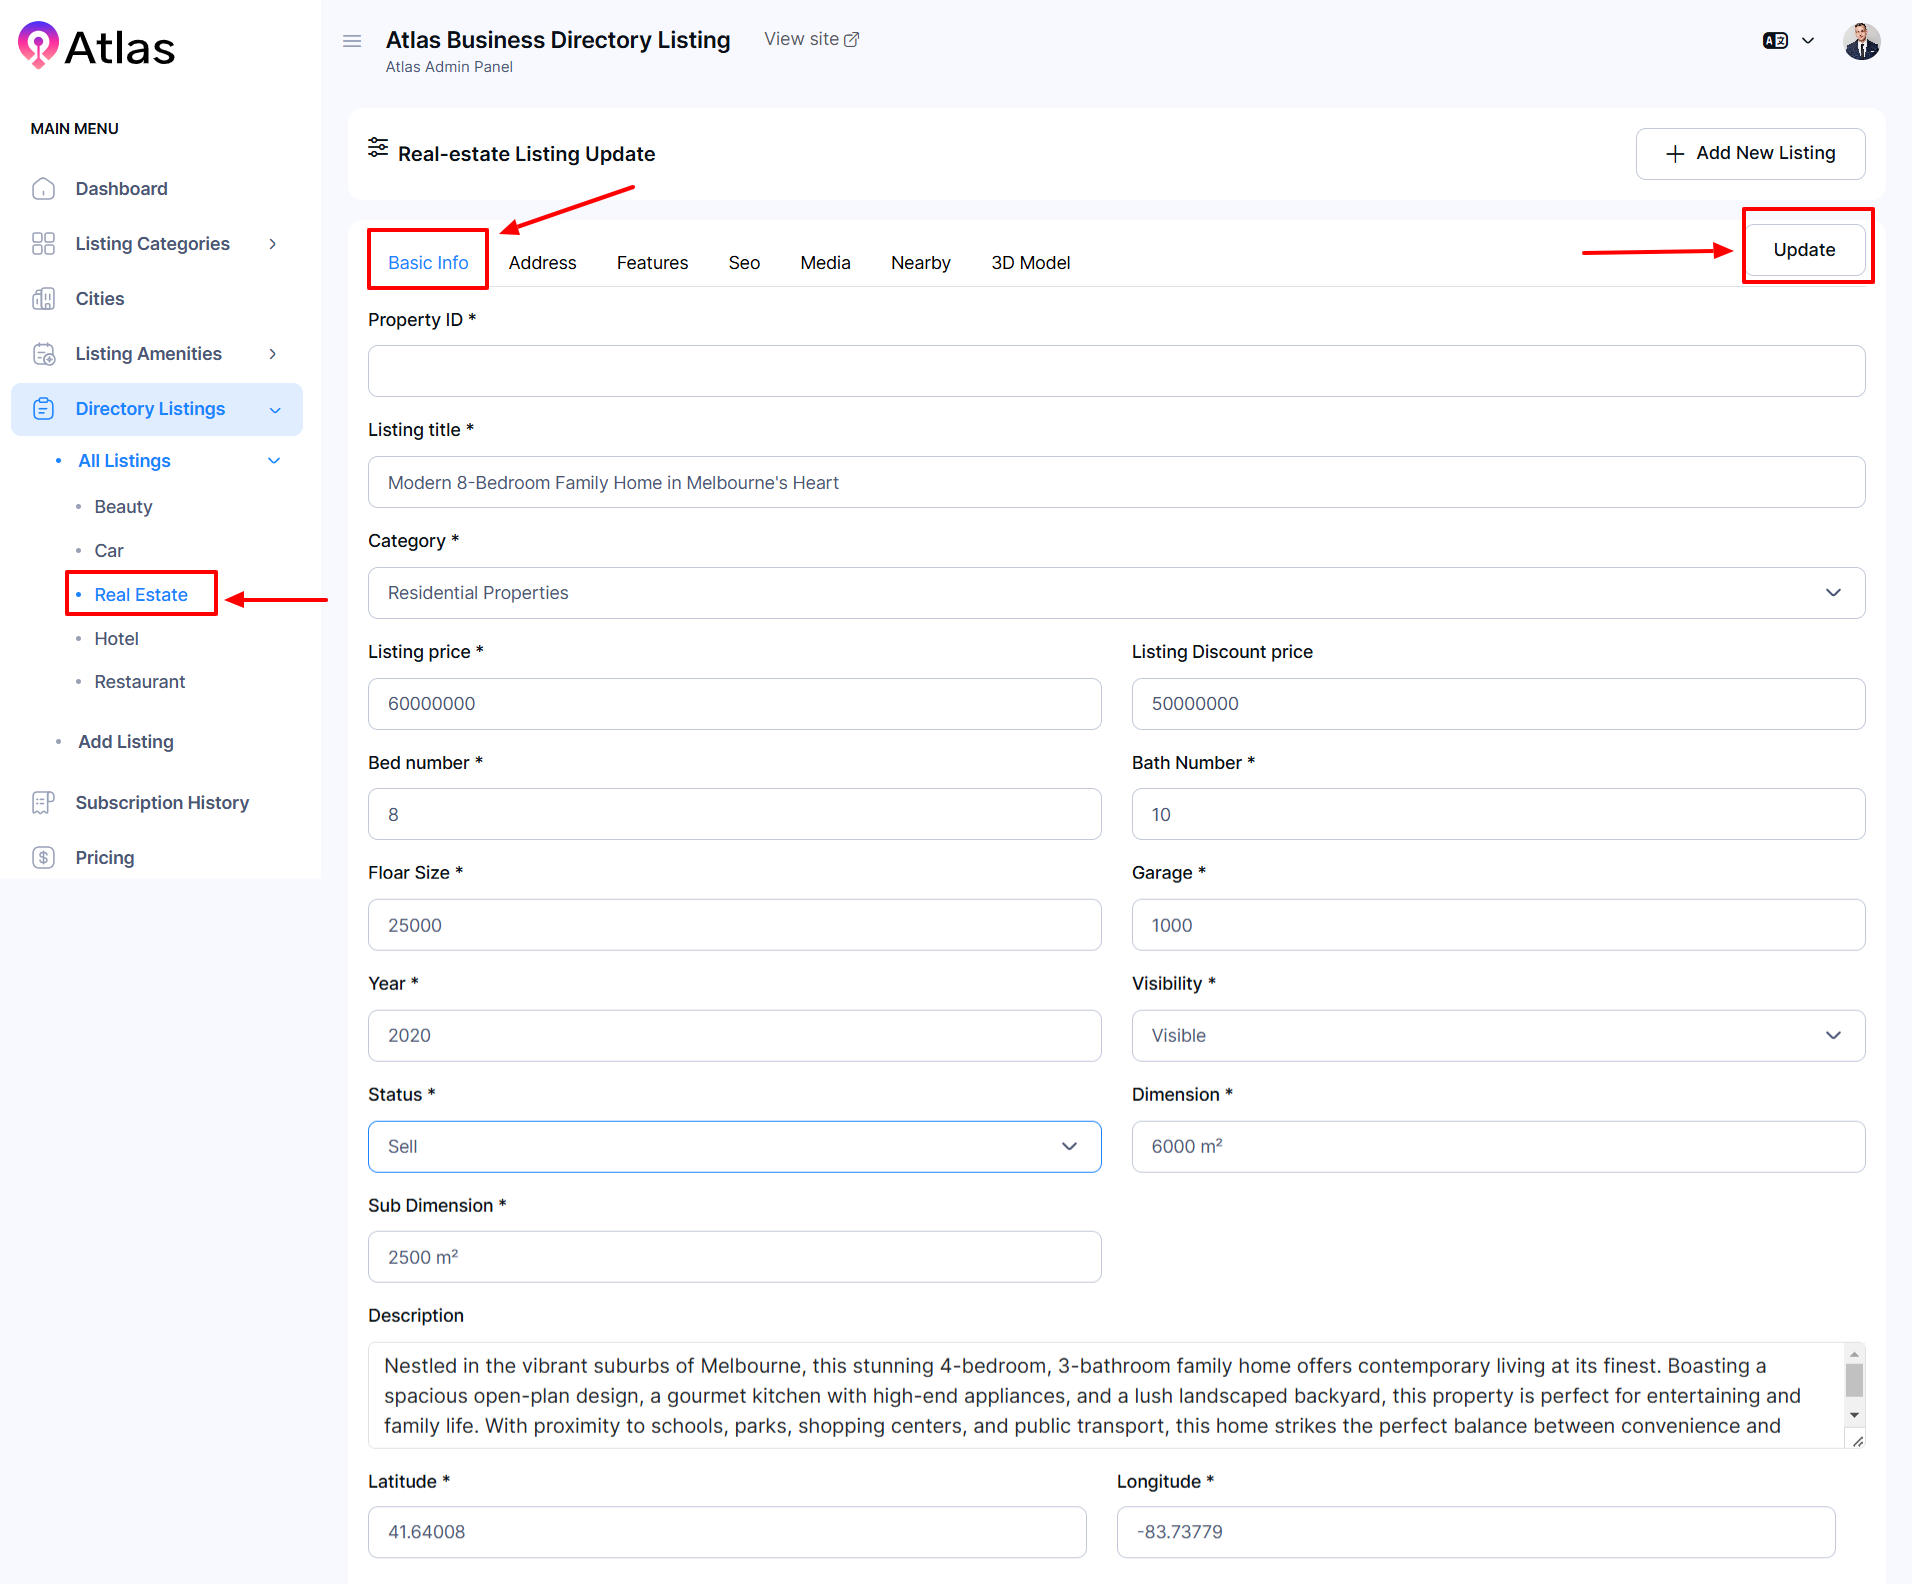
- In the Basic Info section:
-
-
Enter the Property ID in the respective field.
-
Provide the title in the Listing Title field.
-
Choose a Category from the dropdown menu.
-
Enter or select the price in the Listing Price and Discount Price fields.
-
Specify the number of Beds and Baths as required.
-
Input the Floor Size and Garage Size details.
-
Select or type the Year of the property.
-
Set the Visibility and Status using the dropdown menus.
-
Enter the property Dimension and Sub-Dimension information.
-
Provide a detailed Description of the property.
-
Enter the Latitude and Longitude values for the location.
-
-
- Finally, click the Update button to save all the details.
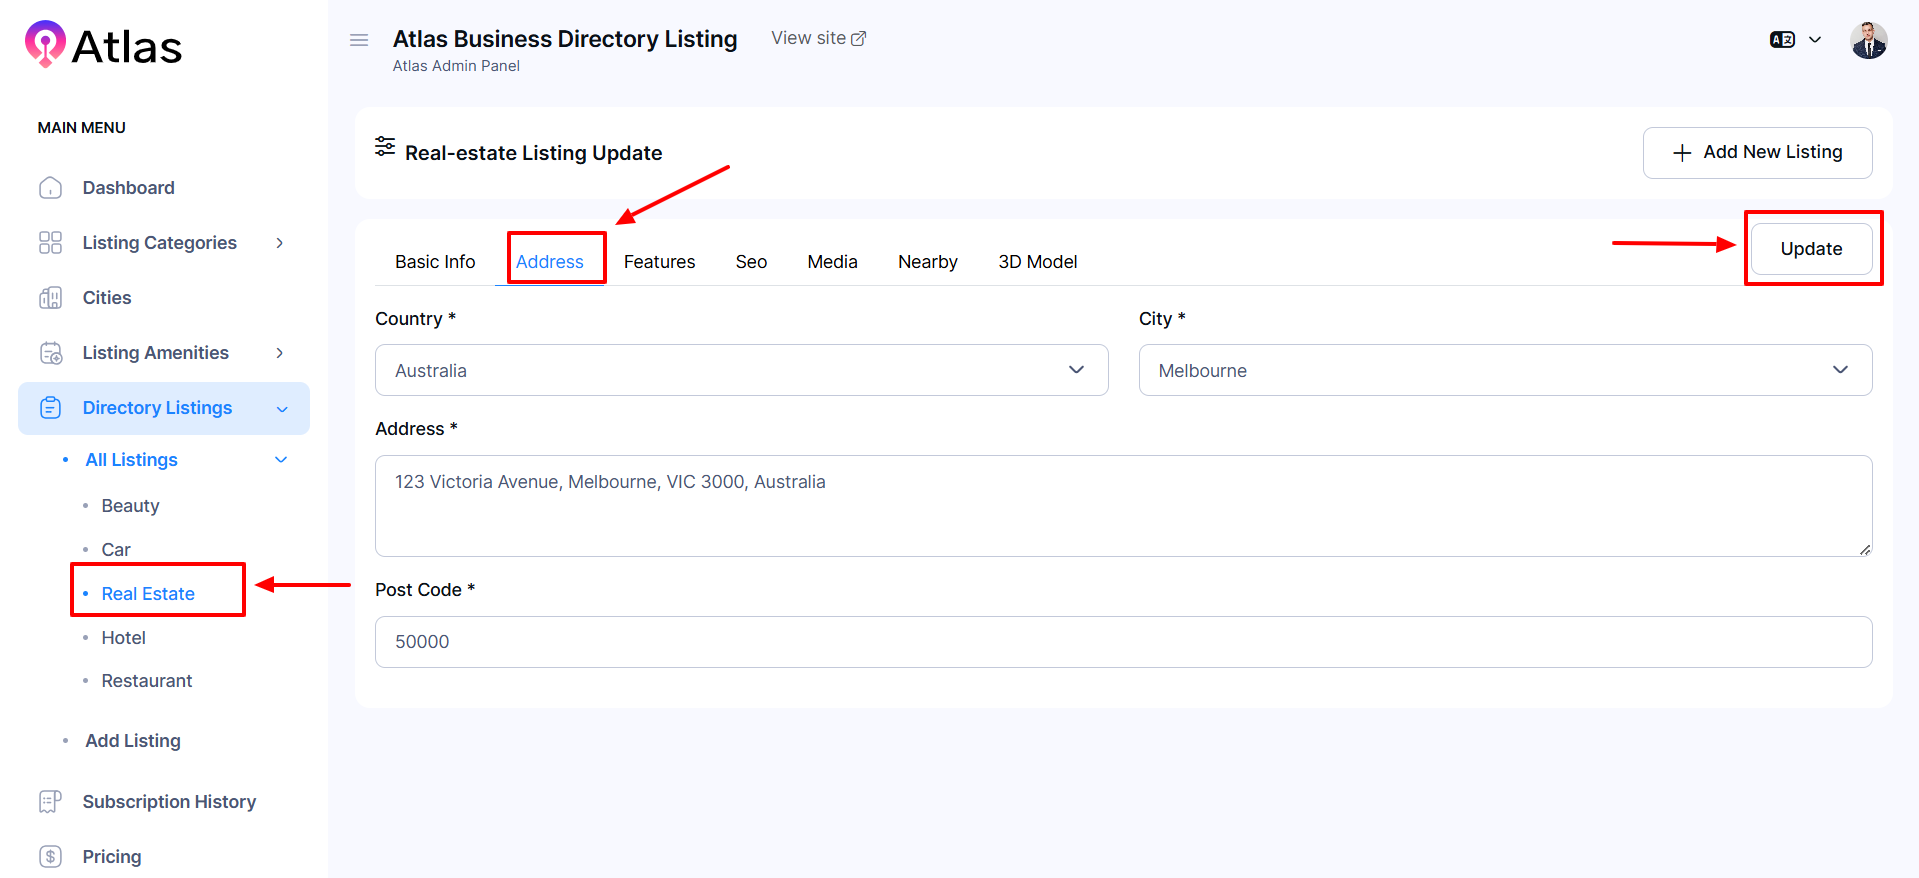
- In the Address section:
-
-
Select Country from the Country dropdown menu.
-
Choose City from the City dropdown menu.
-
Put the Address in the Address field.
-
Type the postcode in the Post Code field.
-
-
Click the Update button to save all the provided information.
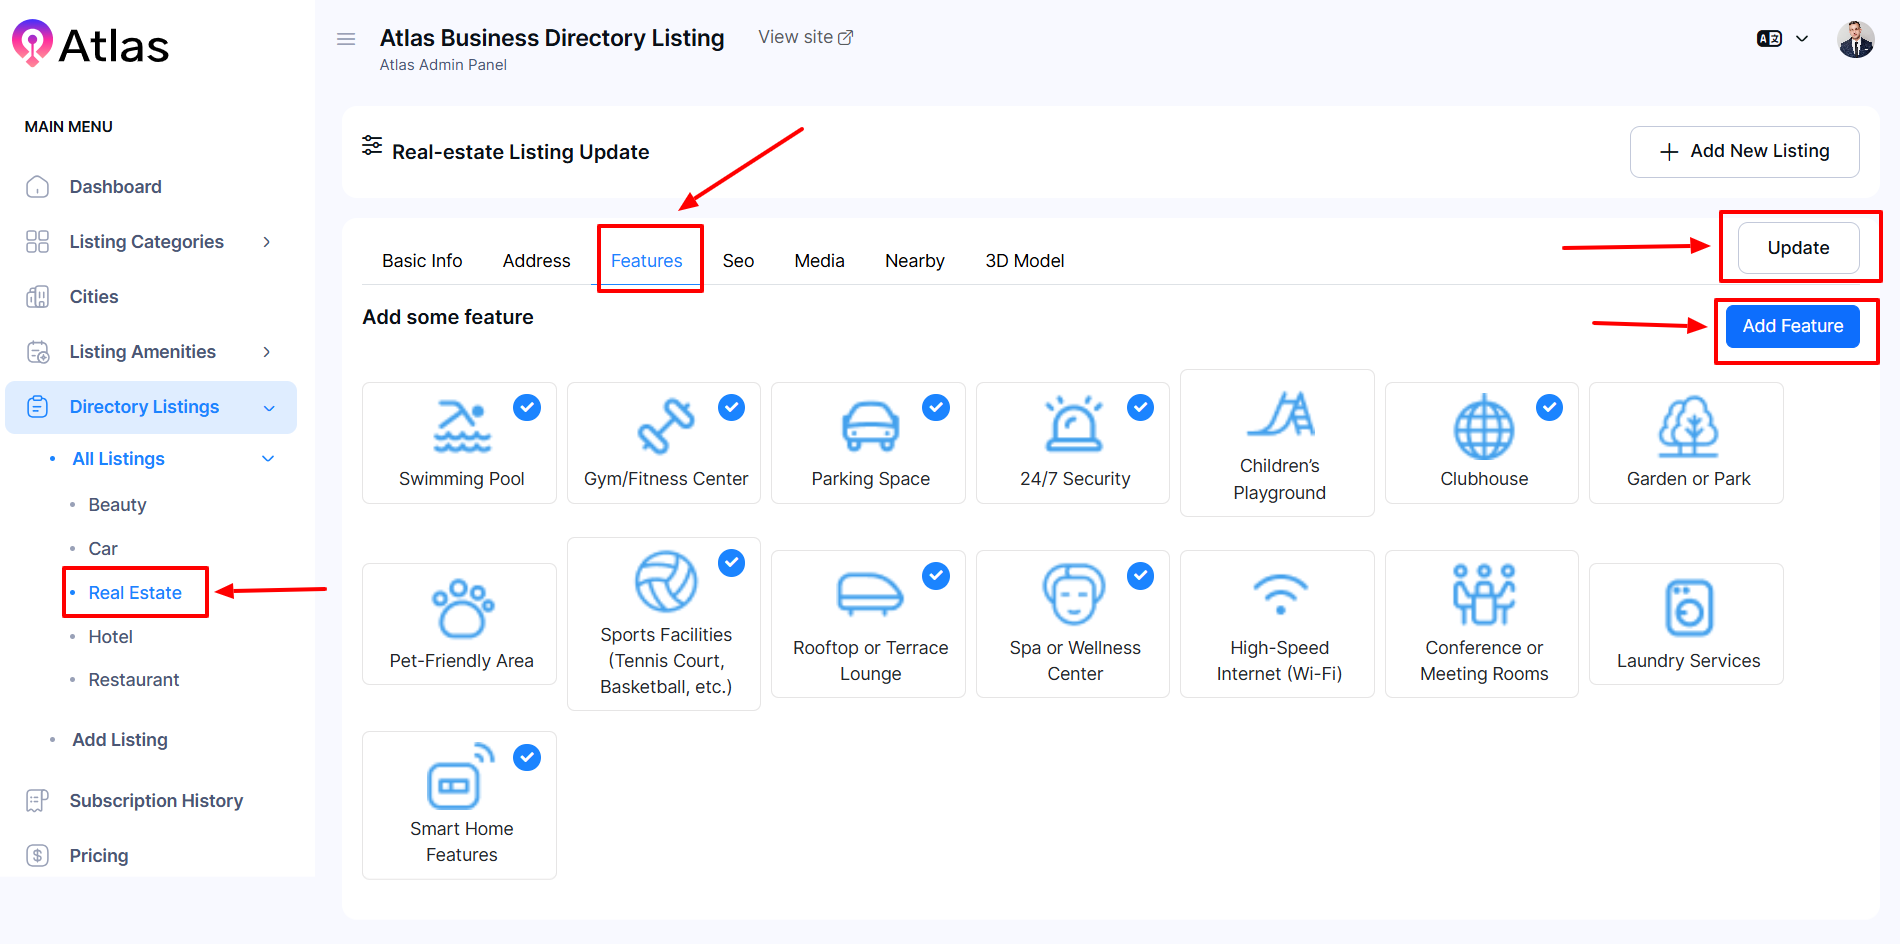
- In the Features section:
- Click the Features button to pop up a window.
- Click Add Feature to create a new feature:
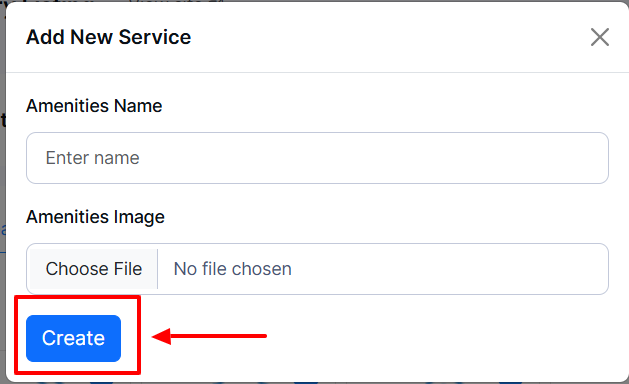
-
-
Enter the Amenities Name in the Amenities Name field.
-
Upload the Amenities Image by clicking the Choose File button.
-
Click the Create button to save the feature details.
-
-
- Click the Update button to save all the provided information.
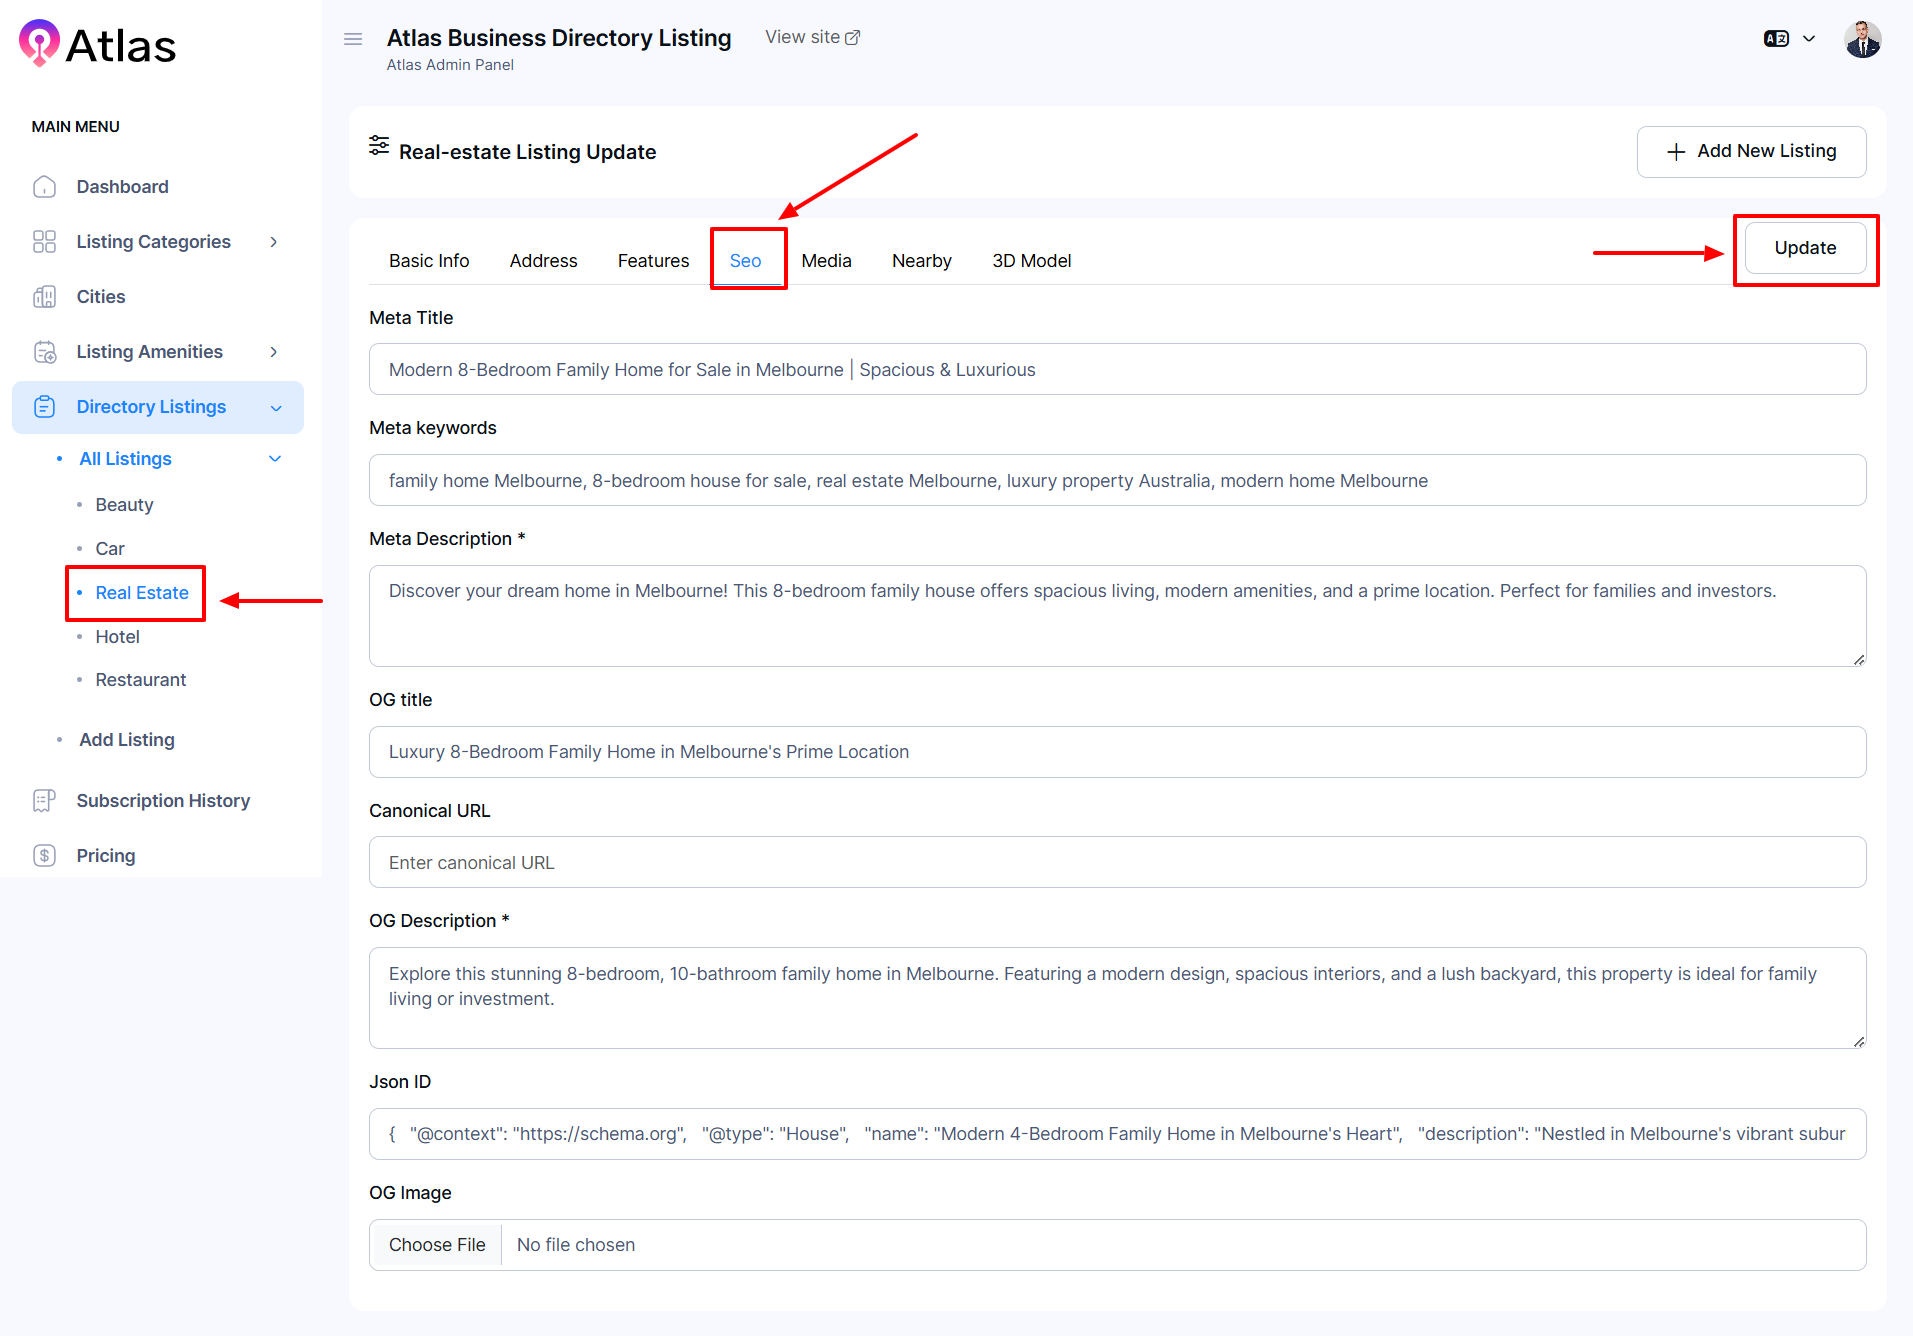
- In the SEO section:
-
-
Fill in the fields for Meta Title, Meta Keywords, Meta Description, Og Title, Canonical URL, Og Description, and Json ID.
-
Upload the Og Image by clicking the Choose File button to upload a relevant image.
-
-
- Click the Update button to save all the provided information.
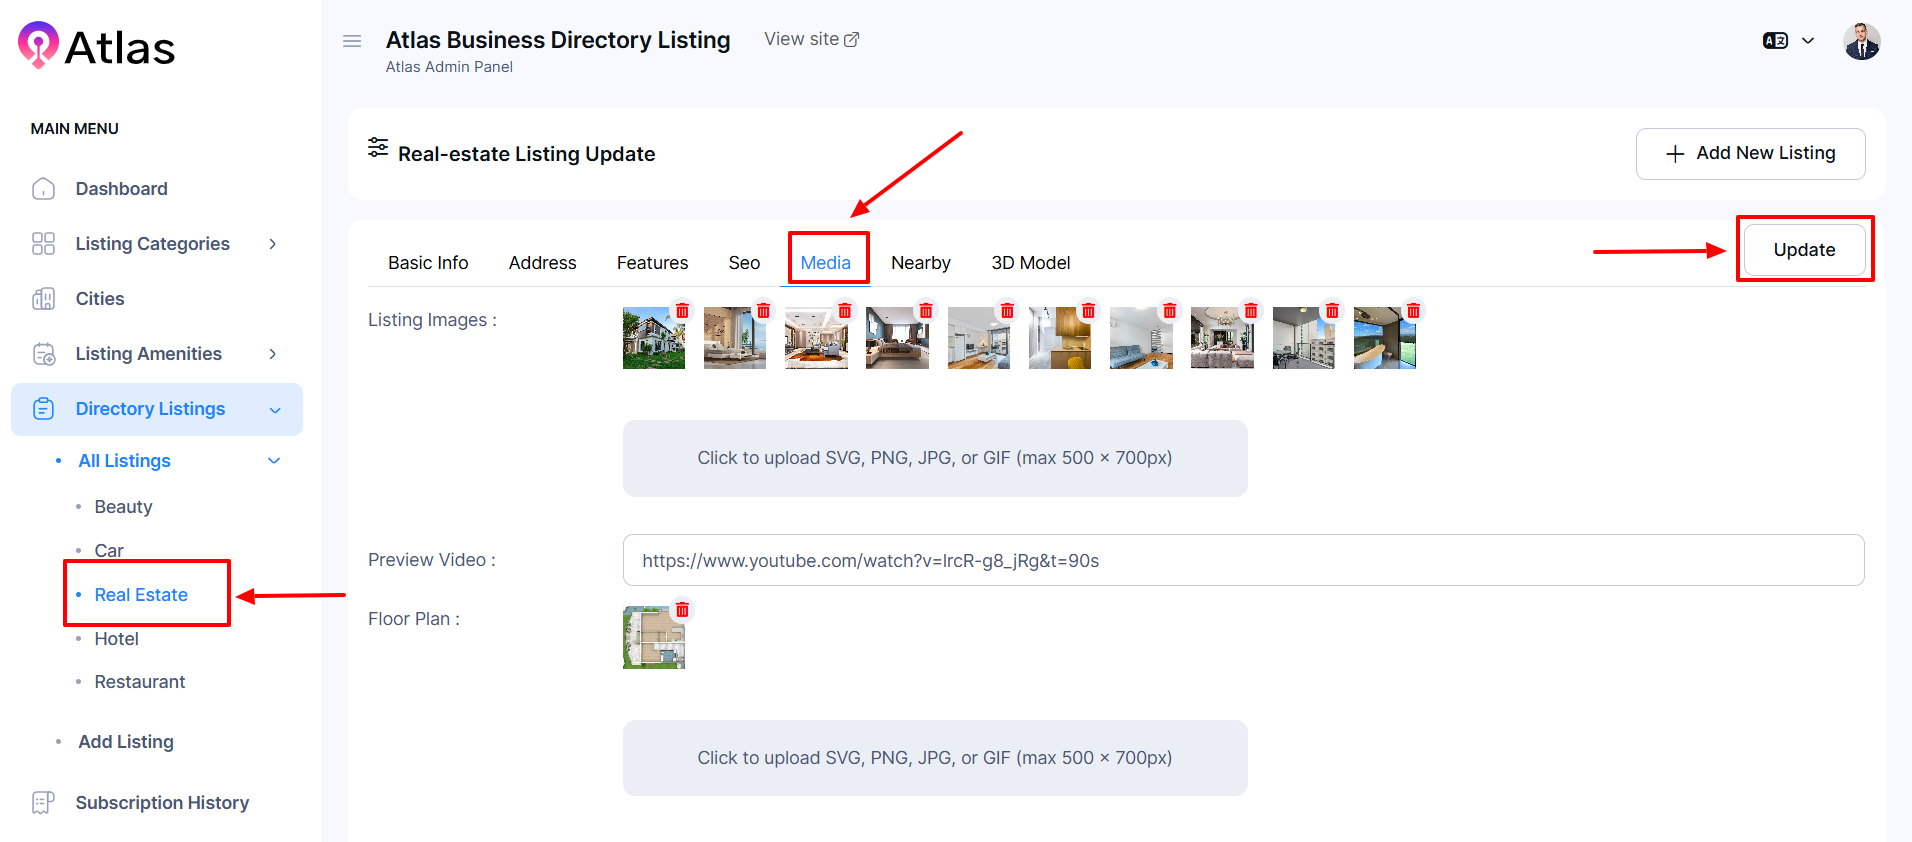
- In the Media section:
-
-
Upload a listing image in the Listing Images field.
-
Add a video link in the Preview Video field that is applicable.
-
Upload the floor plan image in the Floor Plan field.
-
-
- Click the Update button to save all the provided information.
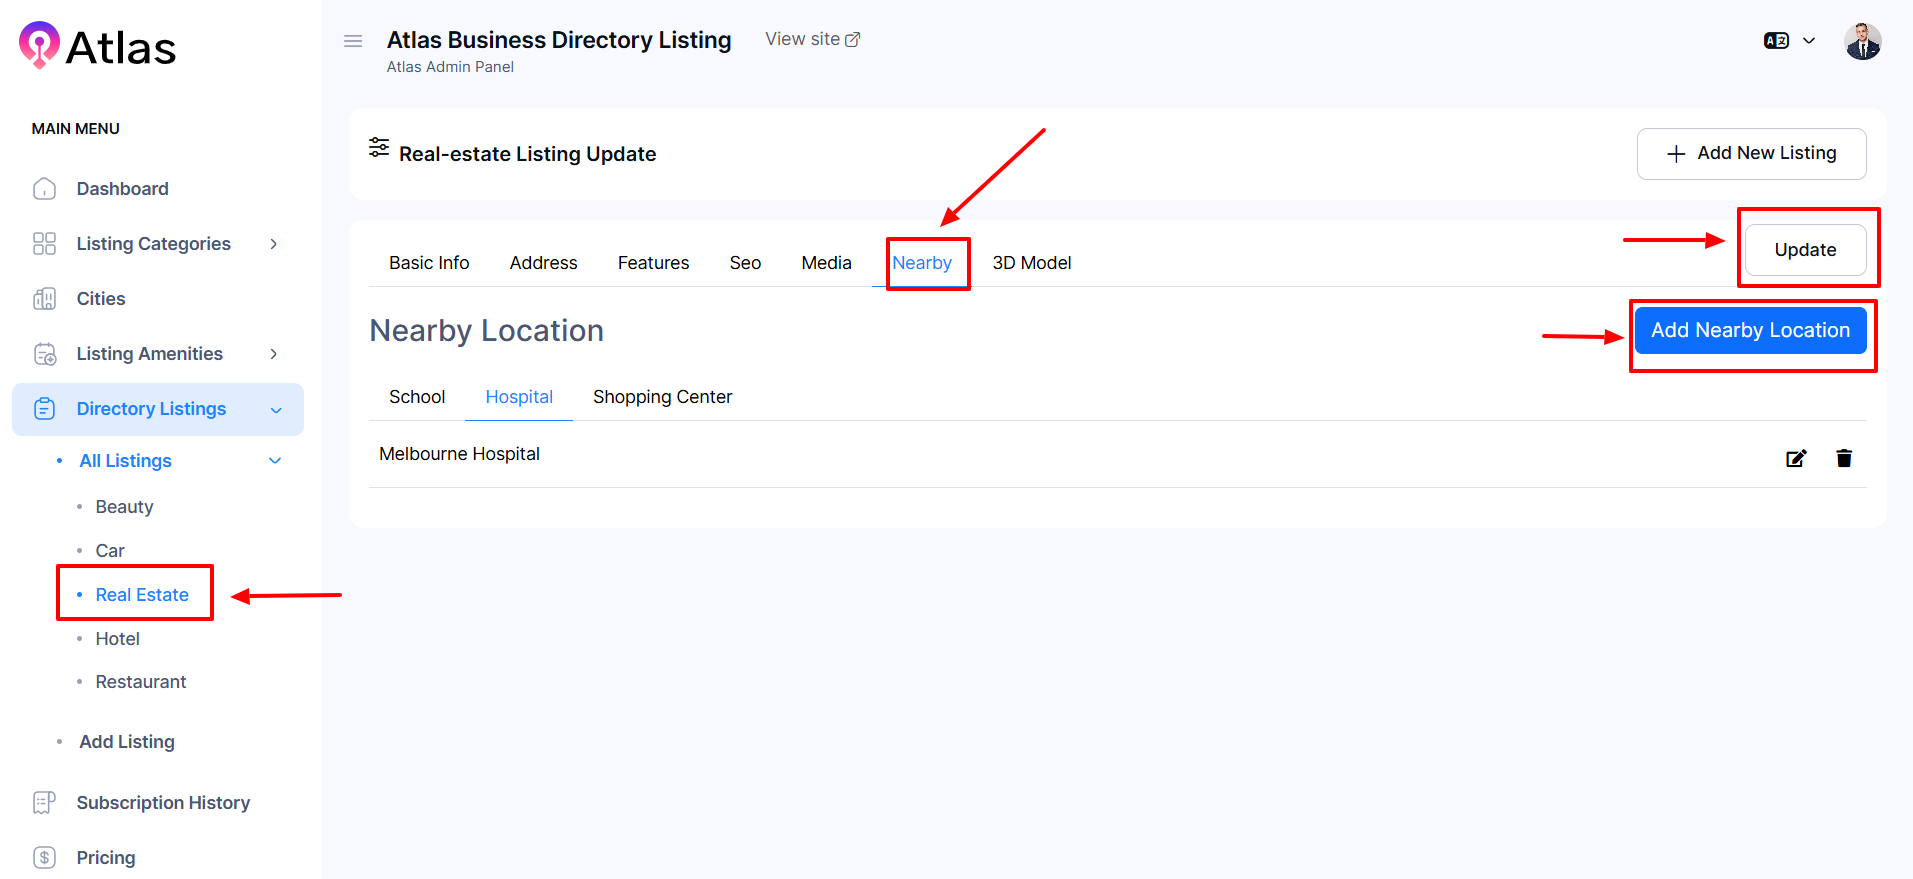
- In the Nearby section:
-
-
Click the Add Nearby button an entry form will pop up.
-
Select the nearby location from the Add a Nearby Location dropdown menu.
-
Provide the relevant name in the Name field.
-
Input the latitude and longitude values in their respective fields.
-
Select the location by clicking the visible Google map.
-
Click the Save Nearby button to save the provided information
-
-
- Click the Update button to save all the provided information.
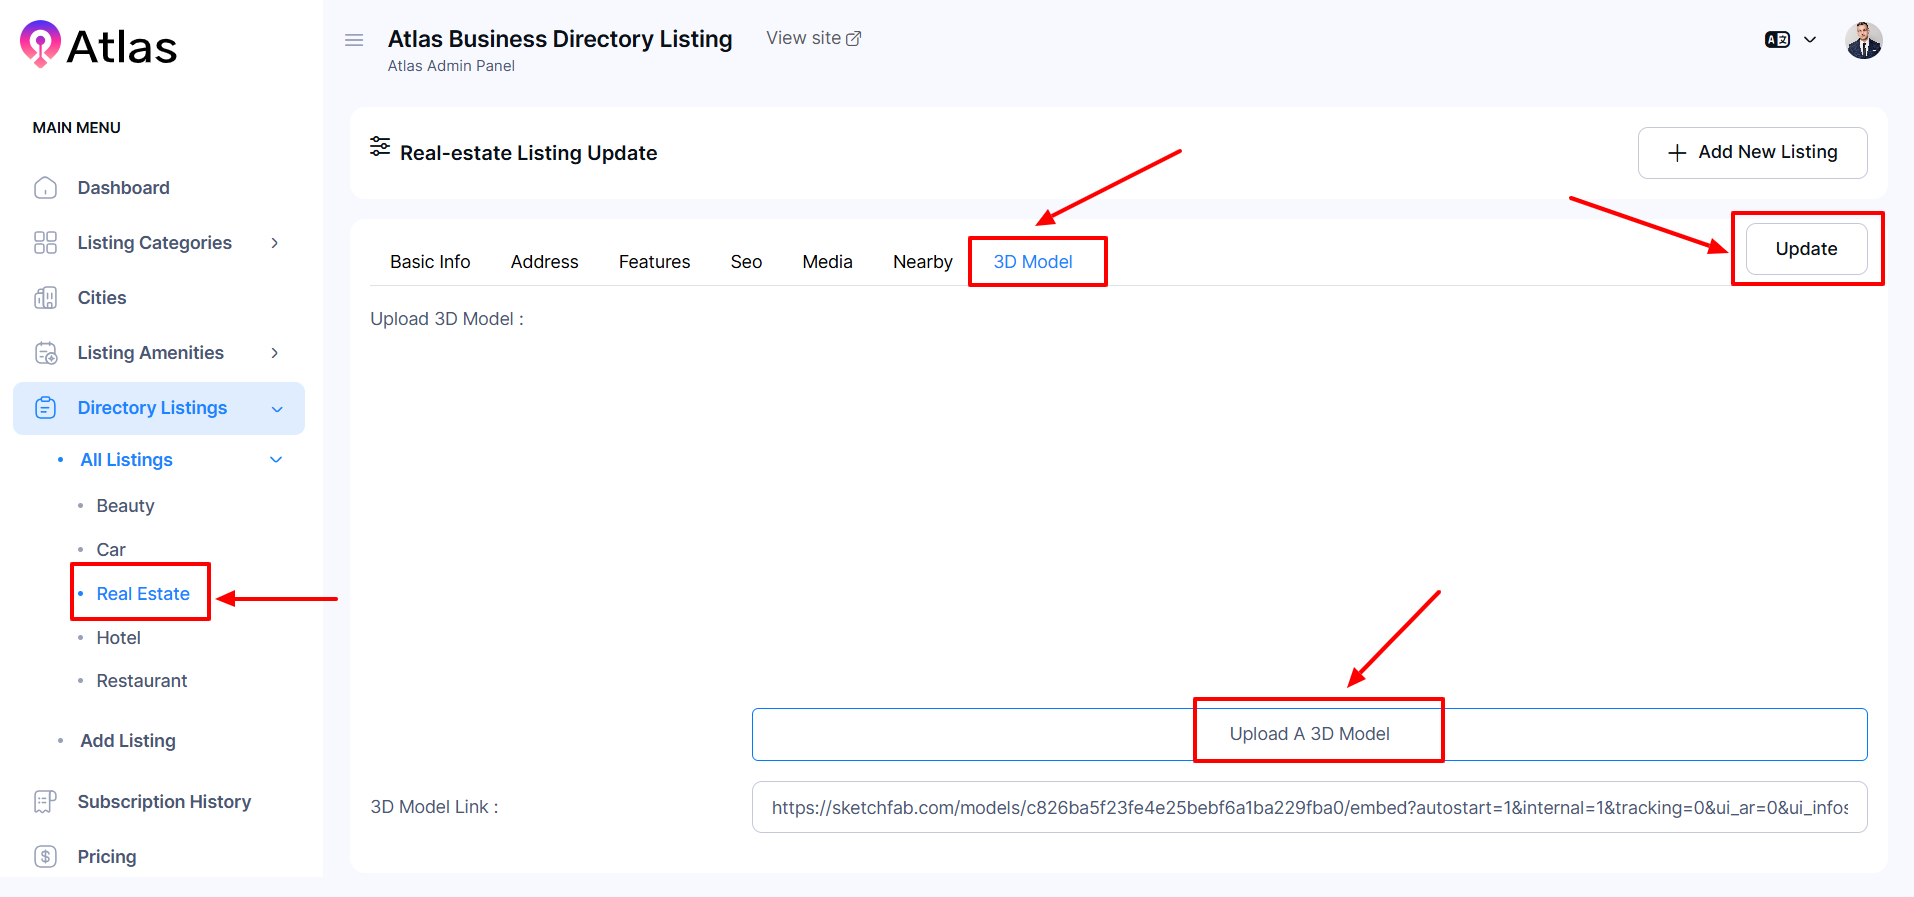
- In the 3D Model section:
-
Upload the 3D model image by clicking the 3D Model button.
-
Provide the 3D model link in the 3D Model Link field.
-
- Click the Update button to save all the provided information.
How to Edit a Hotel
- Log in to the Admin and access the Dashboard from the Admin Panel.
- Navigate to Directory Listings from the left menu and select All Listings.
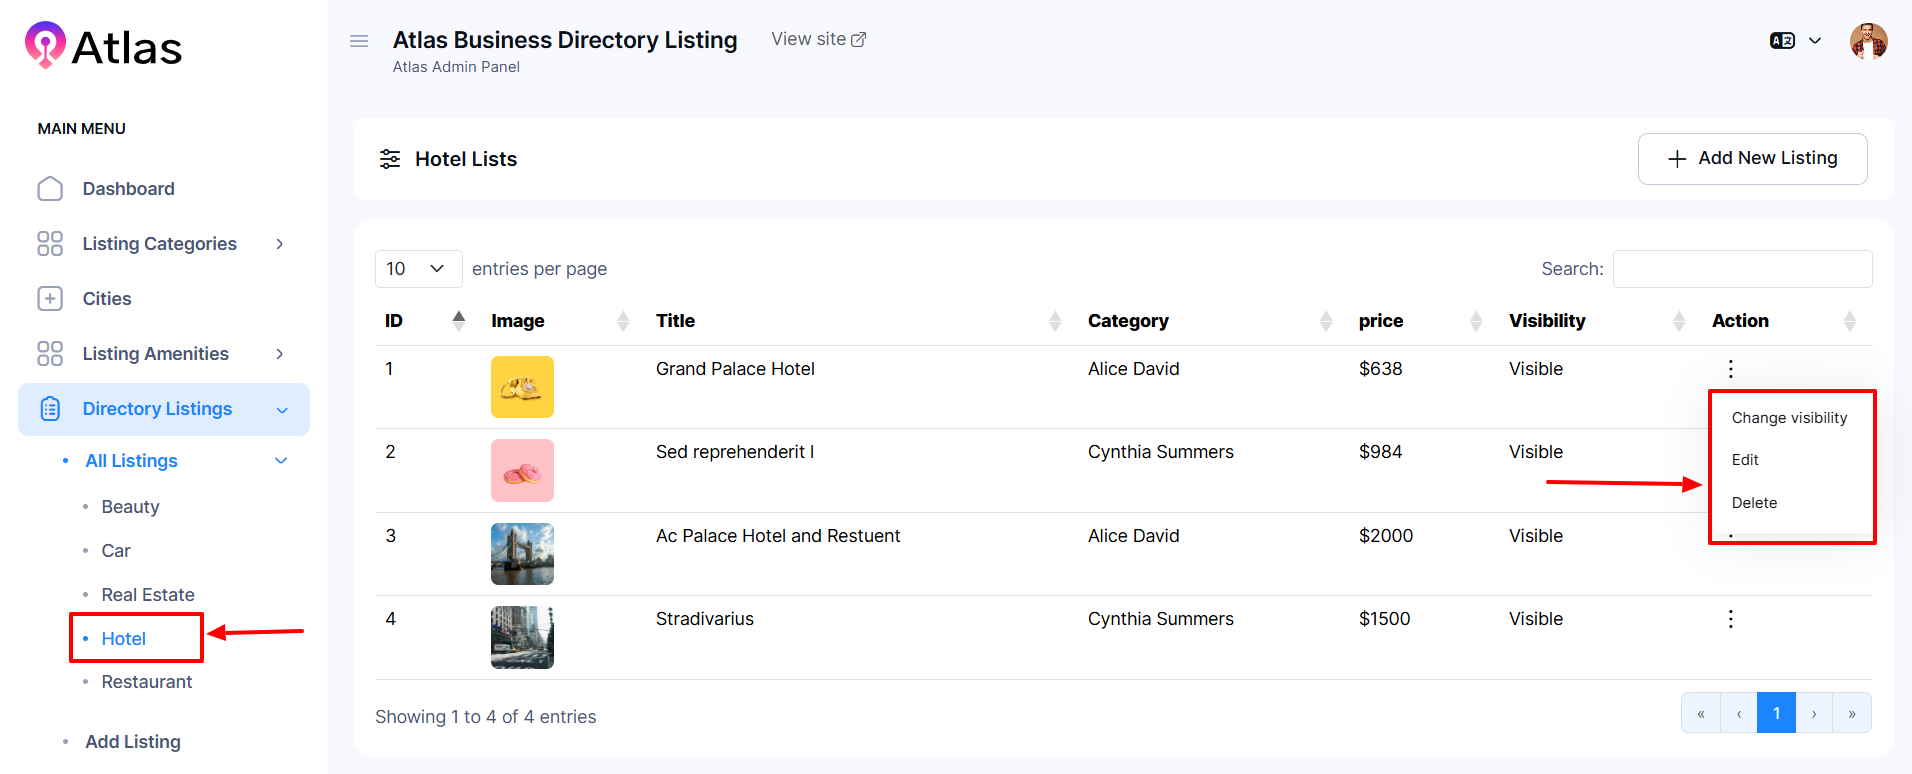
- Click on Hotel from the left menu.
- Click the Action button (three dots) to open a menu with the options to change Visibility, Edit, and Delete.
- Select Edit to open the entry form.
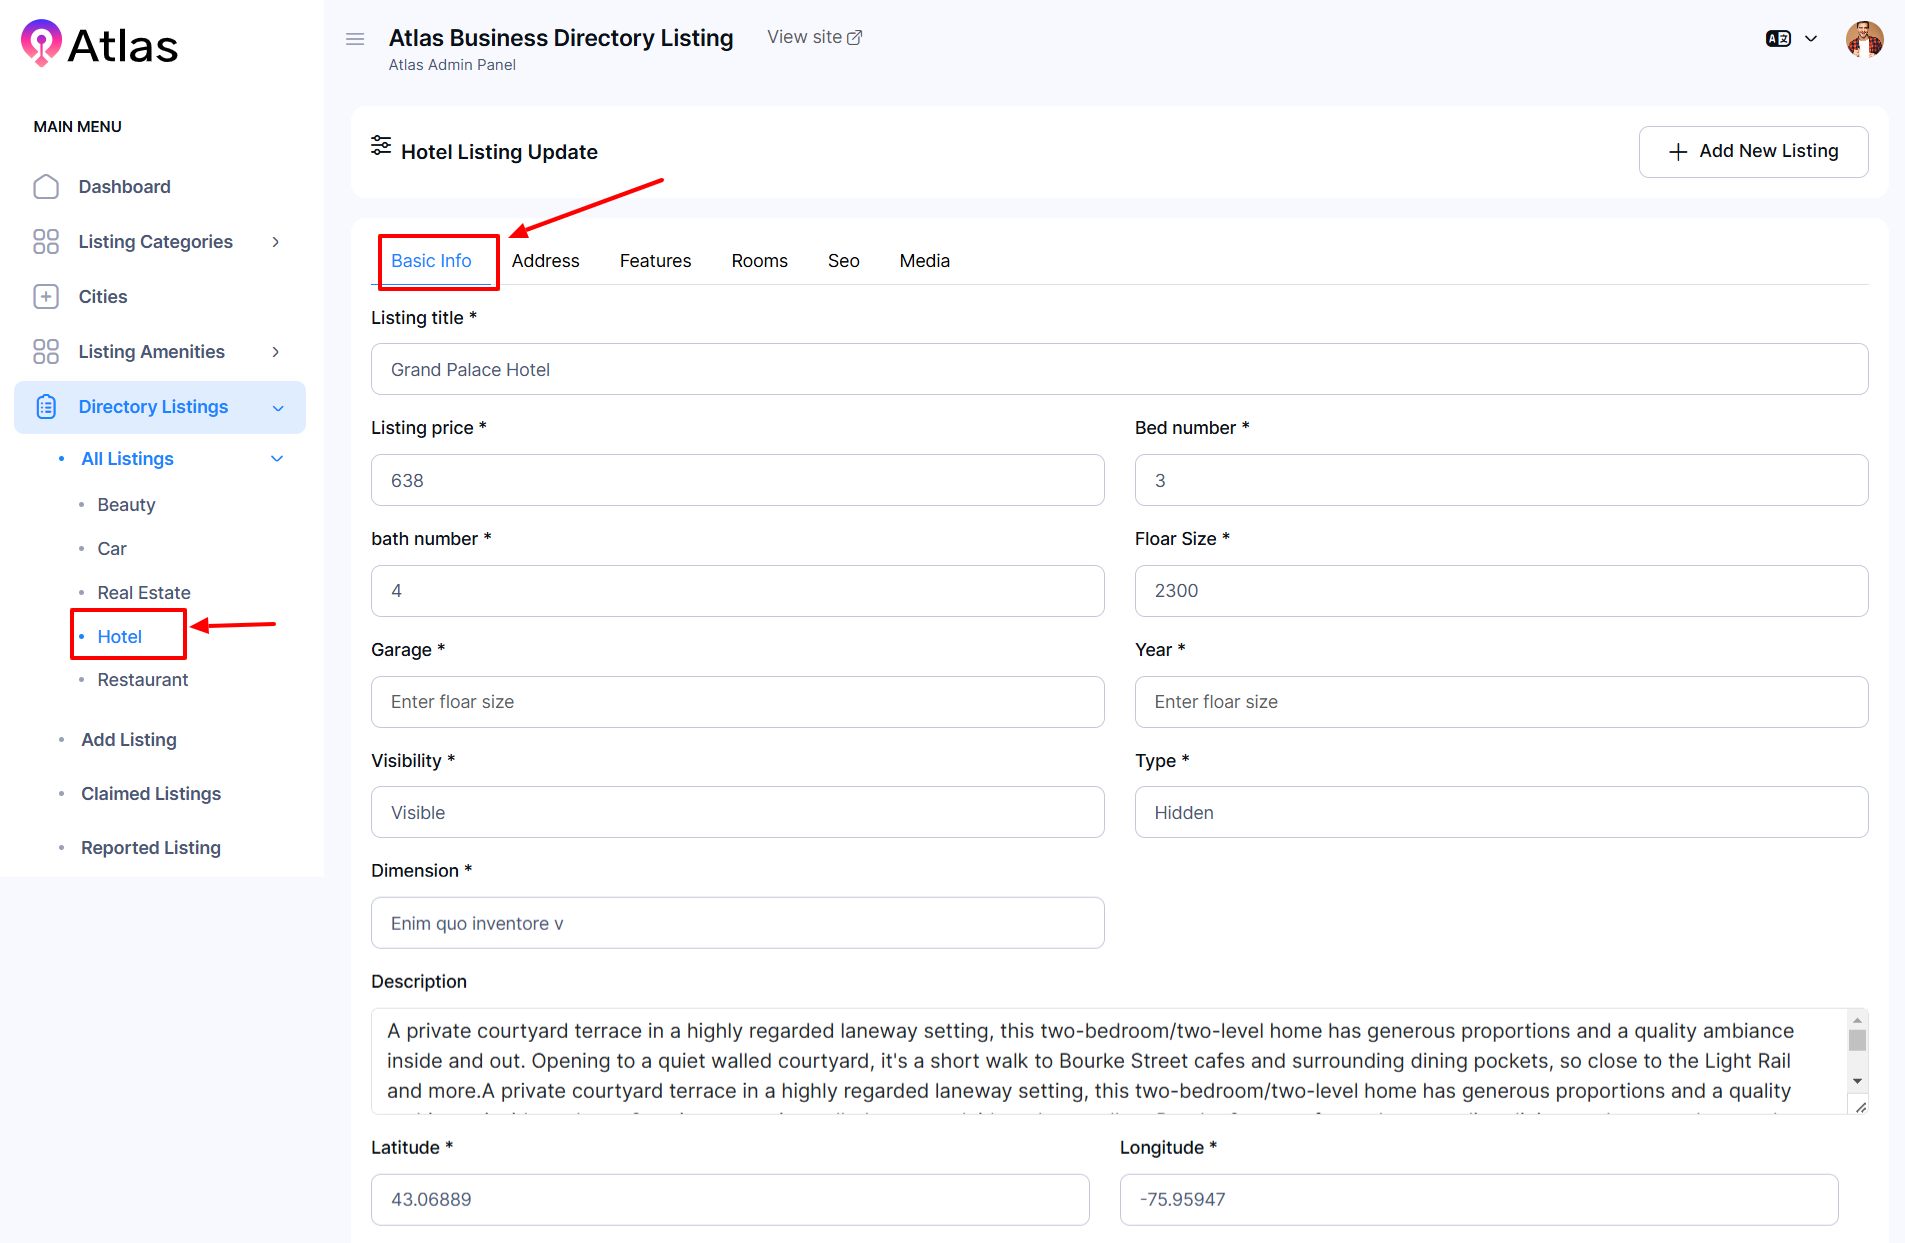
- In the Basic Info section:
-
-
Enter the listing title in the Listing Title field.
-
Please select the Listing Price, Bed Number, Bath Number, Floor size, Garage, Year, Visibility, Type, and Dimension from the dropdown menu or type if necessary.
-
Type the desired description in the Description field.
-
Input the latitude and longitude values in their respective fields.
-
-
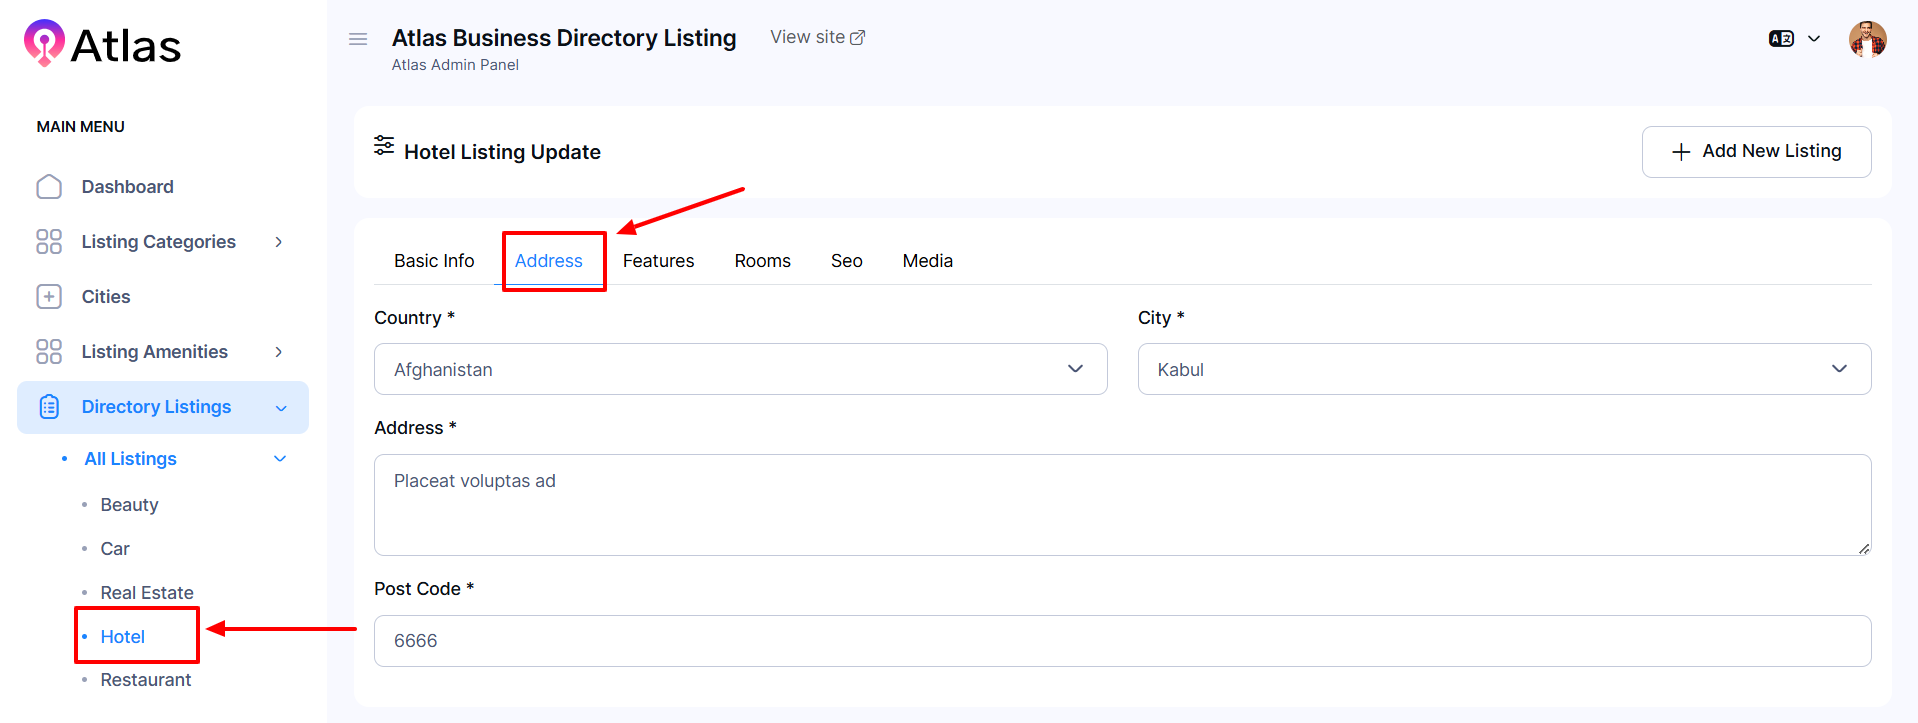
- In the Address section:
-
-
Select Country from the Country dropdown menu.
-
Choose City from the City dropdown menu.
-
Put the Address in the Address field.
-
Type the postcode in the Post Code field.
-
-
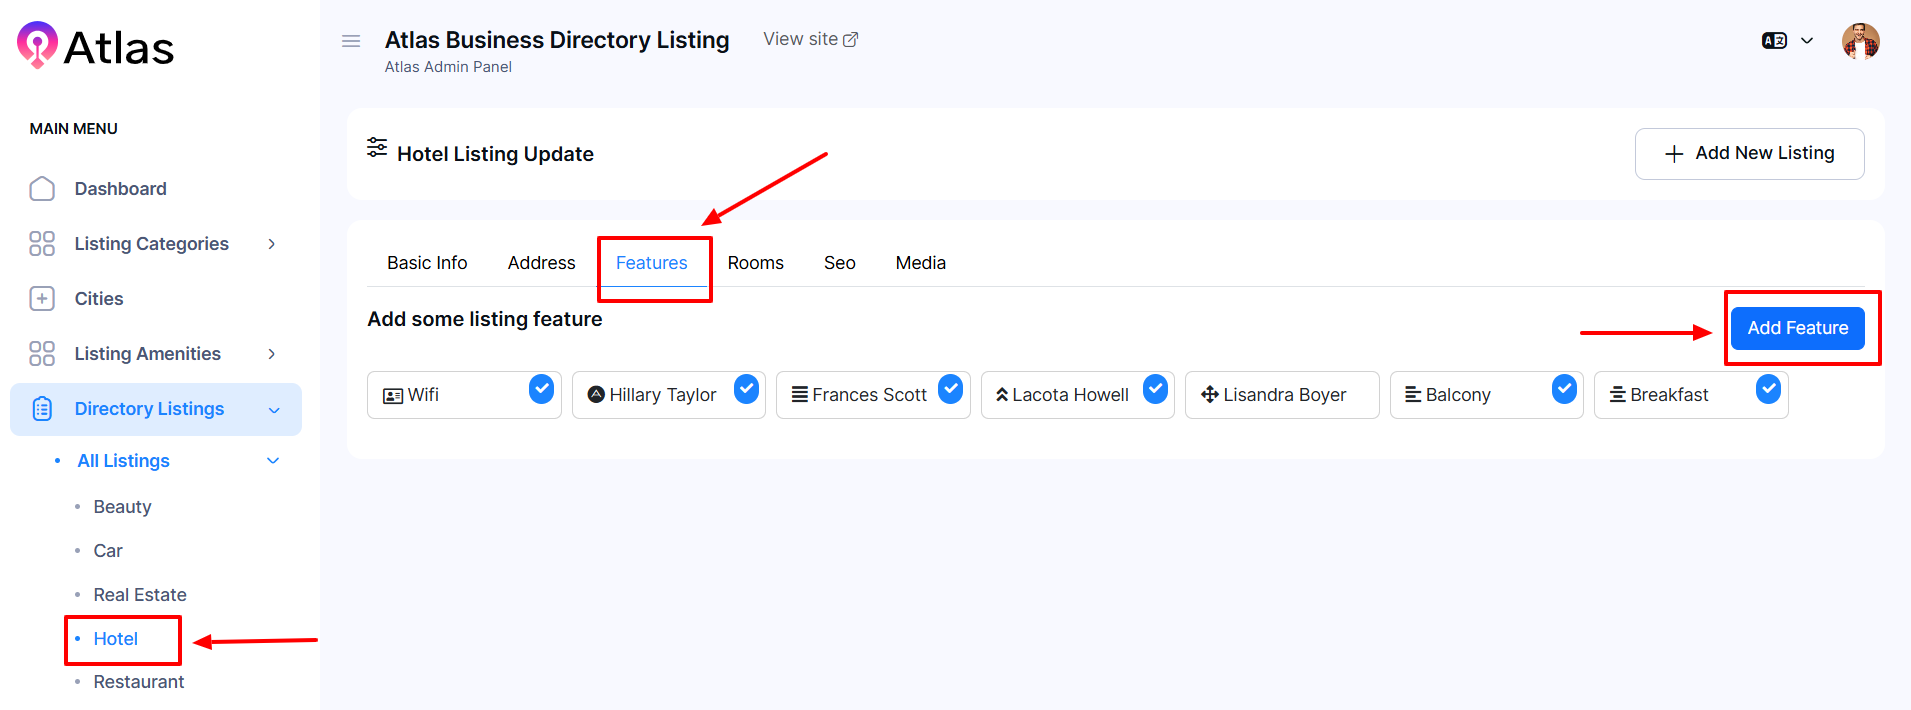
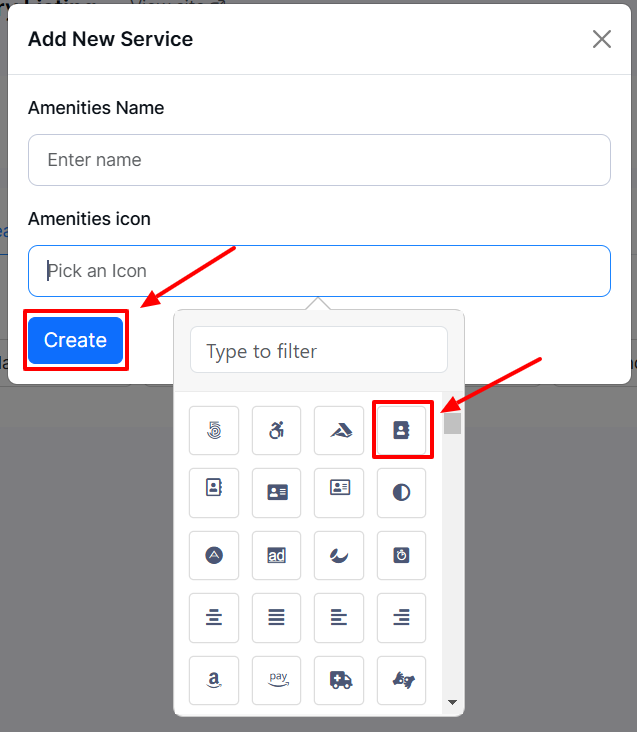
- Click the Features button to pop up a window.
- Click Add Feature to create a new feature:
-
-
Enter the Amenities Name in the Amenities Name field.
-
Choose the Amenities Icon from the Amenities Icon field.
-
Click the Create button to save the feature details.
-
-
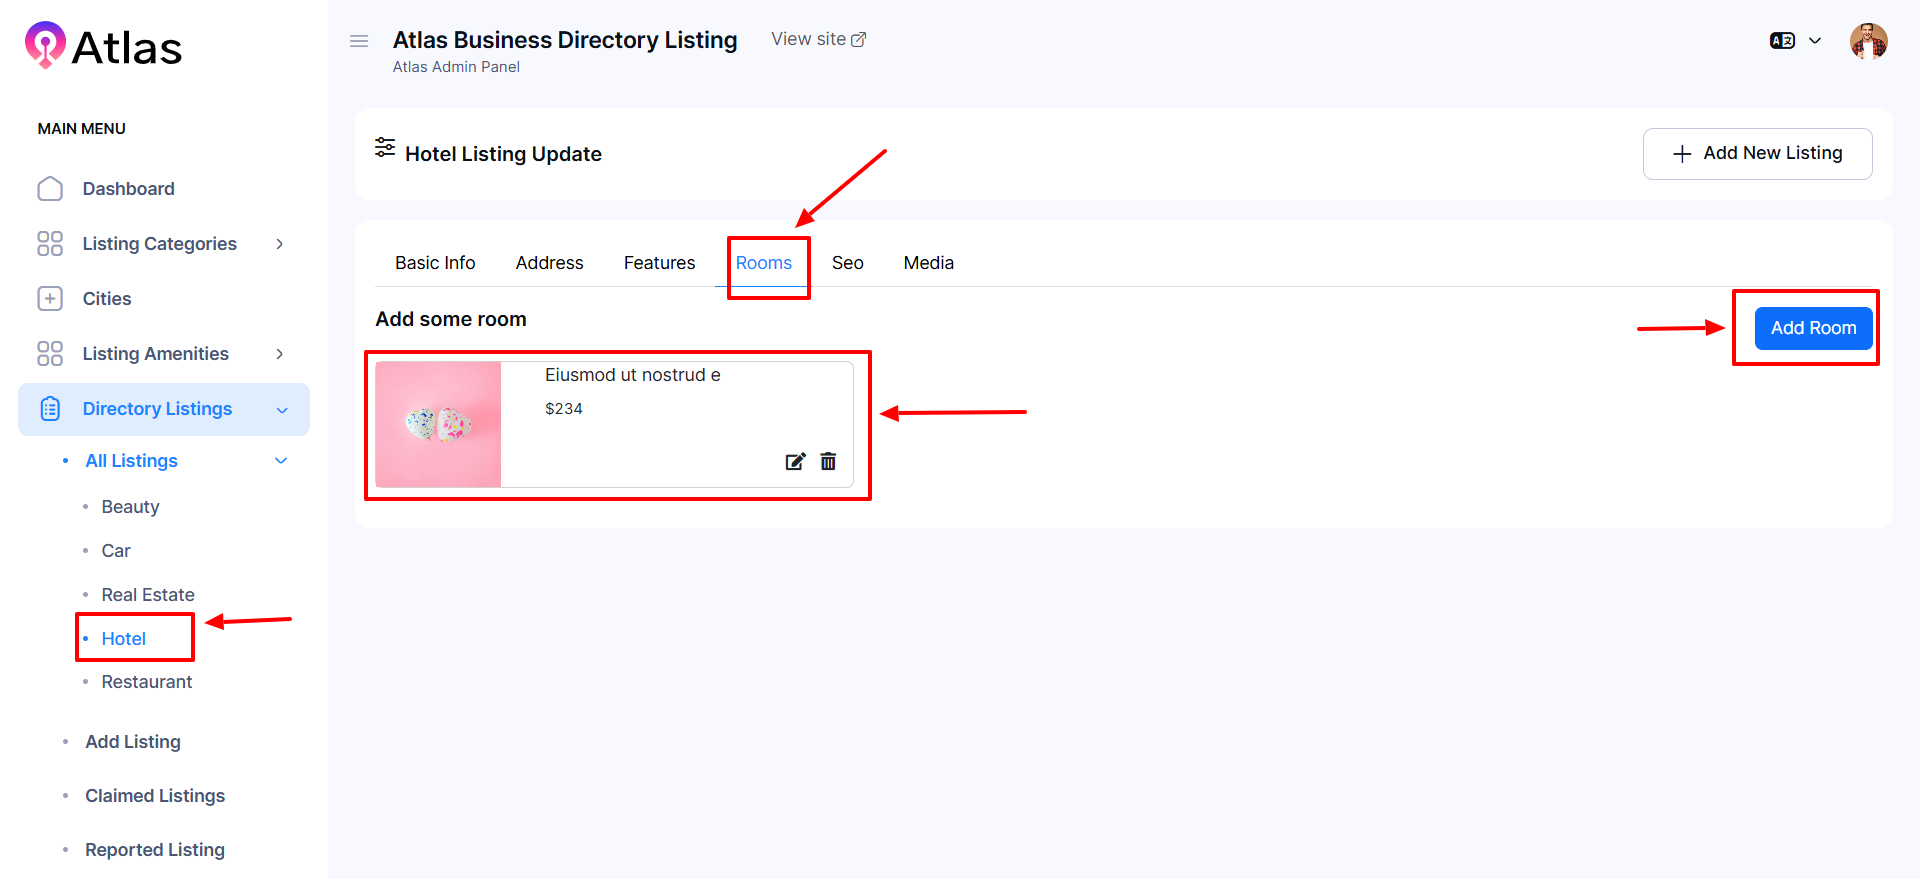
- Click the Rooms button to pop up a window.
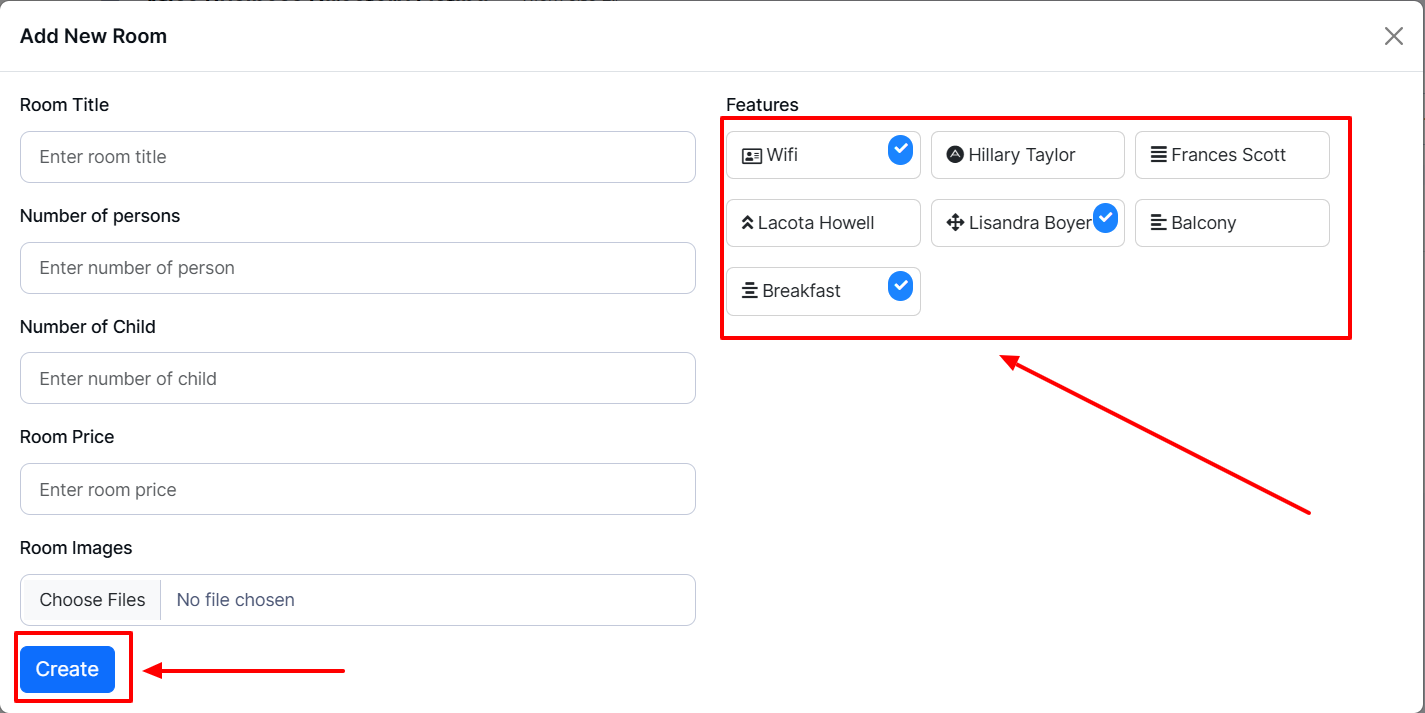
- Click Add Room to create a new Room:
-
-
Enter the Room Title in the Room Title field.
-
Choose the Number of Persons from the Number of Persons dropdown menu or type.
-
Select the Number of Children from the Number of Children dropdown menu or type.
-
Type Room Price in the Room Price field or select from the dropdown menu.
-
In the Room Image section, click Choose File to upload a relevant image.
-
Click and Tik Mark on the feature as you require.
-
Click the Create button to save the feature details.
-
-
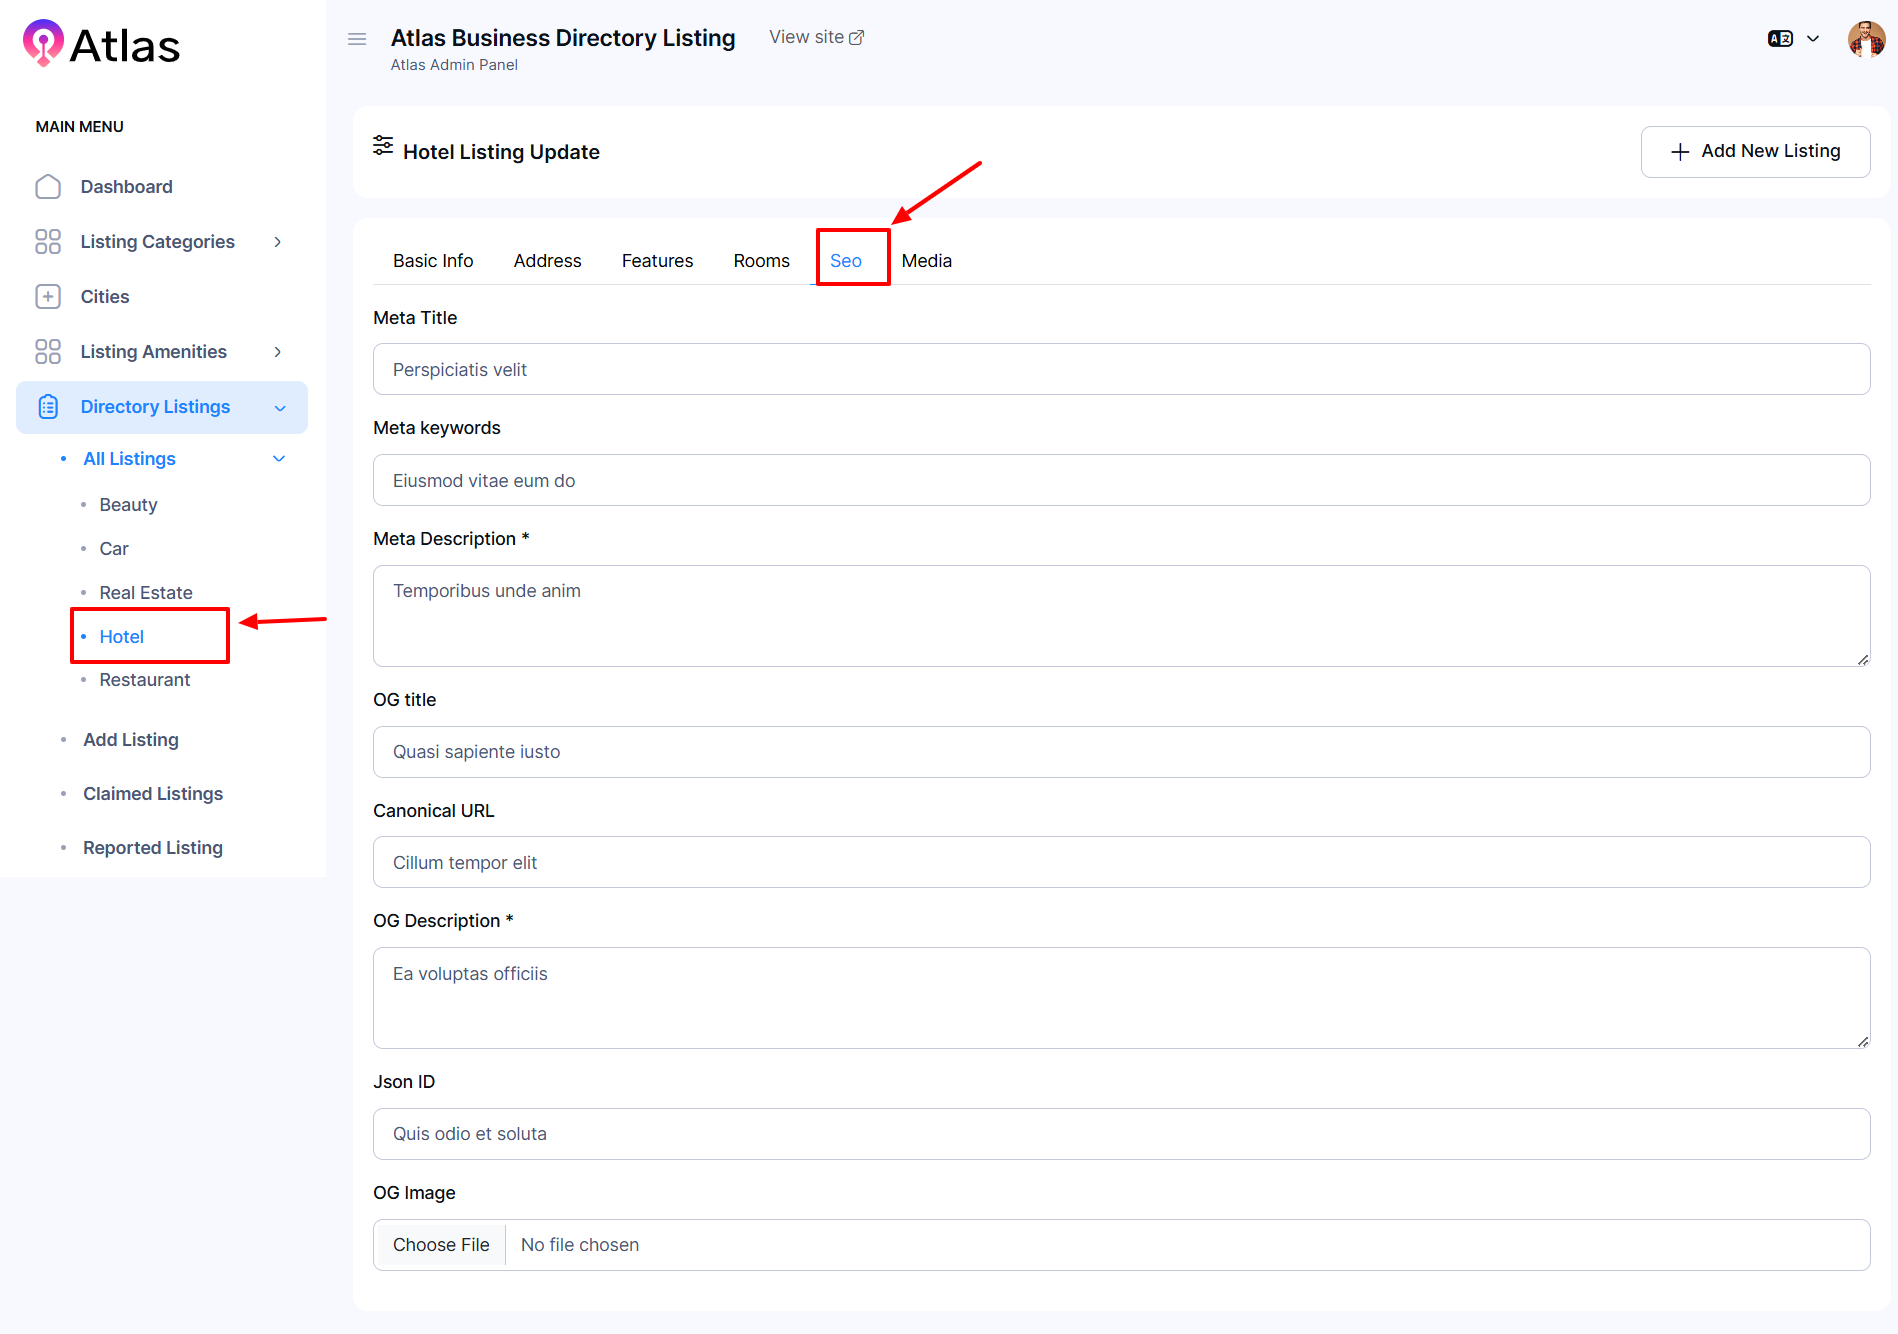
- In the SEO section:
-
-
-
Fill in the fields for Meta Title, Meta Keywords, Meta Description, Og Title, Canonical URL, Og Description, and Json ID.
-
In the Image section, click Choose File to upload a relevant image.
-
-
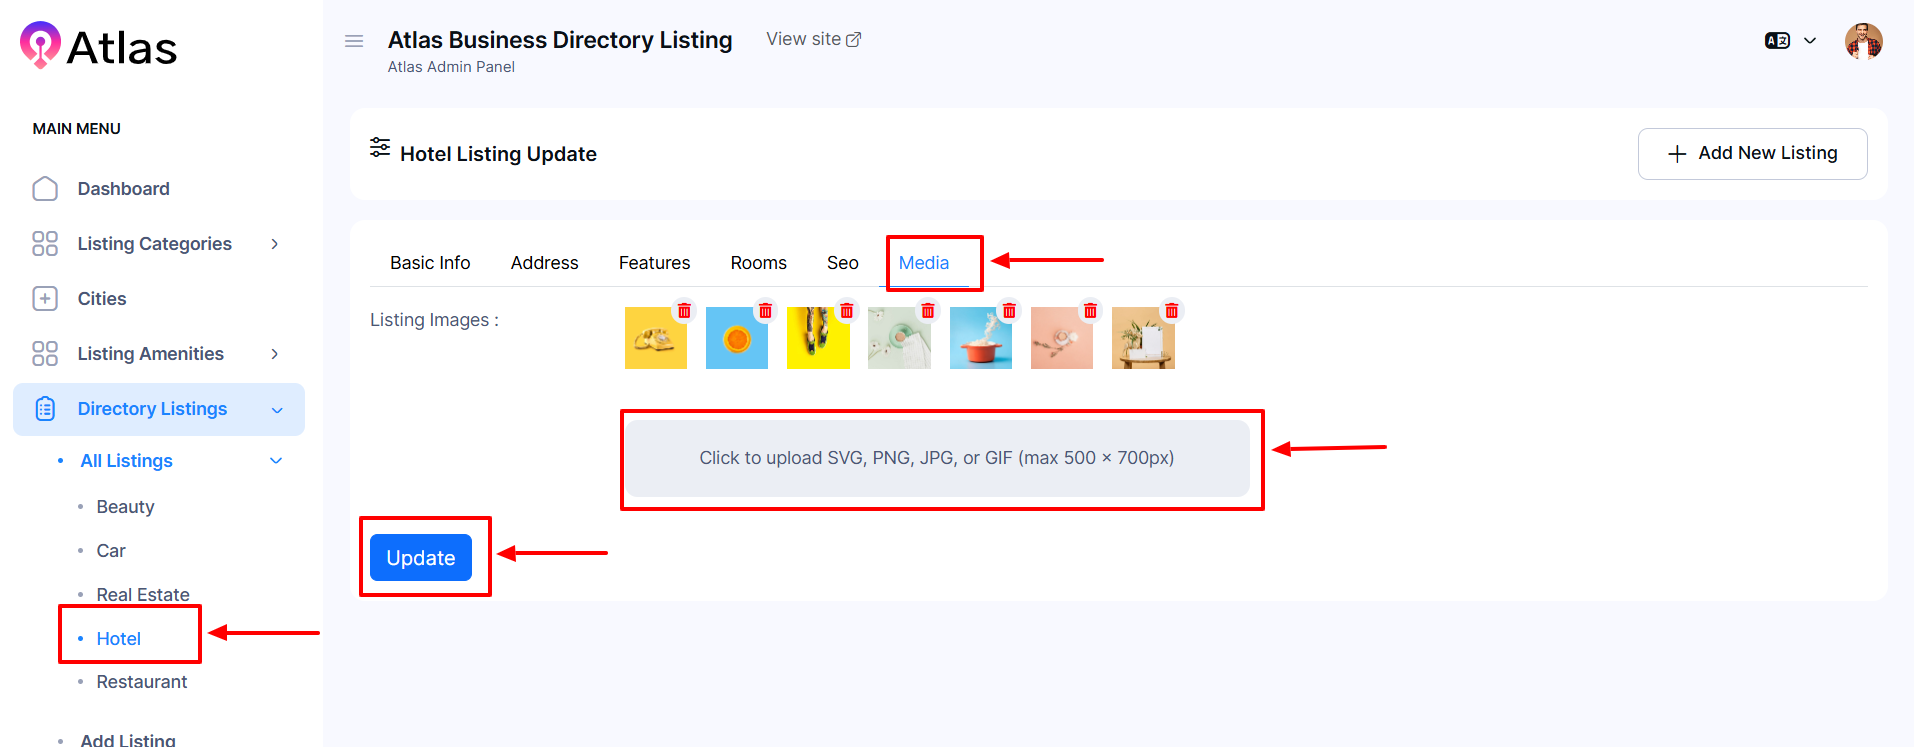
- In the Media section:
-
- Upload a listing image and add a video link in the Preview Video field, which is applicable.
-
- Finally, click the Update button to save the new listing with all the provided information.
How to Edit a Restaurant
- Log in to the Admin and access the Dashboard from the Admin Panel.
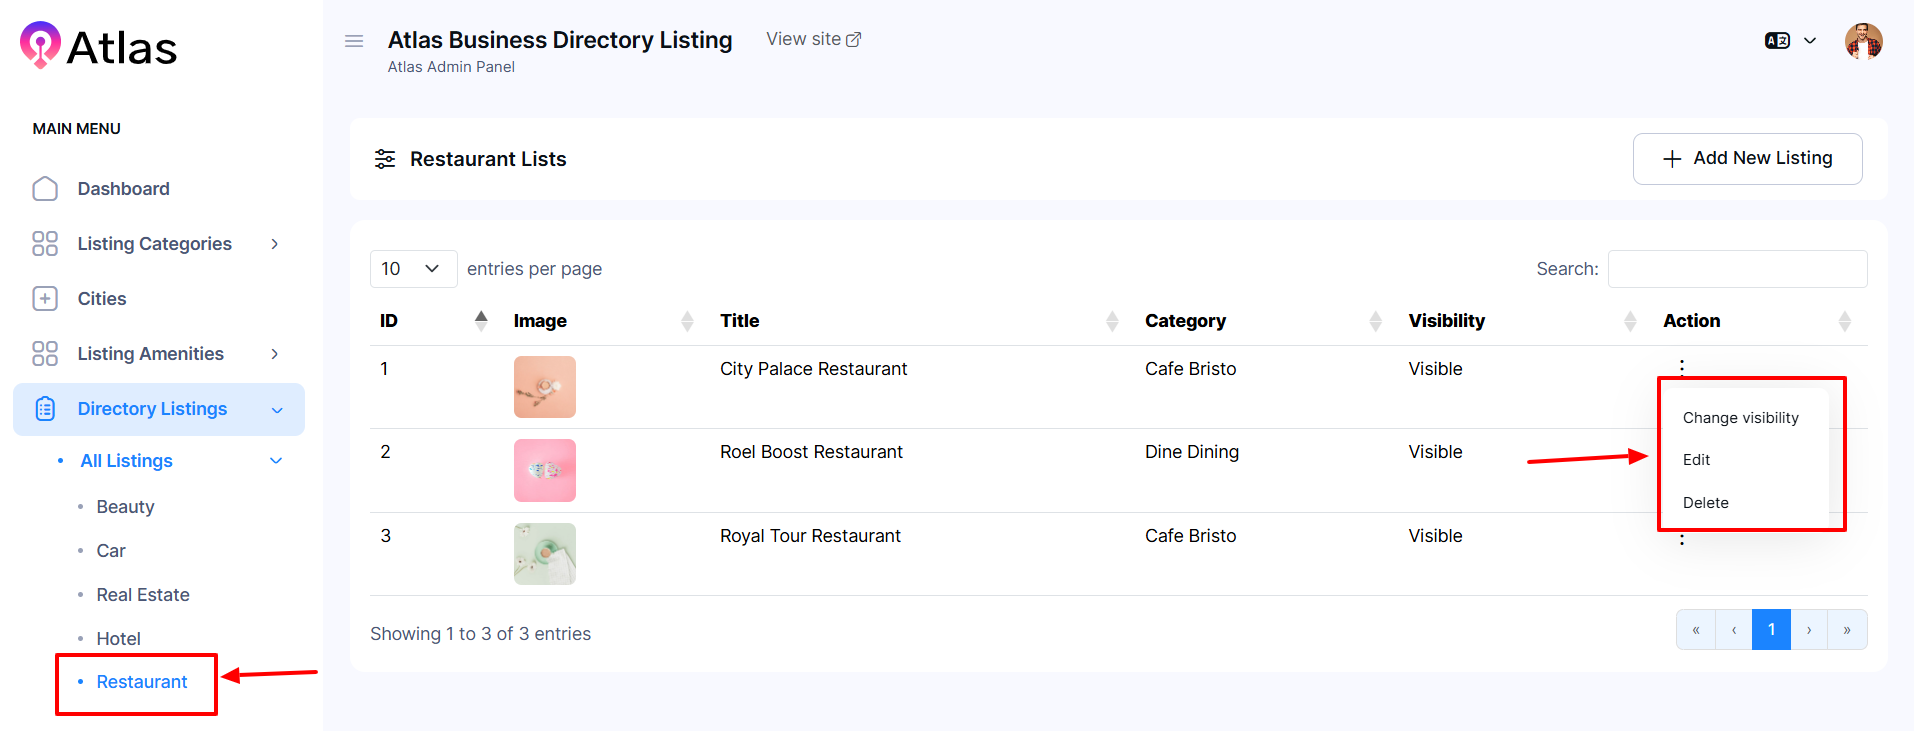
- Navigate to Directory Listings from the left menu and select All Listings.
- Click on Restaurant from the left menu.
- Click the Action button (three dots) to open a menu with the options to change Visibility, Edit, and Delete.
- Select Edit to open the entry form.
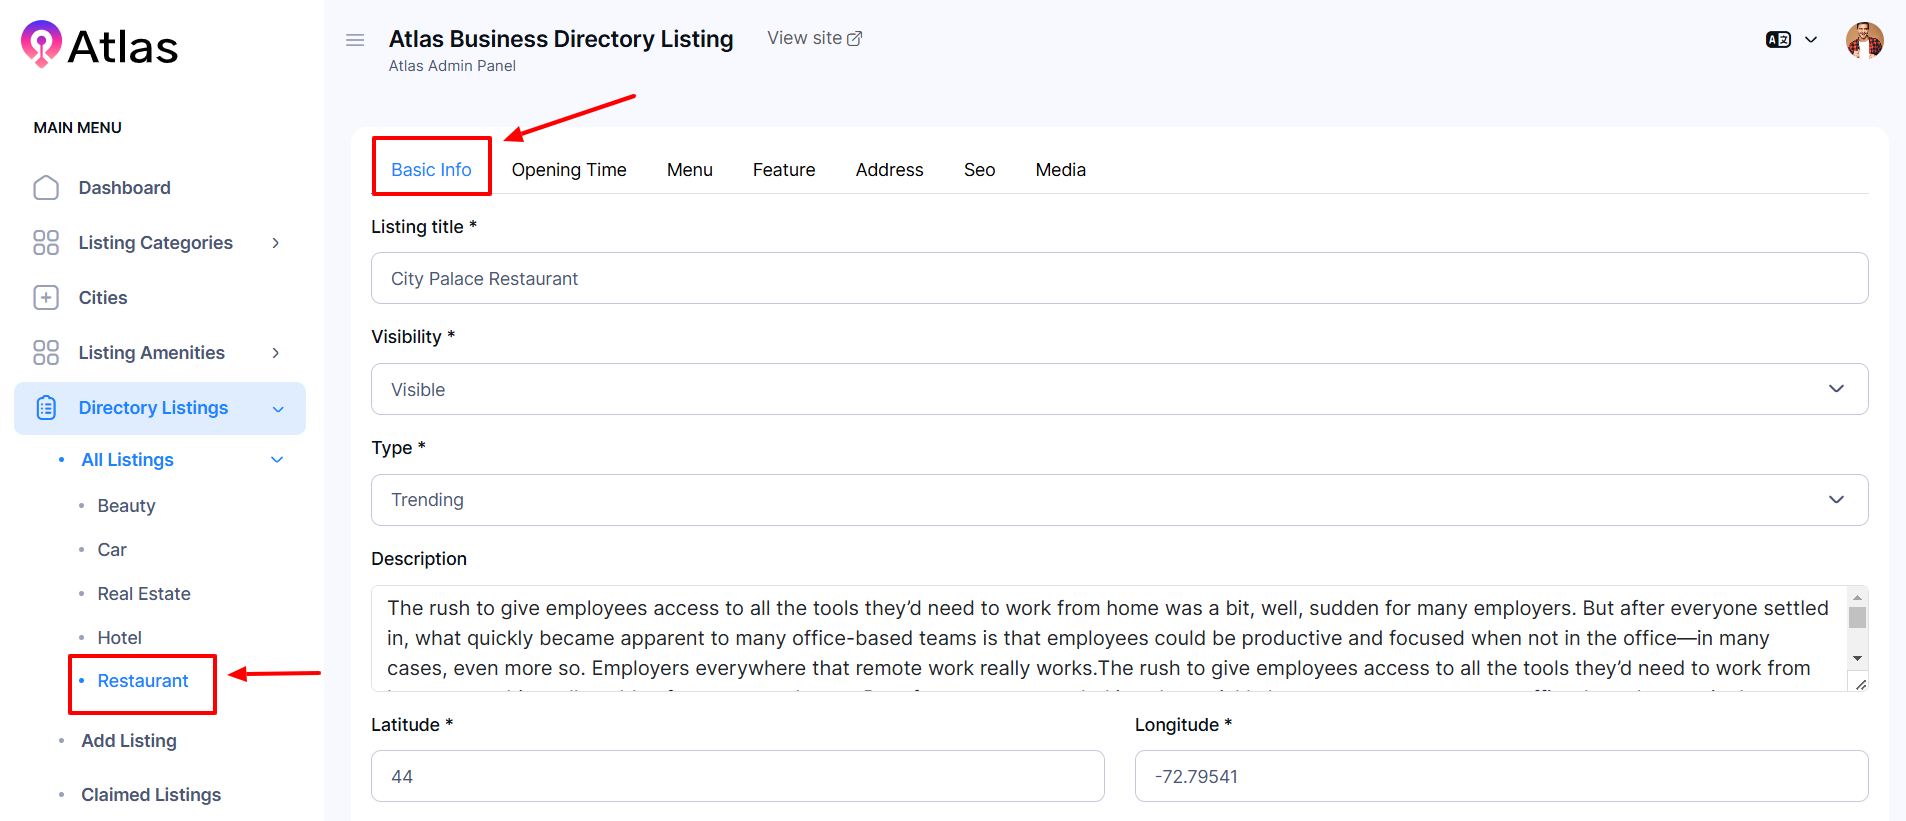
- In the Basic Info section:
-
-
Enter the listing title in the Listing Title field.
-
Select the Visibility from the Visibility dropdown menu.
-
Choose the Type from the Type dropdown menu.
-
Type the desired description in the Description field.
-
Input the latitude and longitude values in their respective fields.
-
-
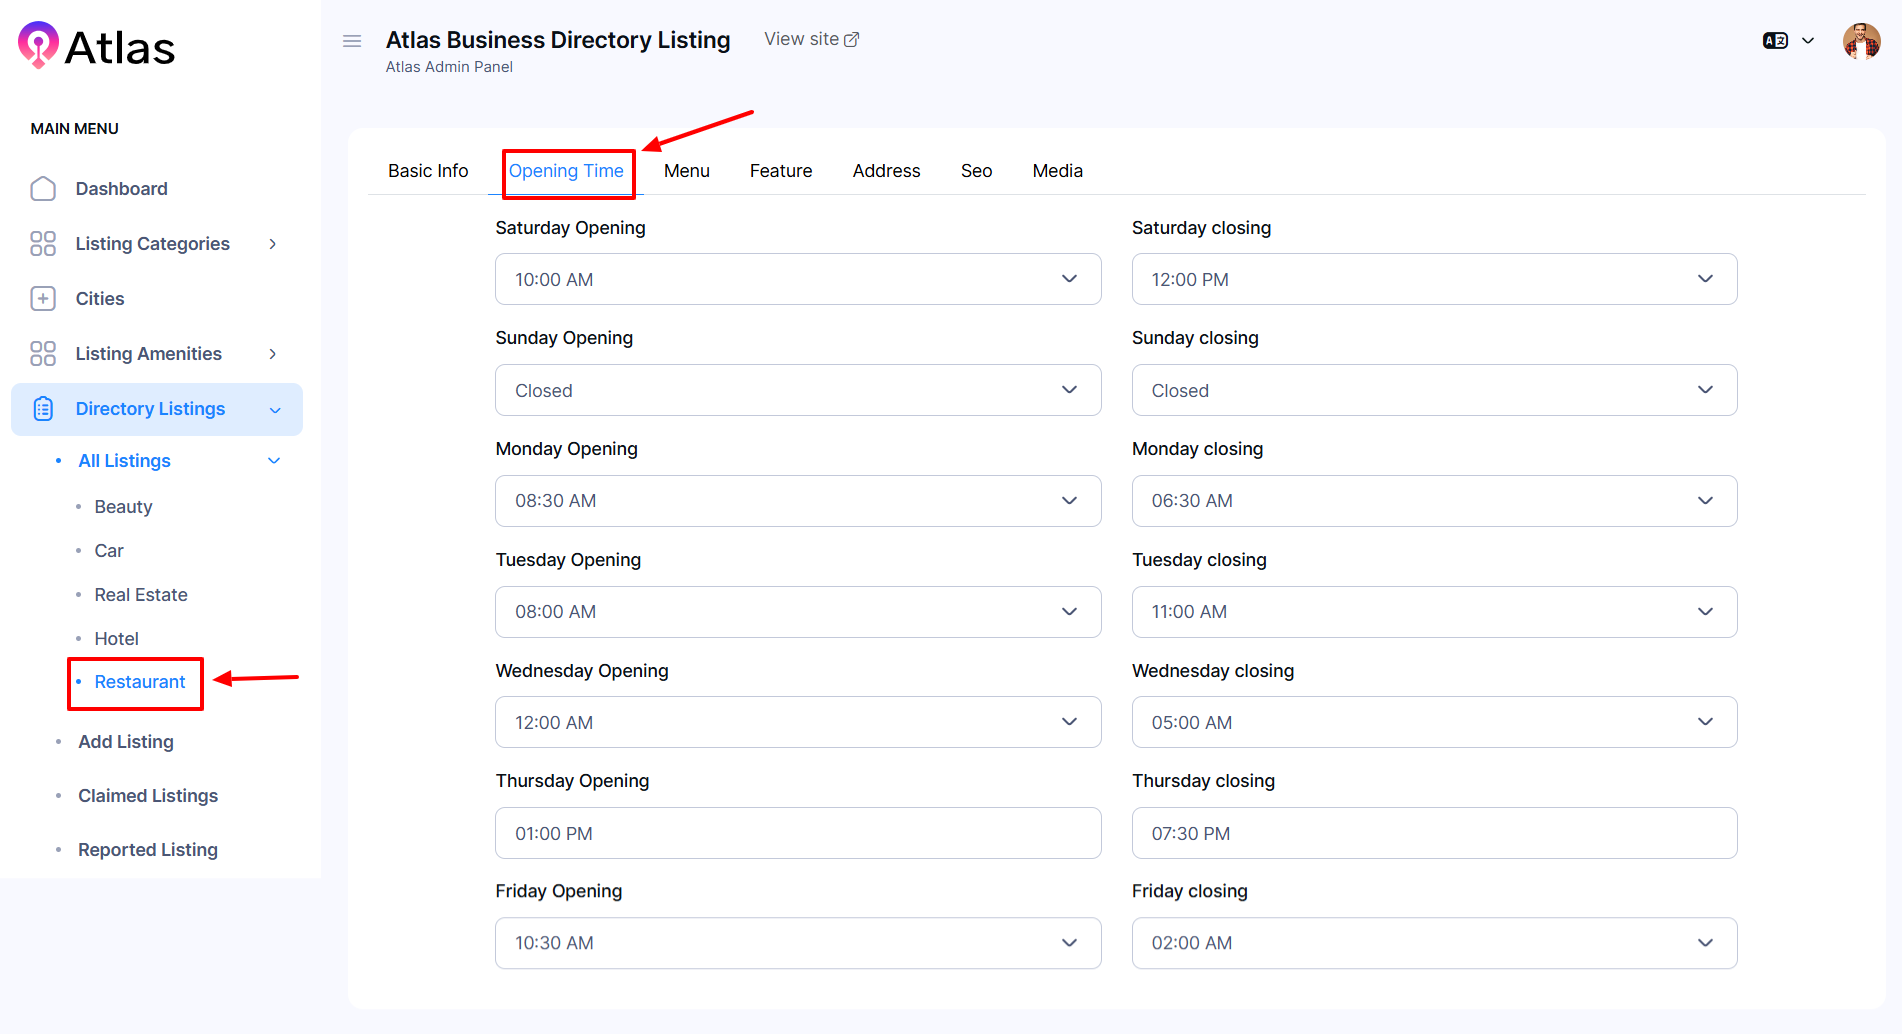
- Click the Opening Time button to manage working hours.
-
-
Choose the Time from the dropdown menu of the respective field.
-
-
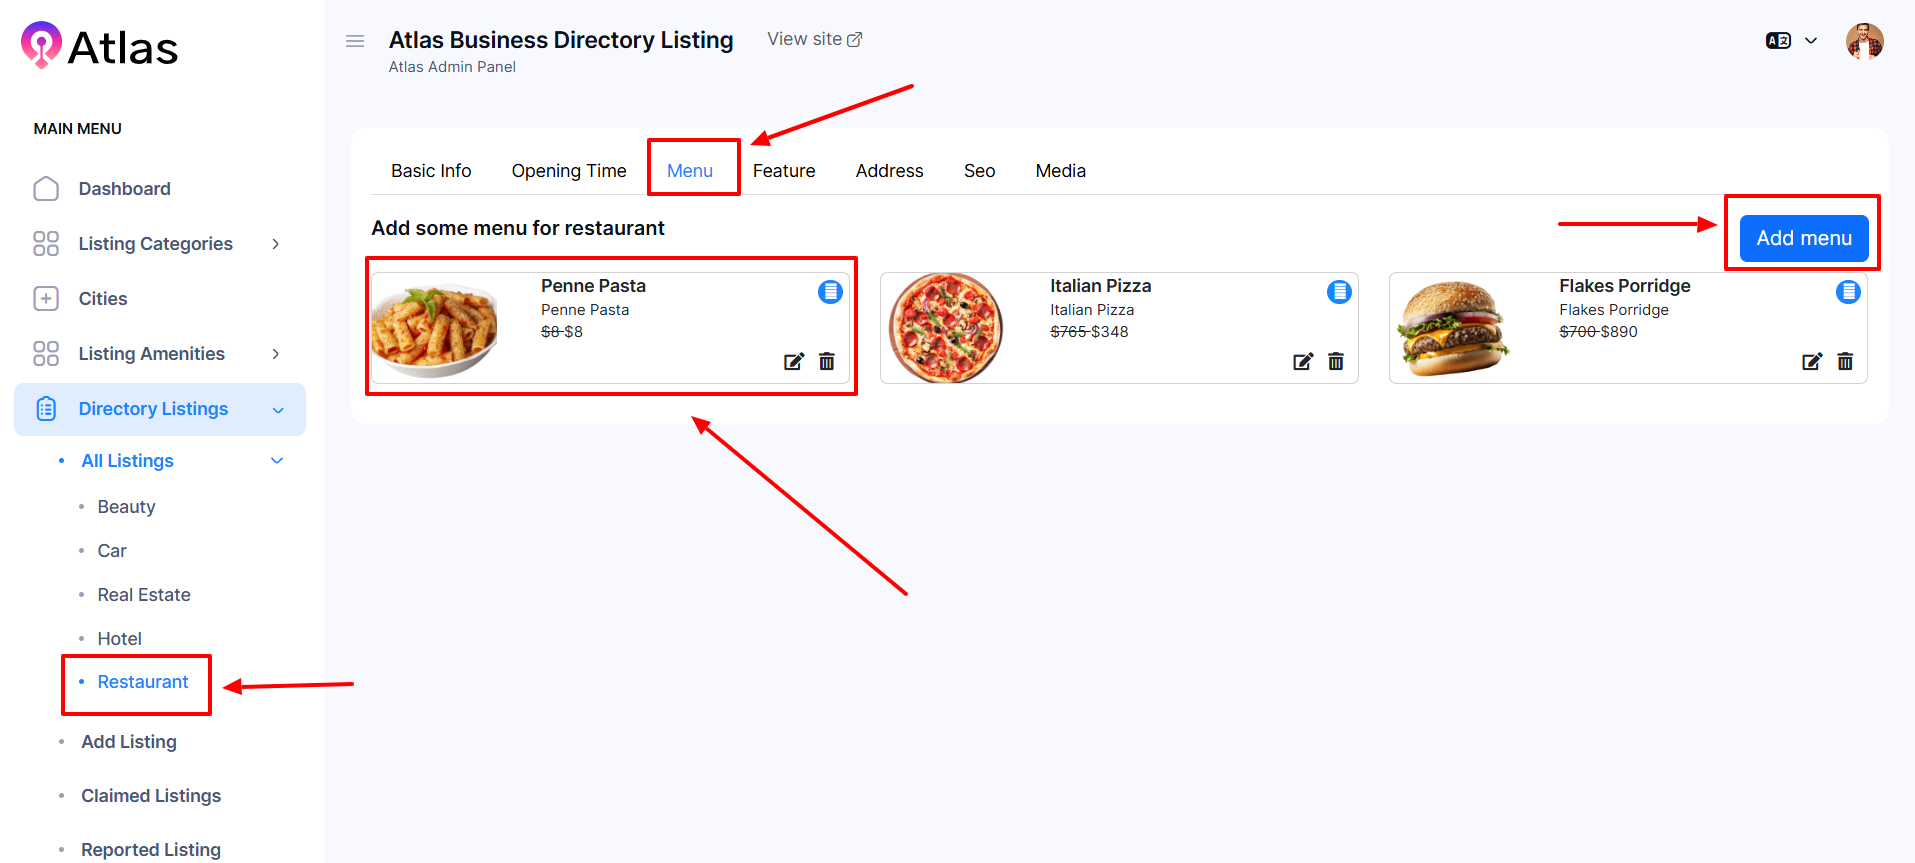
- Click the Menu to create a new Menu.
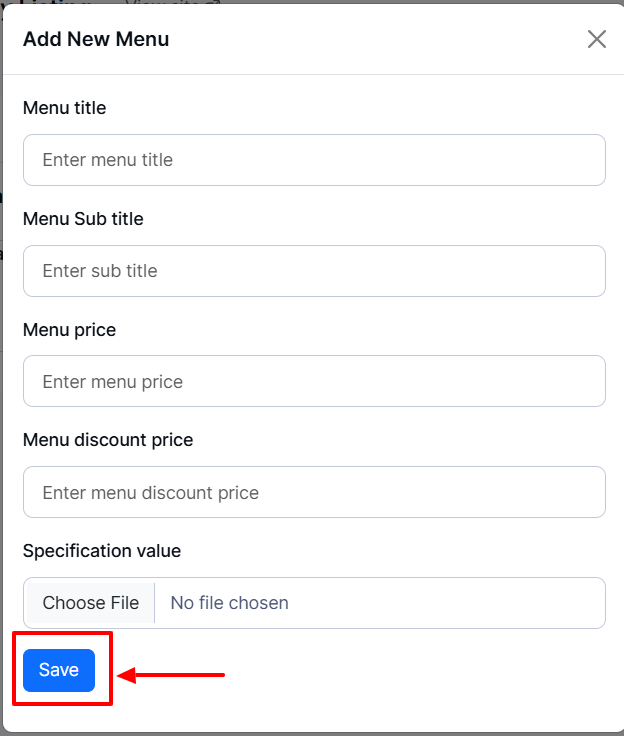
- Click the Add Menu button an entry form will pop up:
-
-
Enter the Menu Title in the Menu Title field.
-
Enter the Menu Sub-title in the Menu Sub-title field.
-
Put the Menu Price from the Menu Price field or pick from the dropdown menu.
-
Put the Menu Discount Price from the Discount Price field or pick from the dropdown menu.
-
In the Room Image section, click Choose File to upload a relevant image.
-
Click the Save button to save the menu details.
-
-
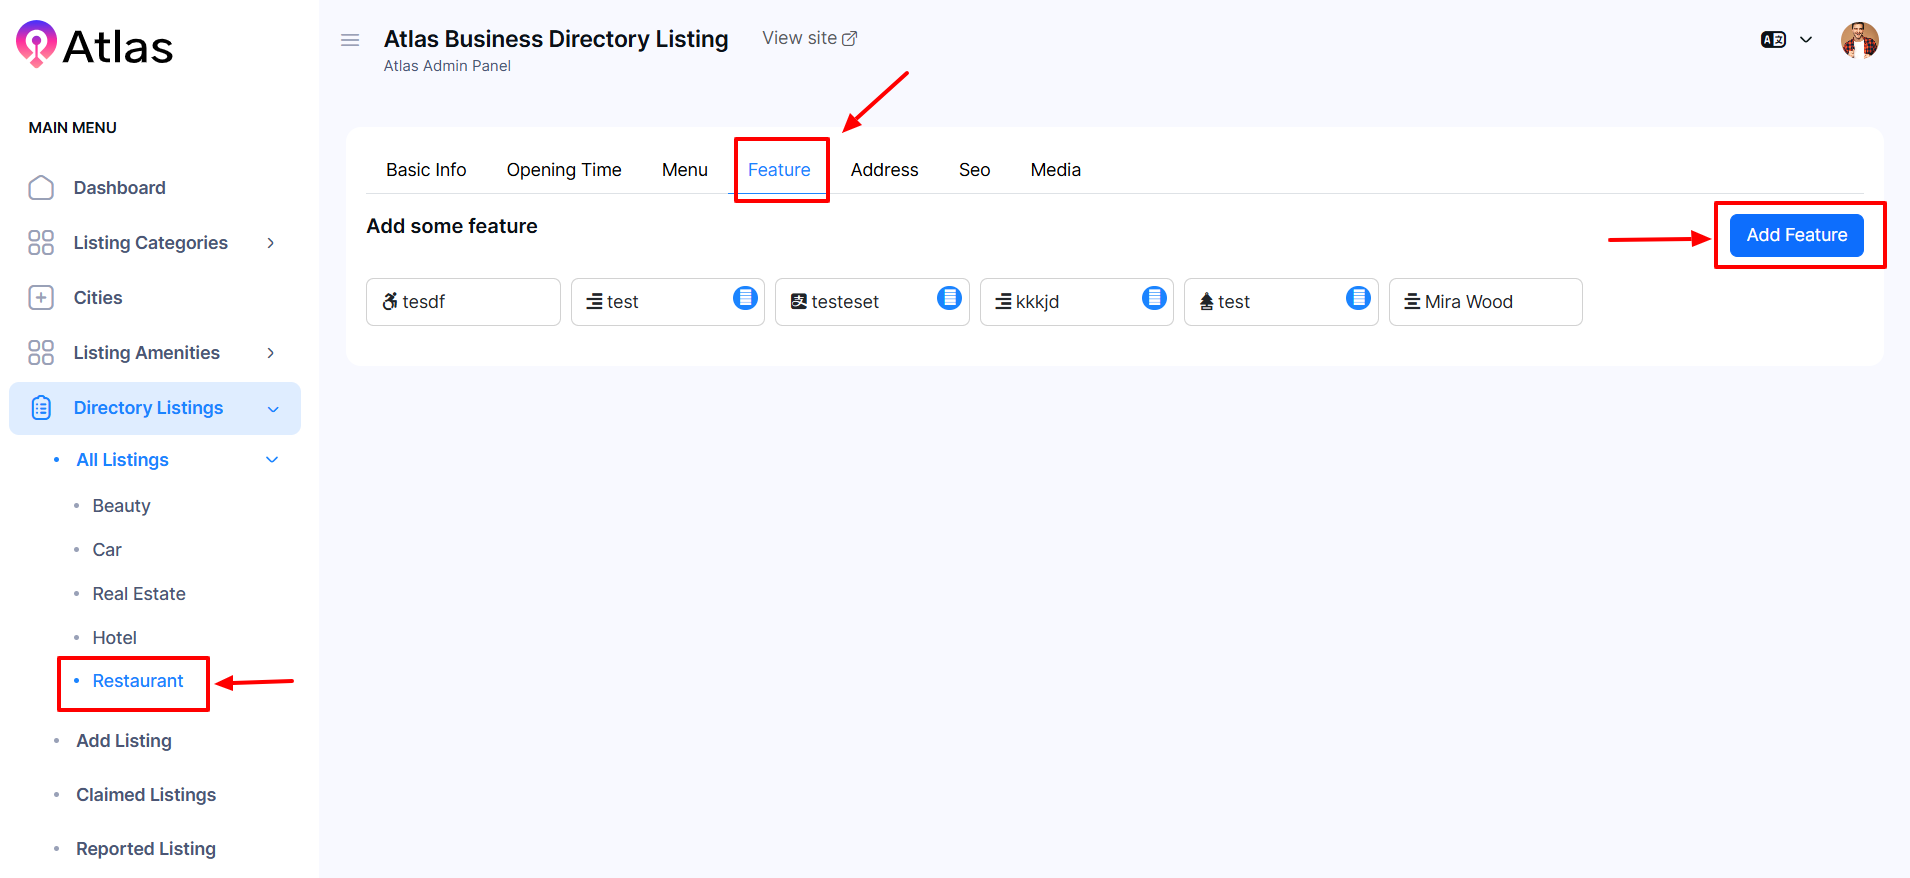
- Click the Features button to pop up a window.
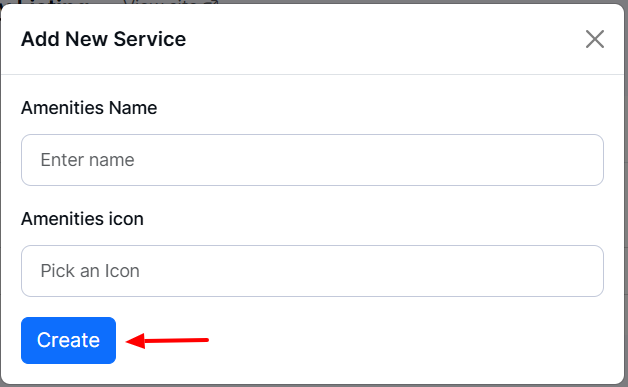
- Click Add Feature to create a new feature:
-
-
Enter the Amenities Name in the Amenities Name field.
-
Choose the Amenities Icon from the Amenities Icon field.
-
Click the Create button to save the feature details.
-
-
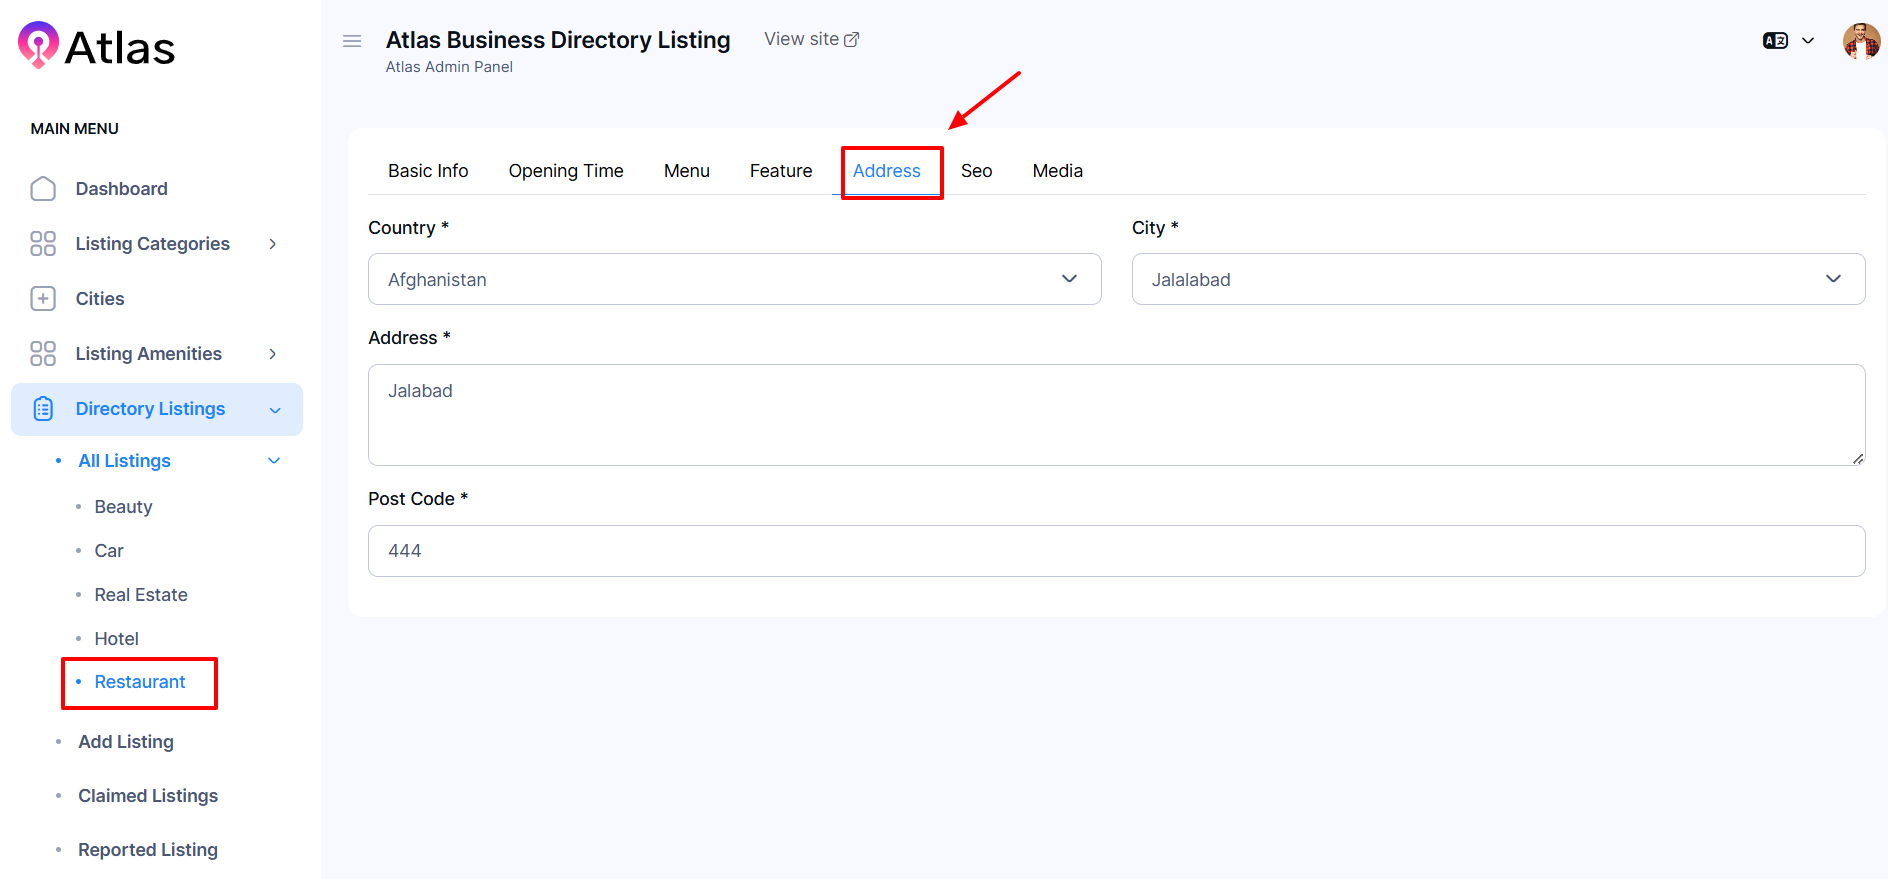
- In the Address section:
-
-
Select Country from the Country dropdown menu.
-
Choose City from the City dropdown menu.
-
Put the Address in the Address field.
-
Type the postcode in the Post Code field.
-
-
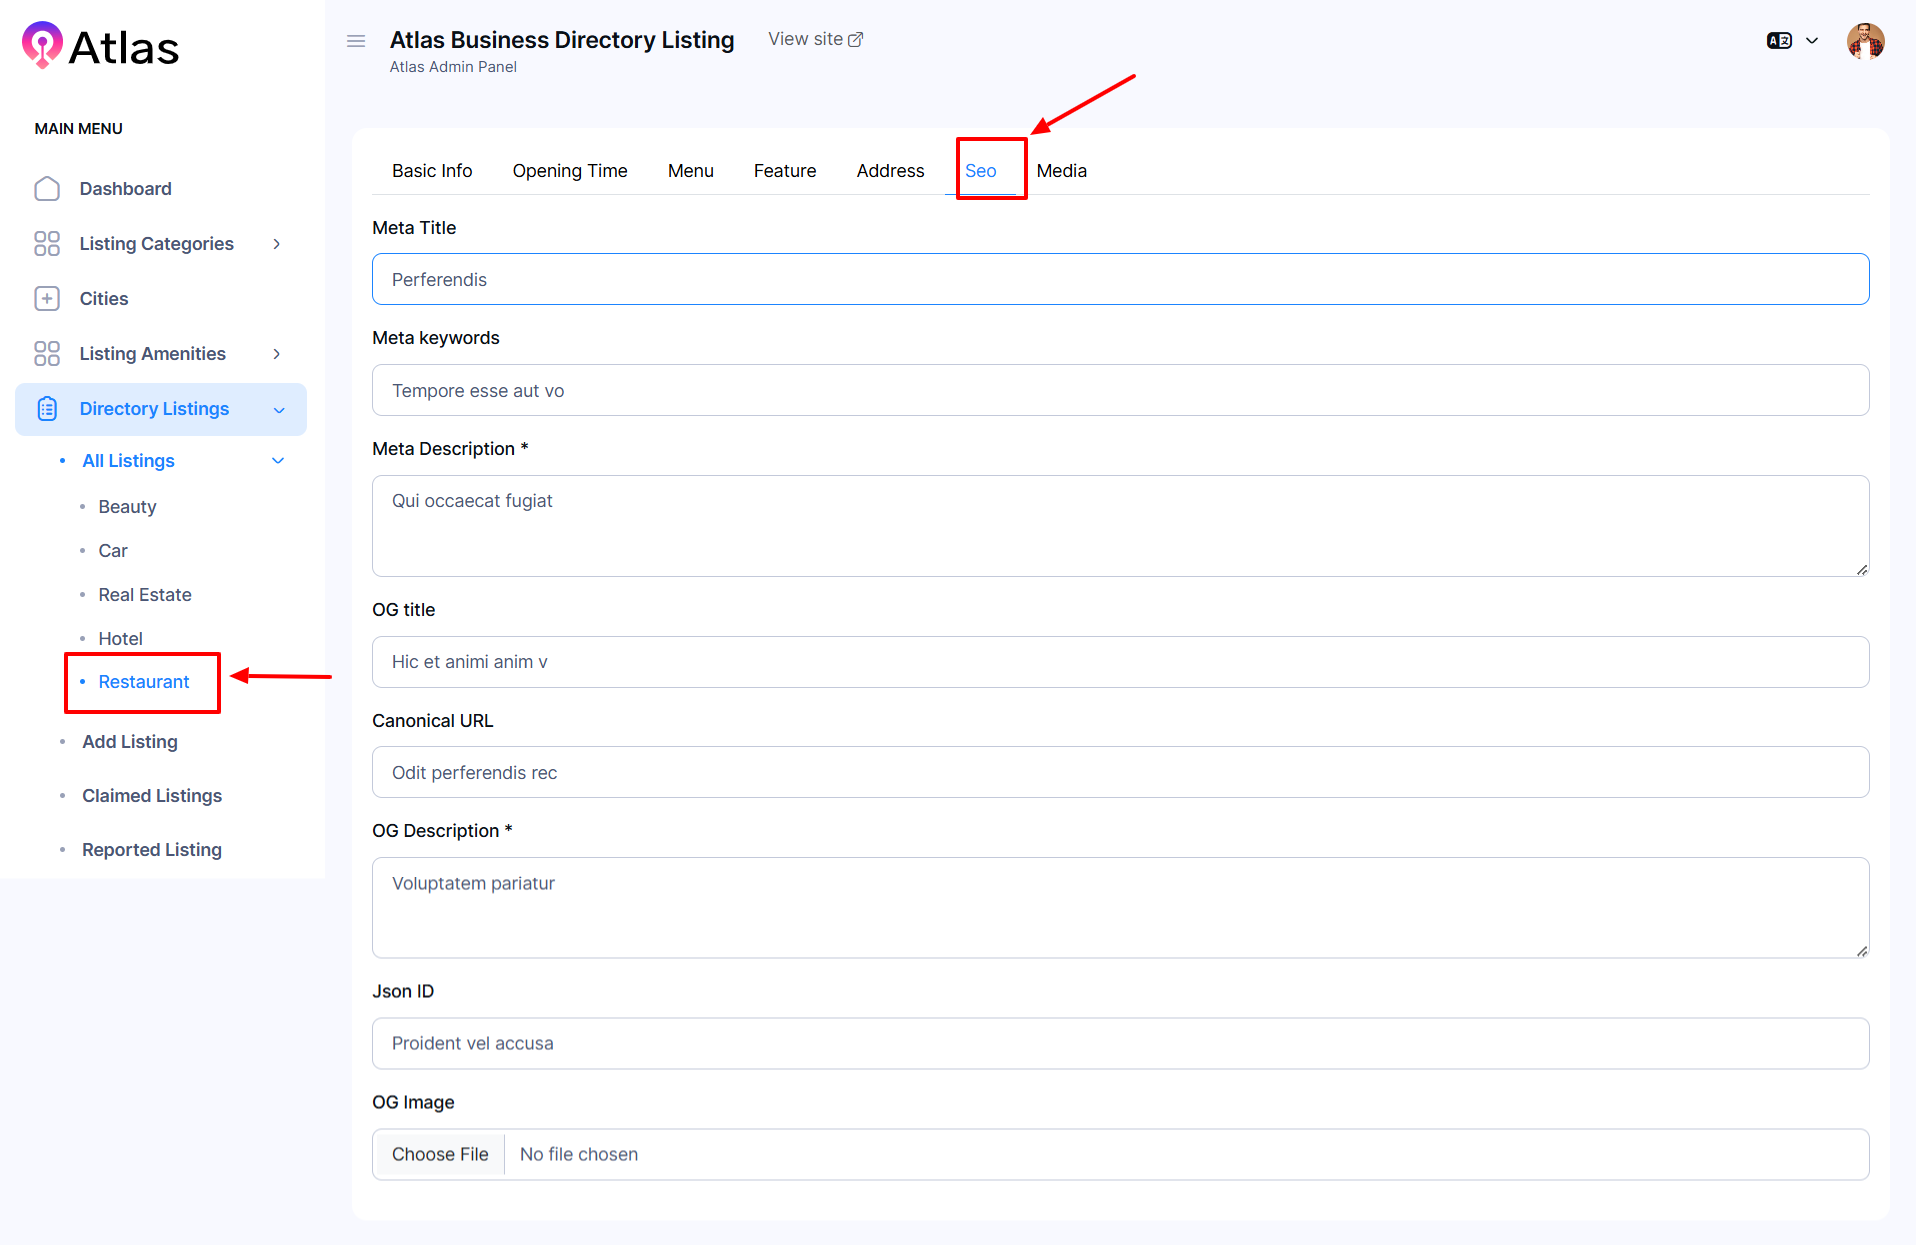
- In the SEO section:
-
-
Fill in the fields for Meta Title, Meta Keywords, Meta Description, Og Title, Canonical URL, Og Description, and Json ID.
-
In the Image section, click Choose File to upload a relevant image.
-
-
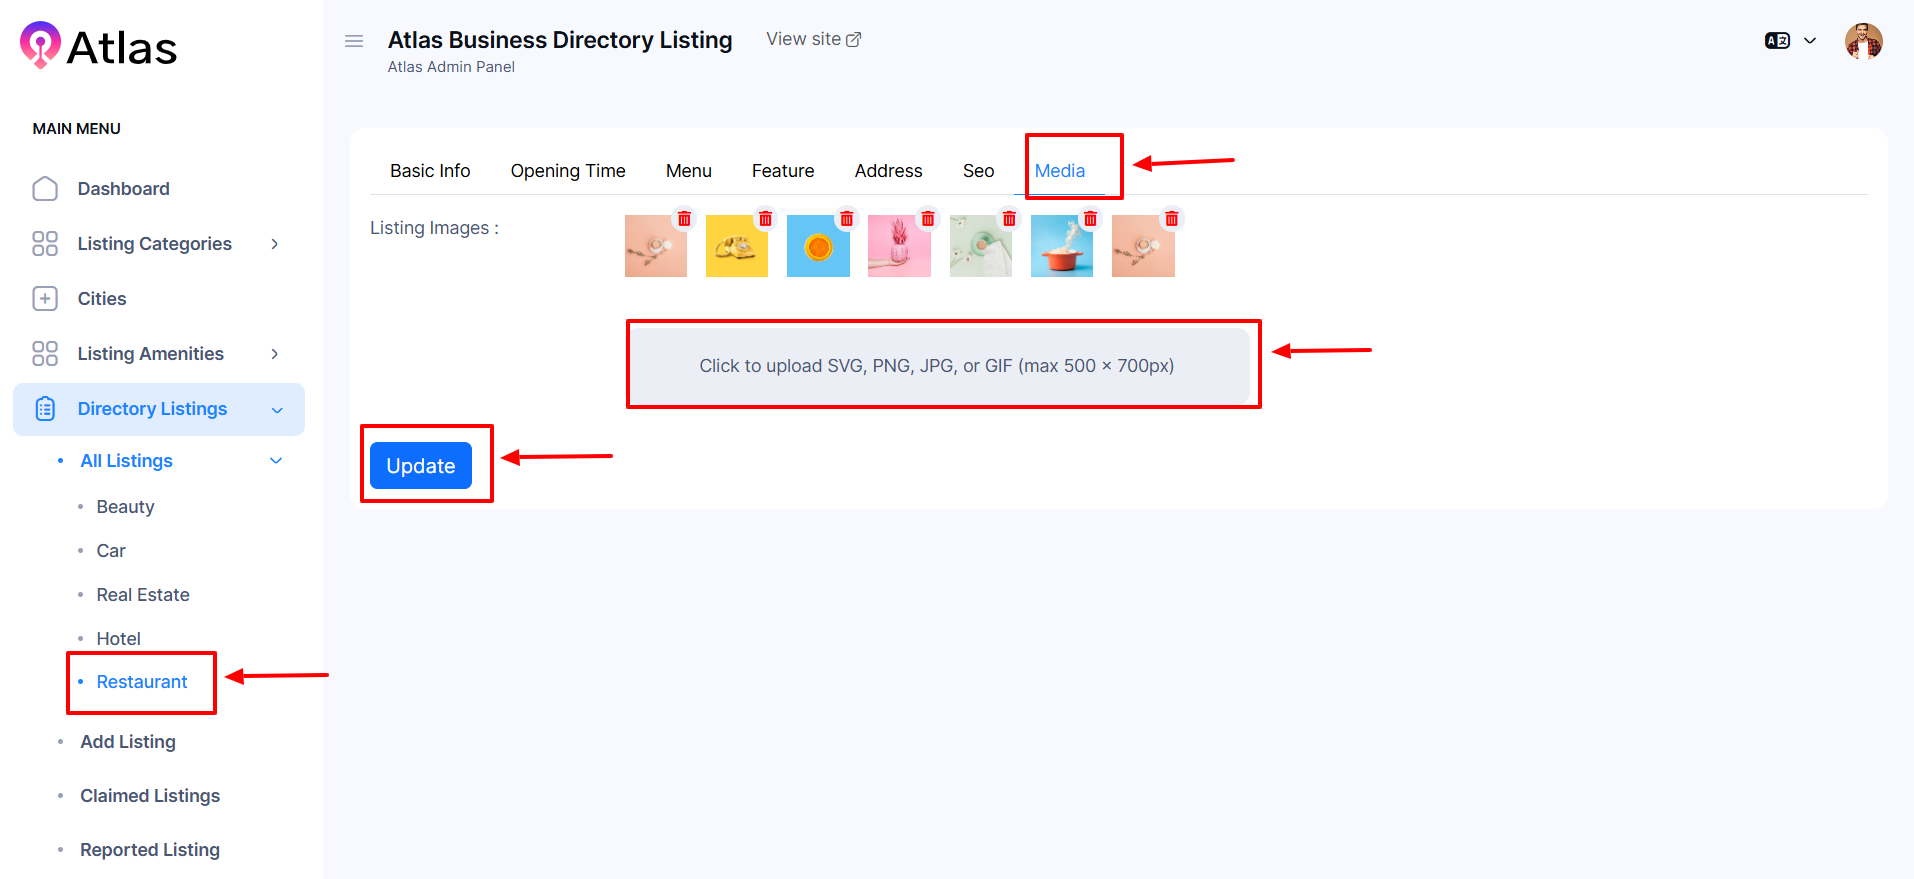
- In the Media section:
-
- Upload a listing image and add a video link in the Preview Video field, which is applicable.
-
- Finally, click the Update button to save the new listing with all the provided information.
Was this article helpful to you?
Contact us and we will get back to you as soon as possible

